


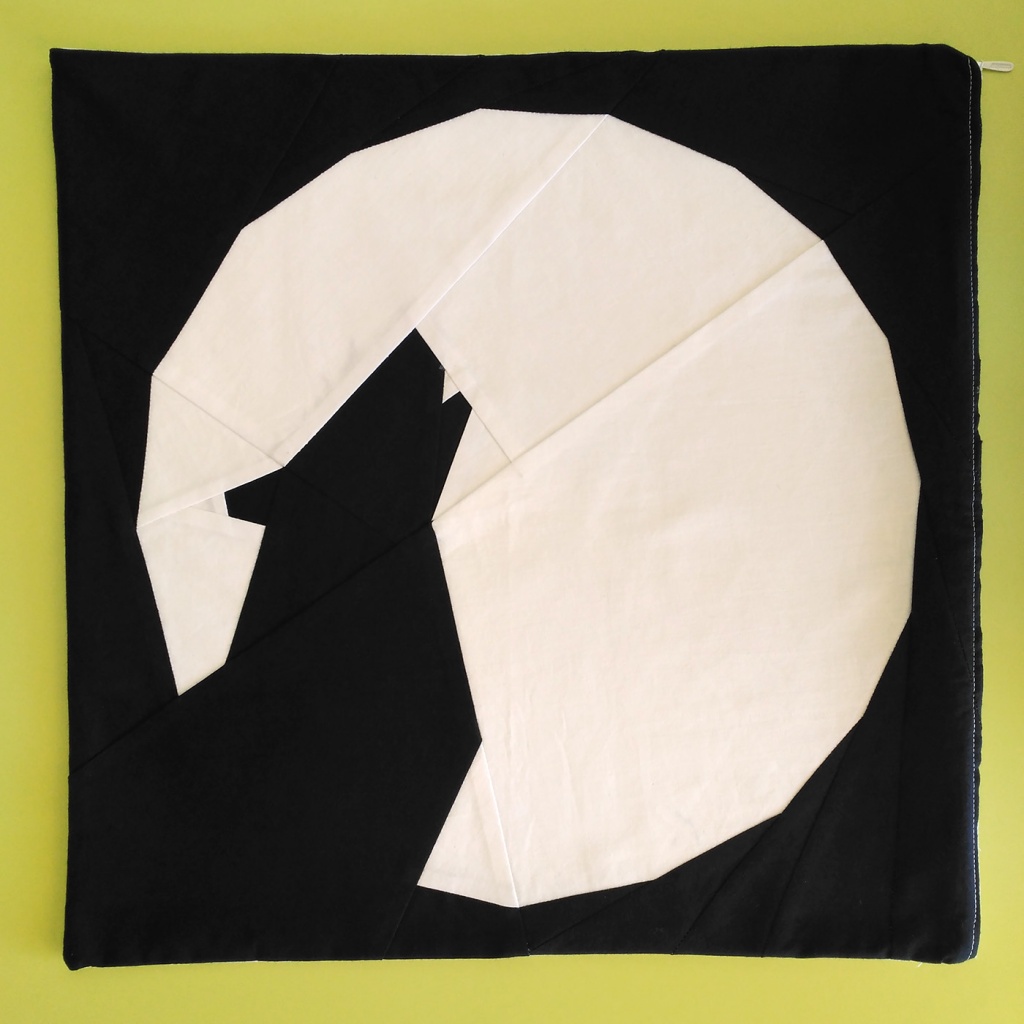
Taking advantage of the fact that I have edited my first pattern of “foundation paper piecing”, Wolf under the Moon, and in order to teach this technique a bit, here is a tutorial that goes by the way paper piecing works.
In the first place, it is necessary to clarify that the “foundation paper piecing” is a patchwork technique that consists in joining pieces of cloth with a paper base to create an image or a block with certain shapes. With this technique you can get very complicated figures in a relatively simple way. It is necessary to differentiate it from the “English paper piecing” where cloth pieces are joined by hand.
To show you the step by step I will use the Wolf under the Moon pattern, with photographs of each of the steps to follow to make this figure. It is not one of the easiest patterns but, with it, you can understand the basics of the technique and see some more highlights.
It is about to make a block of 16,5″ with the idea of having a pillow cover. The pattern is designed to be made in two colors, but you can use for example three different colors/fabrics (moon, wolf and sky) or the colors you want. You can also add some bands all around you if you want to do more a bigest size or use the scaling tables that appear in the pattern (page 3) to make it in different sizes.
Let’s start !!
Materials
- Fabrics
- Base, ruler, and cutter to cut
- Needles
- Soluble / removable cloth marker
- Iron
- Sewing machine
- Paper (as thinner as possble)
- Printer
- The pattern you want to make
Process
Before beginning we must keep in mind some things:
You will see that drawing on paper is the drawing that we want to achieve but mirroed. This is because we’ll sew the fabrics on the back of the paper and when we take out the paper we will have the drawing in the direction we want. This always happens, making any pattern you have to think about the paper has the drawing inverted.
With this technique we will be joining the fabrics one near one. In a simple pattern with a piece of paper it is enough but with a pattern like this we will need a few different pieces of paper that we will call SECTIONS.
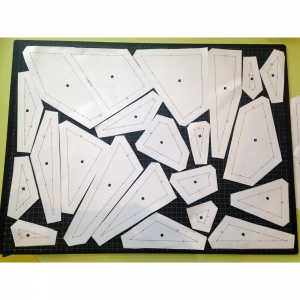
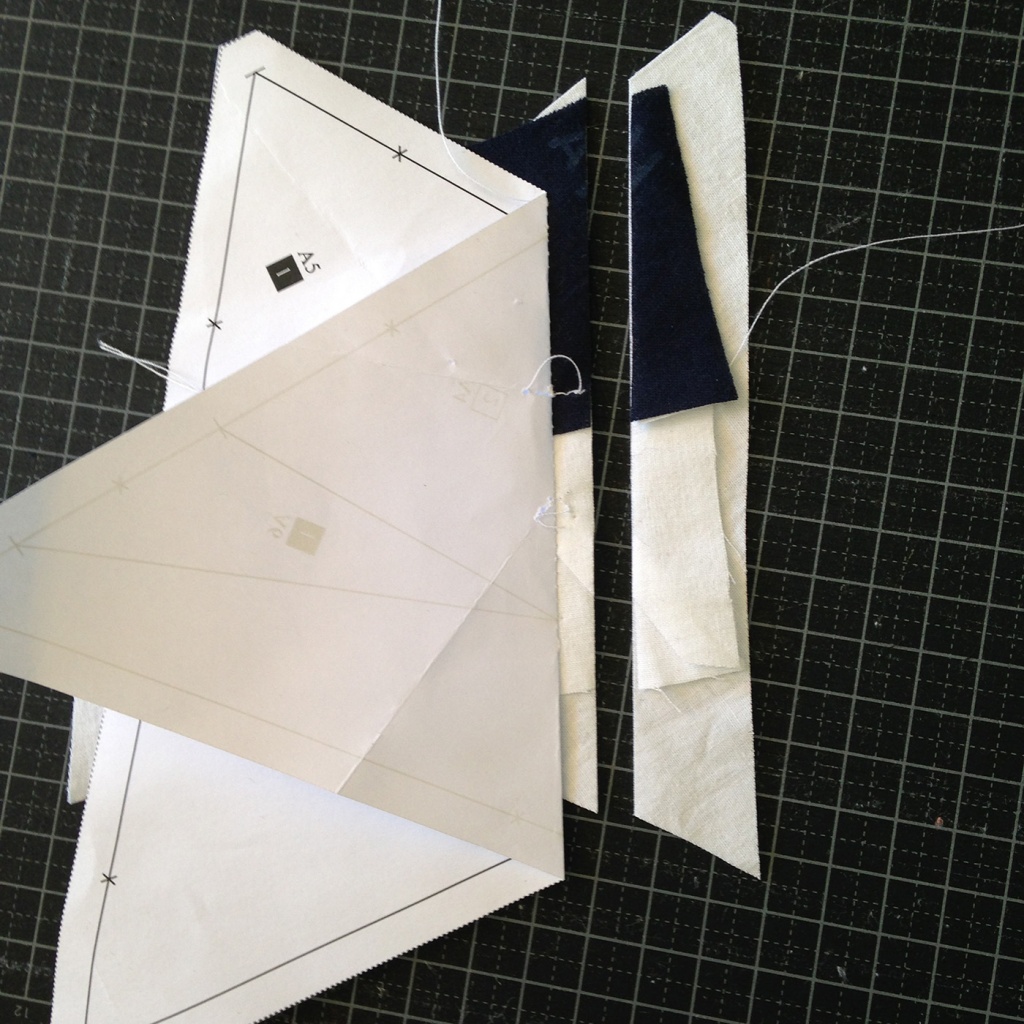
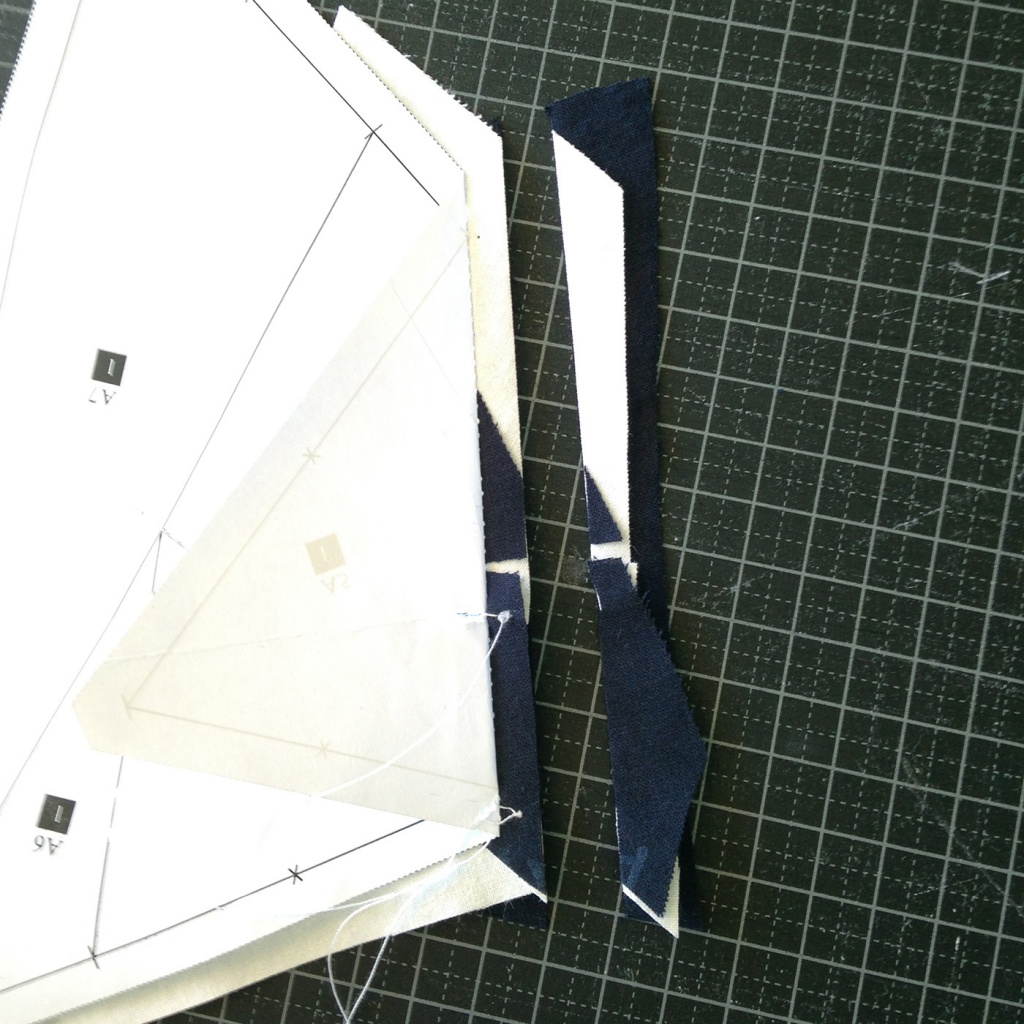
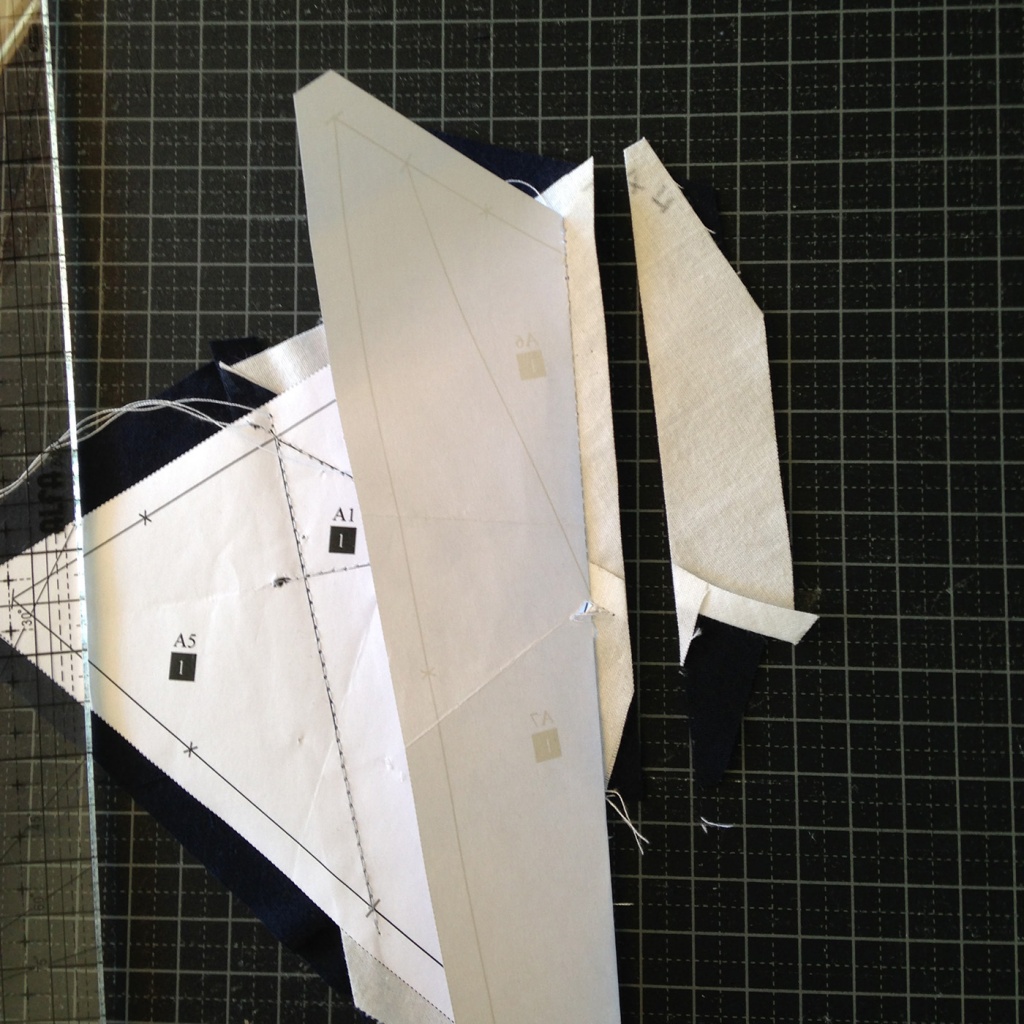
At the time of cutting the fabrics I do it with the templates in the pattern for that purpose (from pg.13). Normally these templates do not come with the patterns but since I’m using them i works very good for me, so I’ve included them in the pattern and I’ll show you exactly how I use them. If we use fabrics much larger than the way we need it, it is easier not to make mistakes but we also waste more fabric, which I do not like at all.
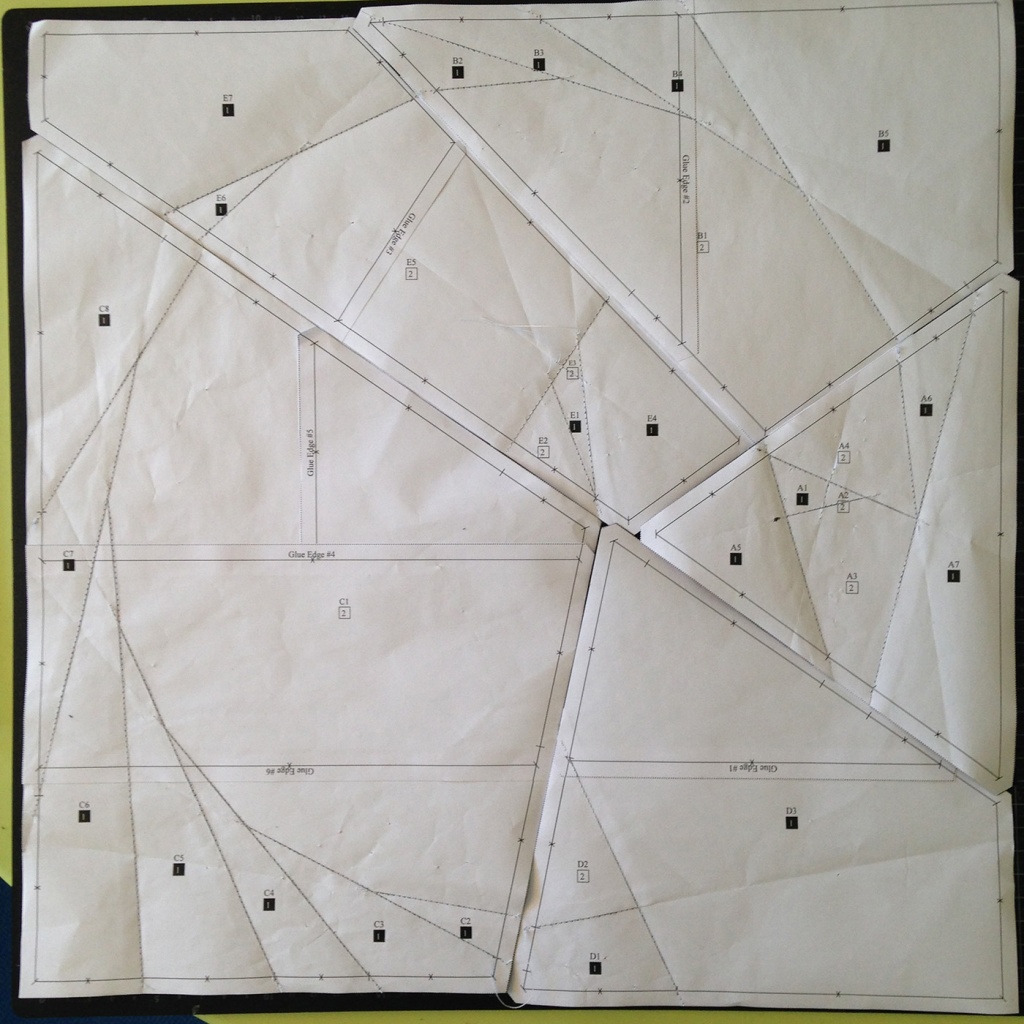
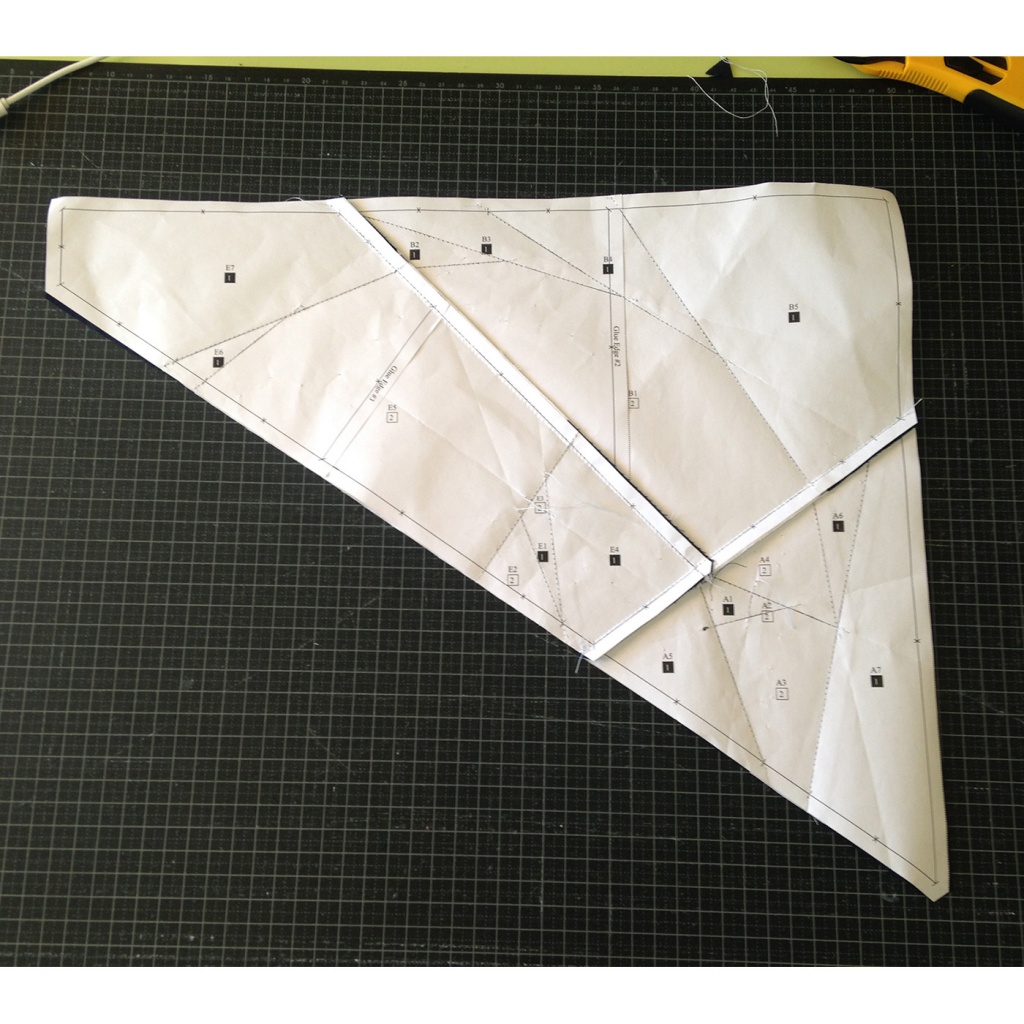
Preparation of the pattern
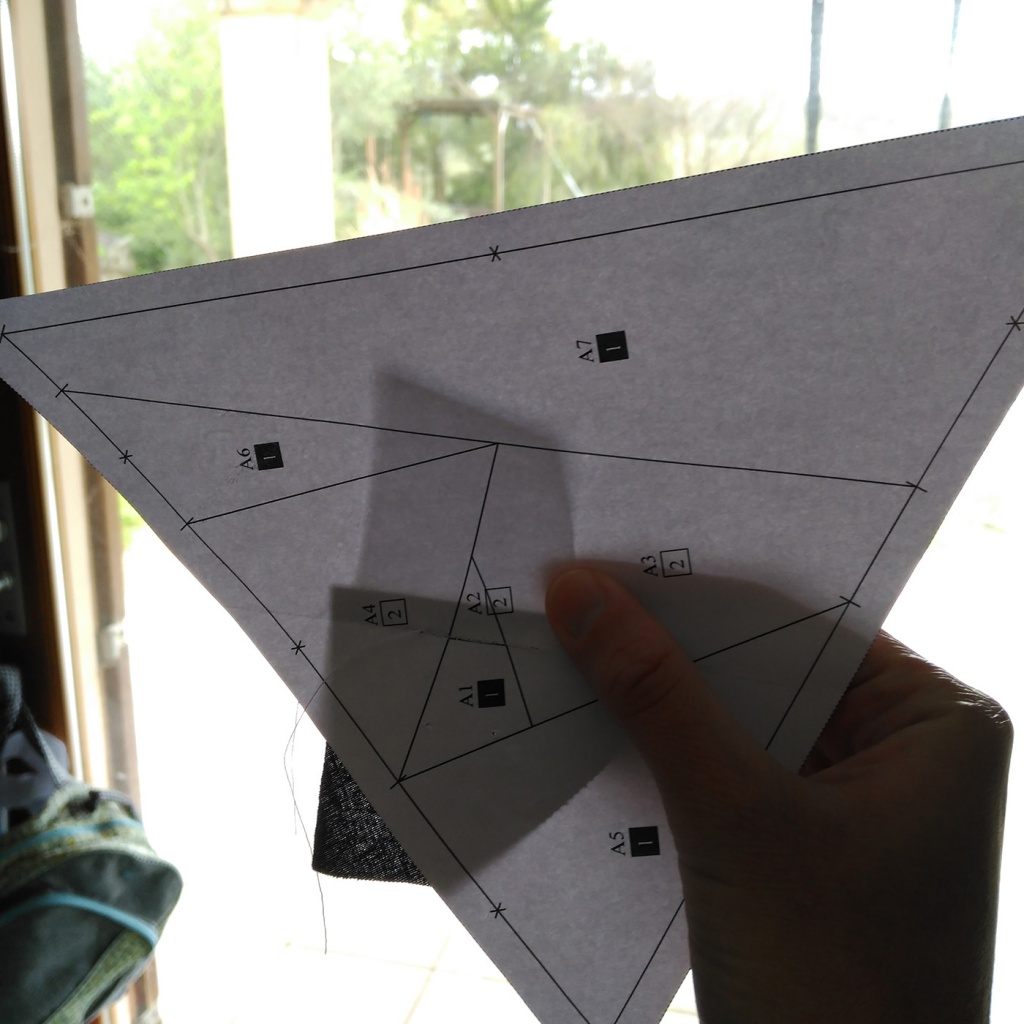
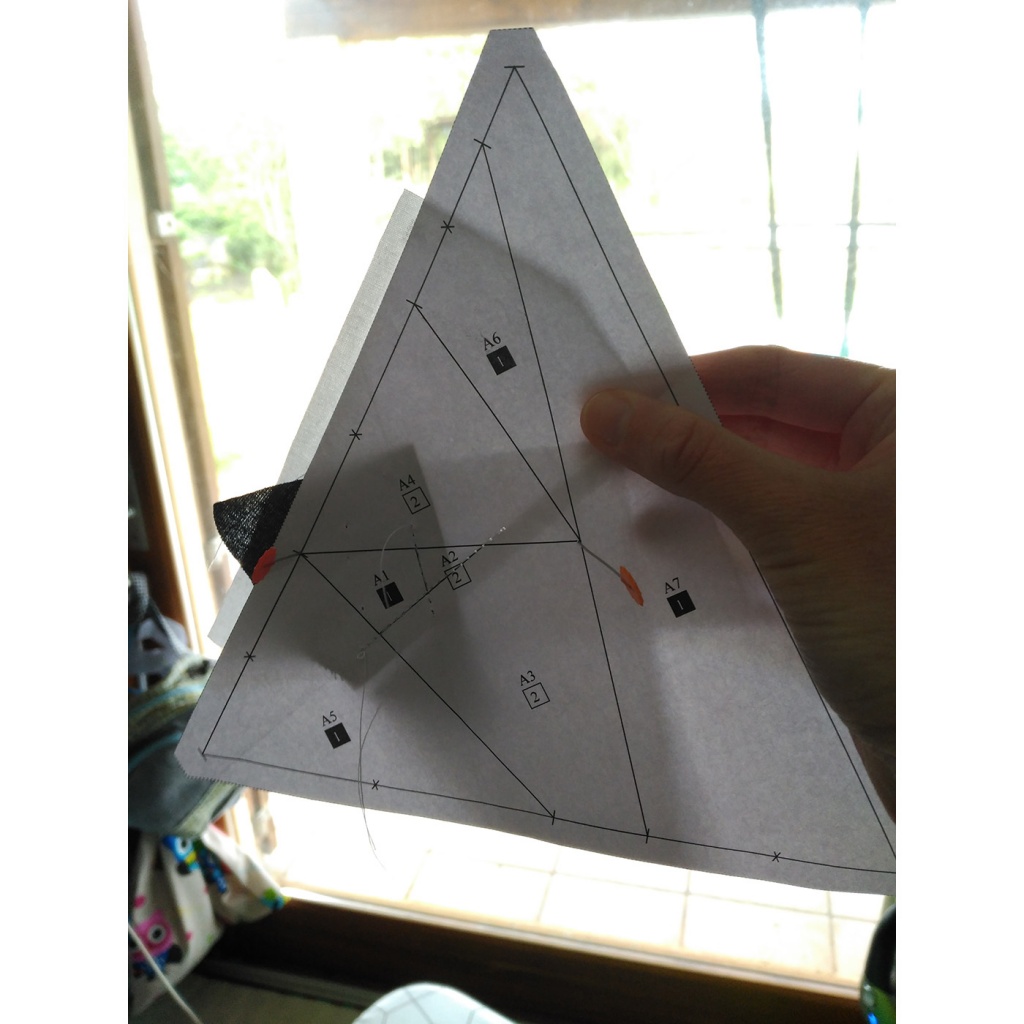
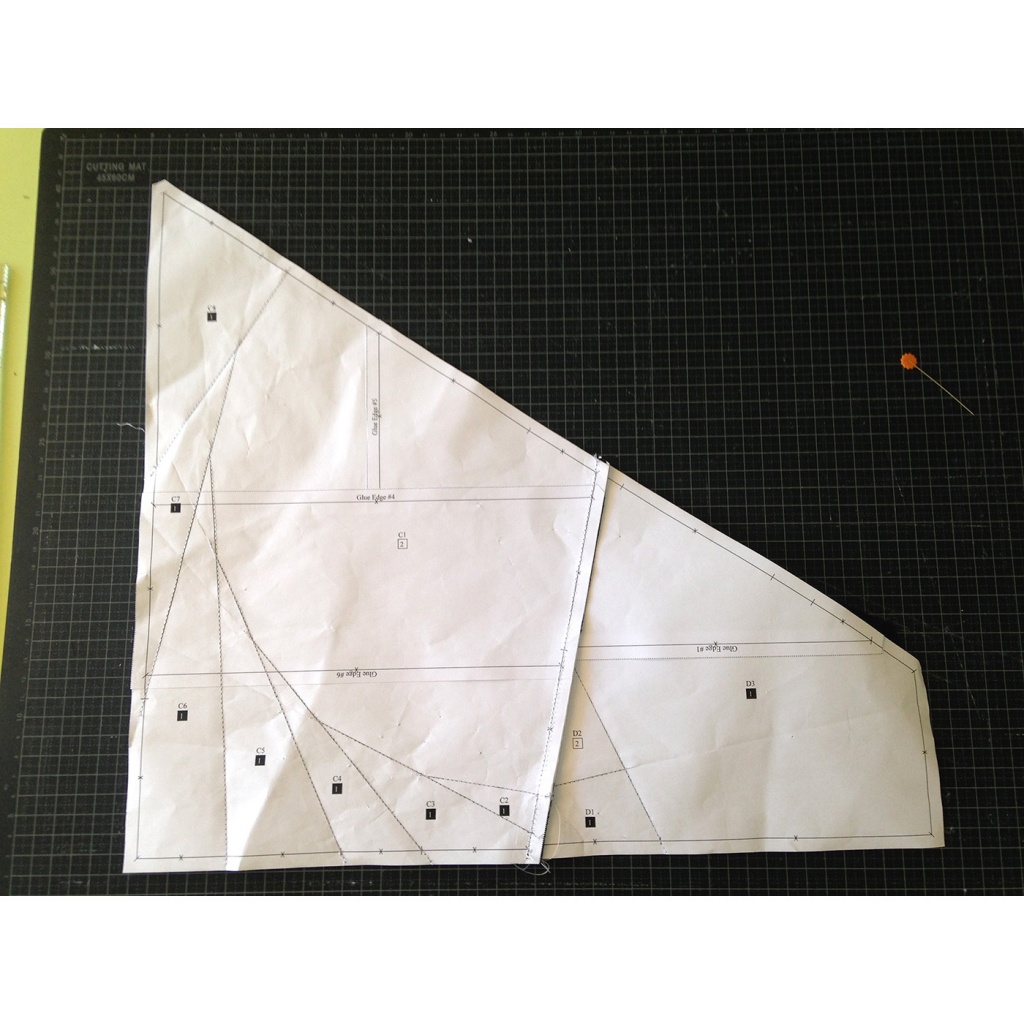
If you look at the pattern you will see that on the 3rd page you will find the instructions for assenbling this pattern. From the 4rd page you can find the pieces of paper to prepare the sections of the drawing and from the 14th page the templates to cut each one of the fabrics that we will need.
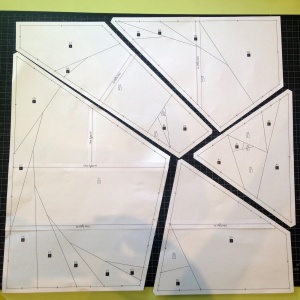
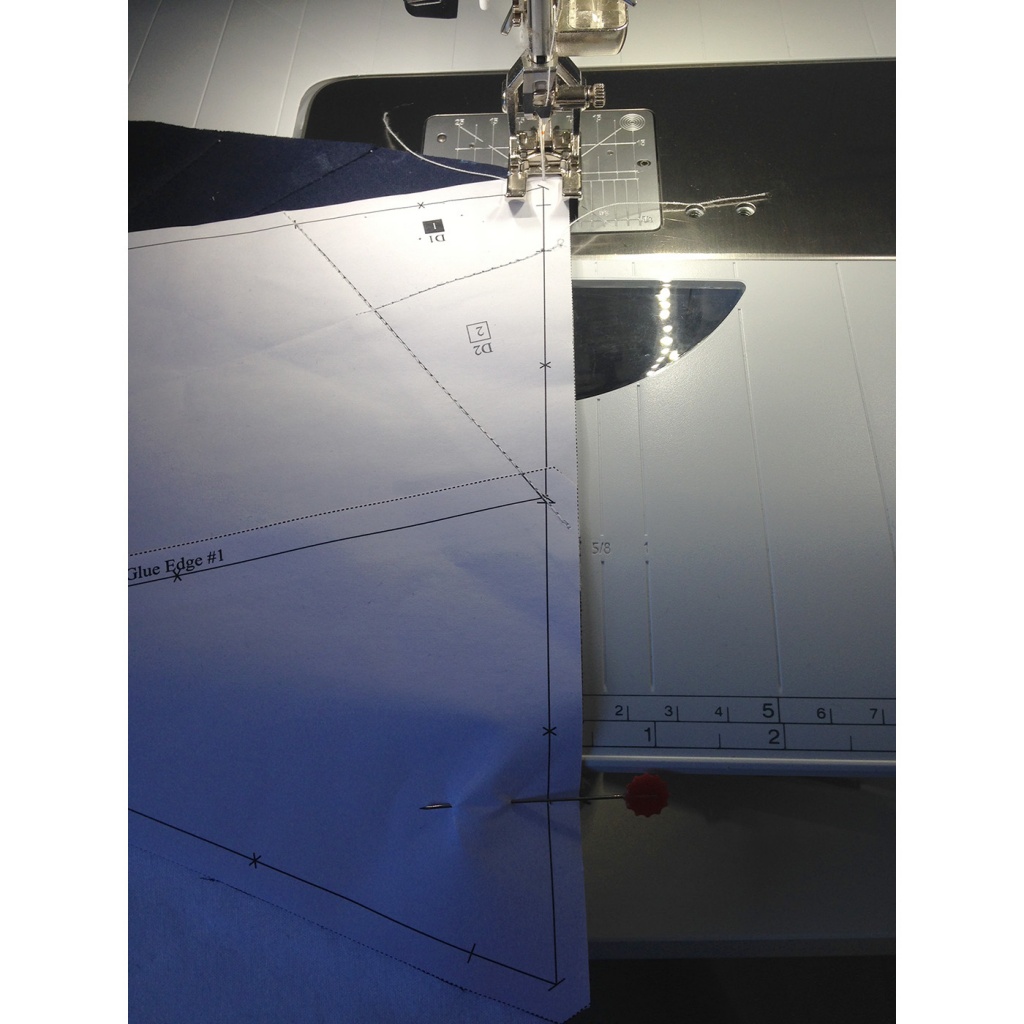
The first thing to do is print page 4 and check that the 1″ measures exactly that, or the final drawing will not make the 16,5″. If the box does not make 1″ exactly check the preferences of your printer to print 100% without scales or margins.
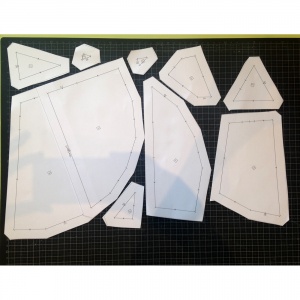
Then, you have to print and trim the pieces of the pattern (left of the image) to mount the sections and the templates to cut the fabrics (right of the image).
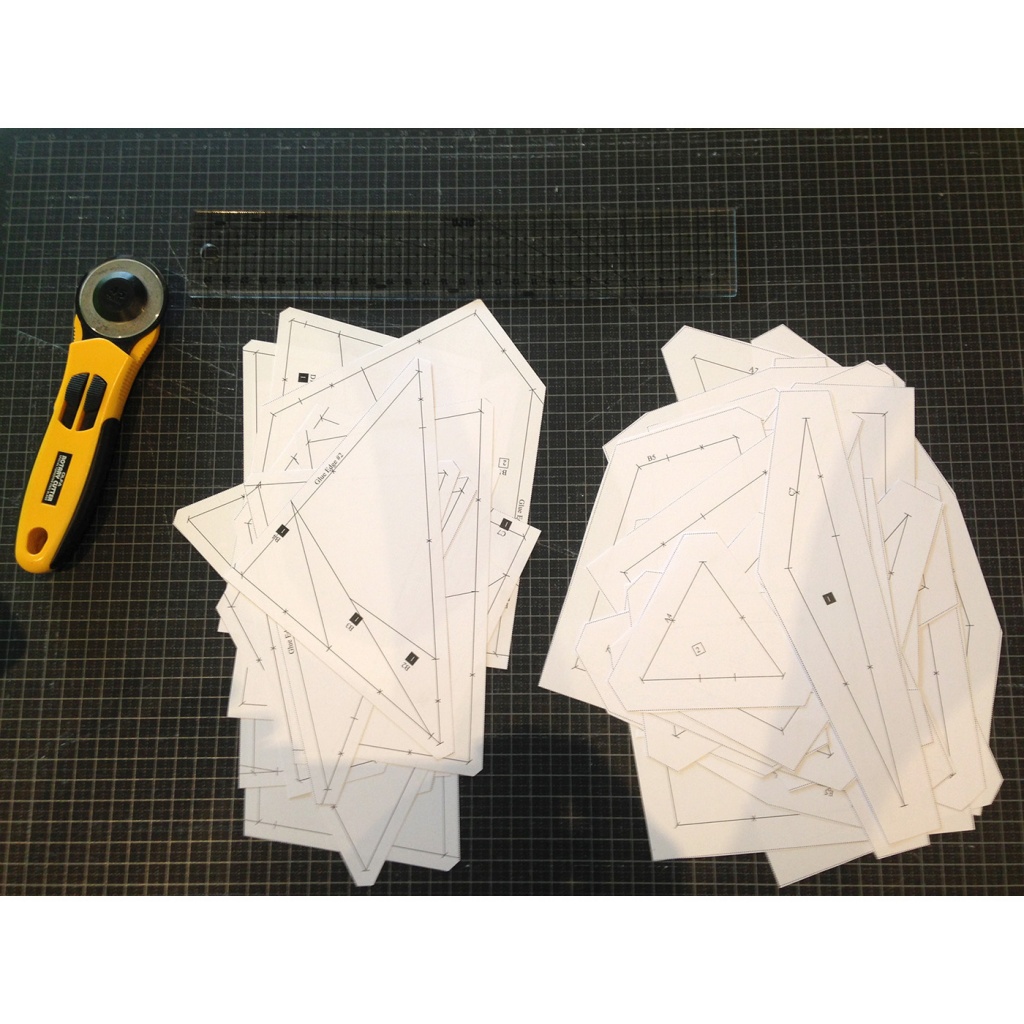
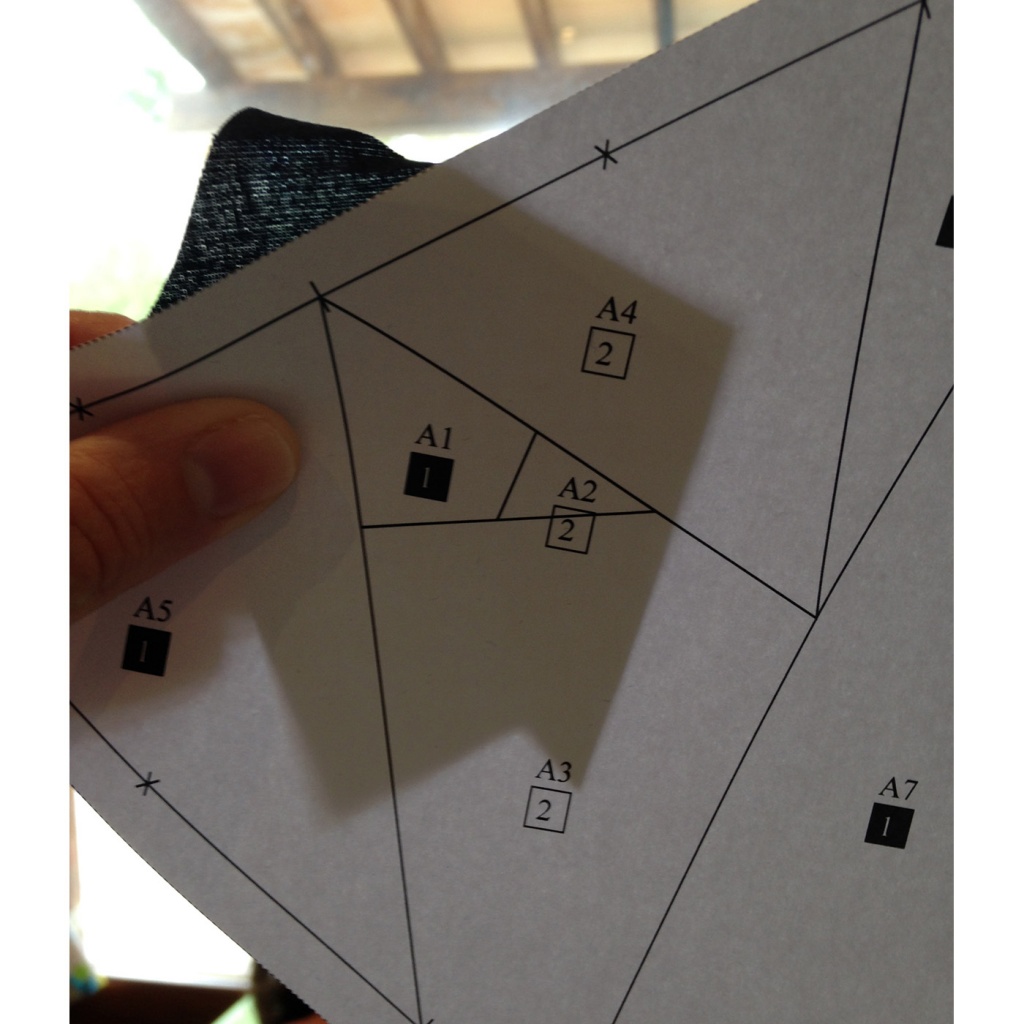
Each one of teh paper of the pieces of the pattern for the sections has printed some information:
- Letter + number: The letter indicates which section belongs to and the number the order in which we will have to sew each fabric.
- Number in a box: to identify the color of the fabric. This pattern is made for two fabrics but you can use all the fabrics that are desired to give different colors.
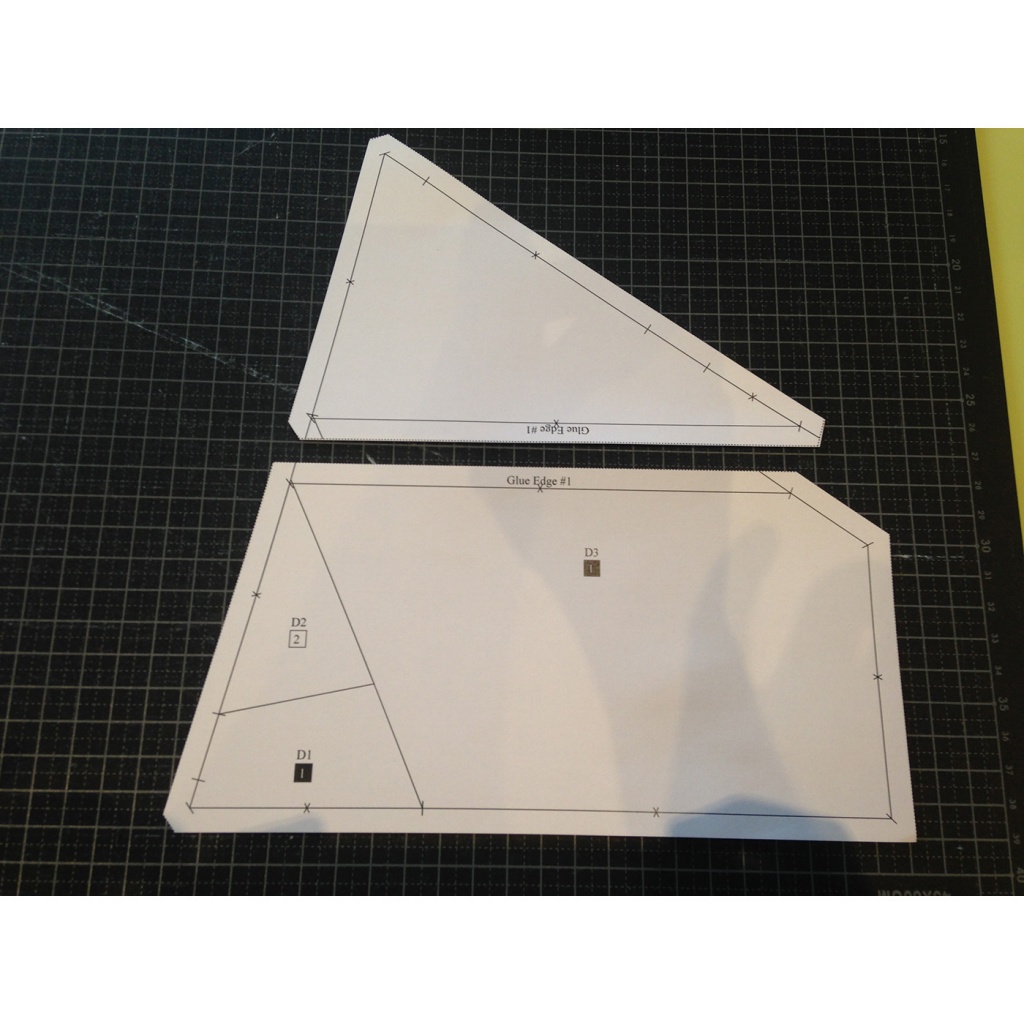
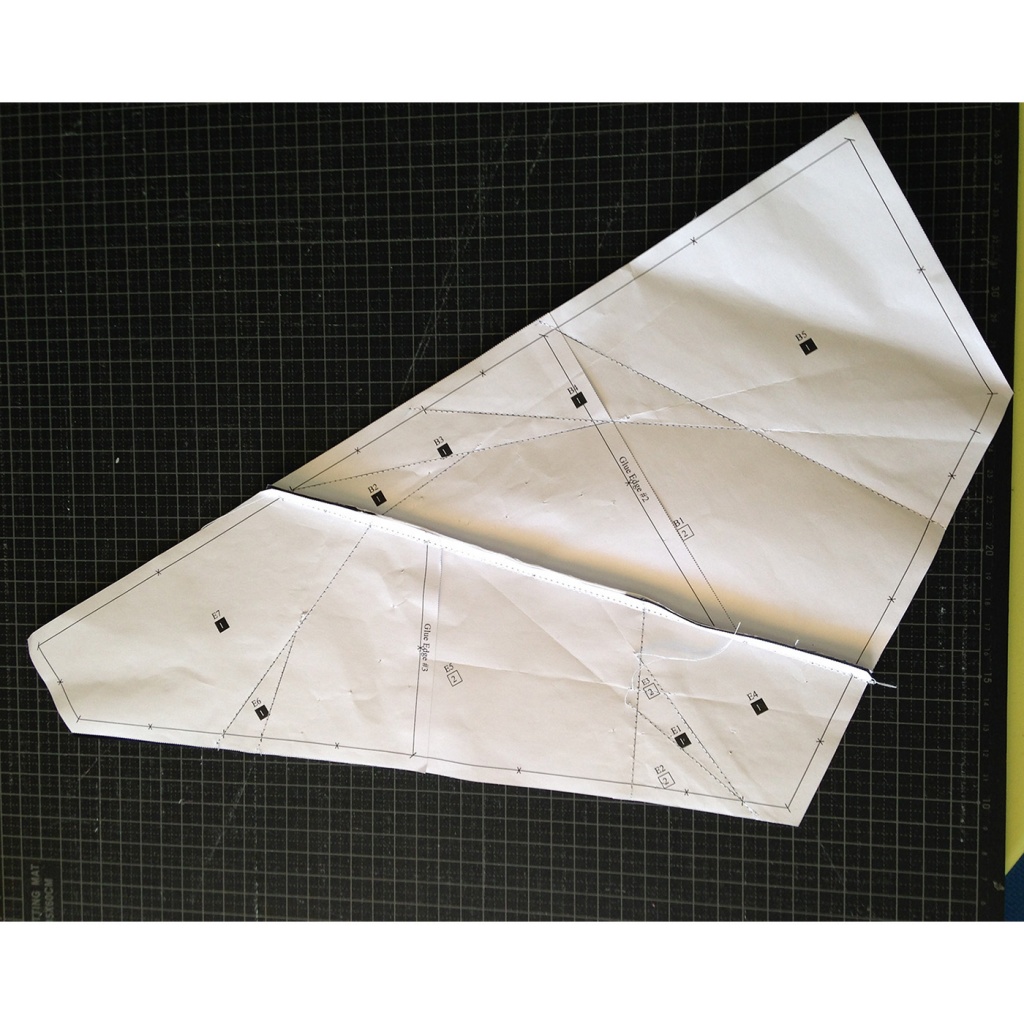
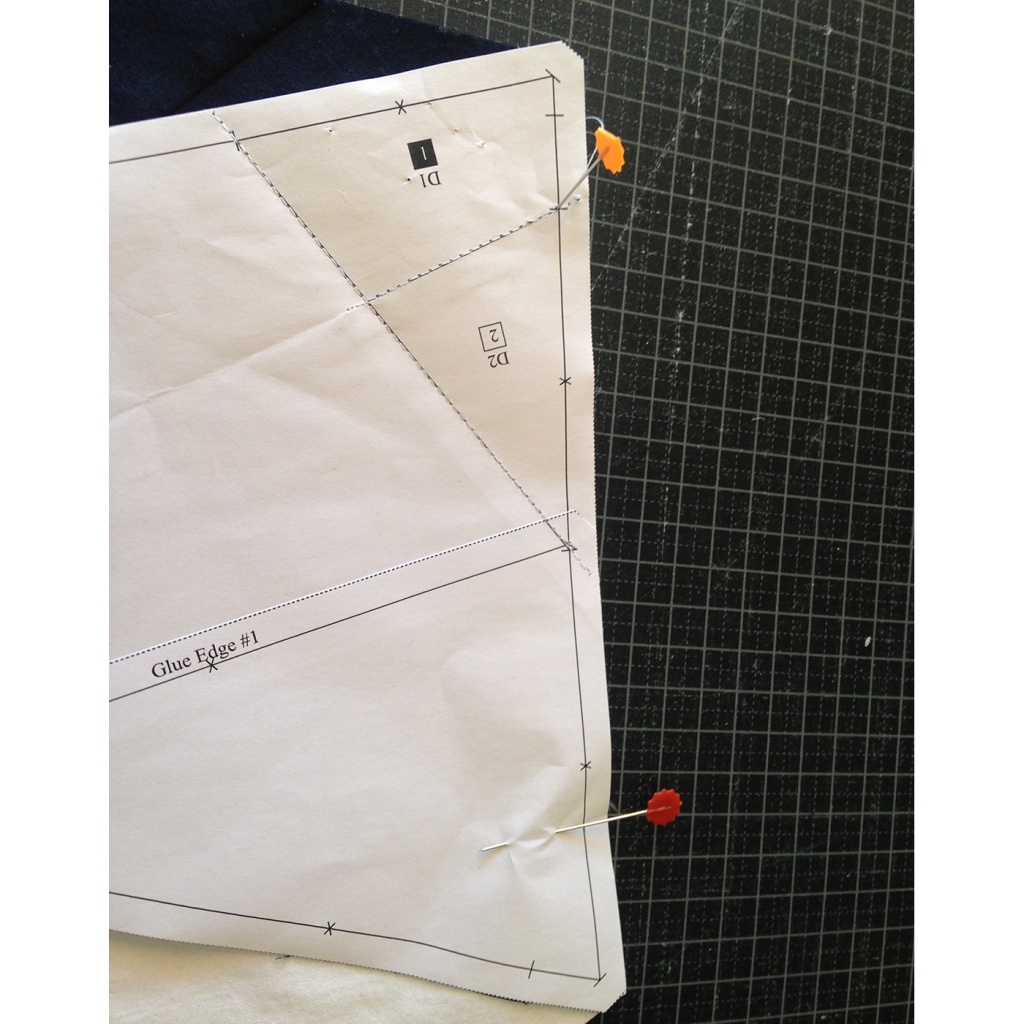
You will see that in the pieces as well as the templates some papers on a sidewalk say “Glue edge # number”. This means that you have to locate the two papers that say the same number and glue them, looking that the lines exactly match. Then we will get the pattern sections and the bigges ttemplates.
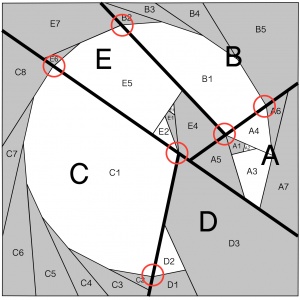
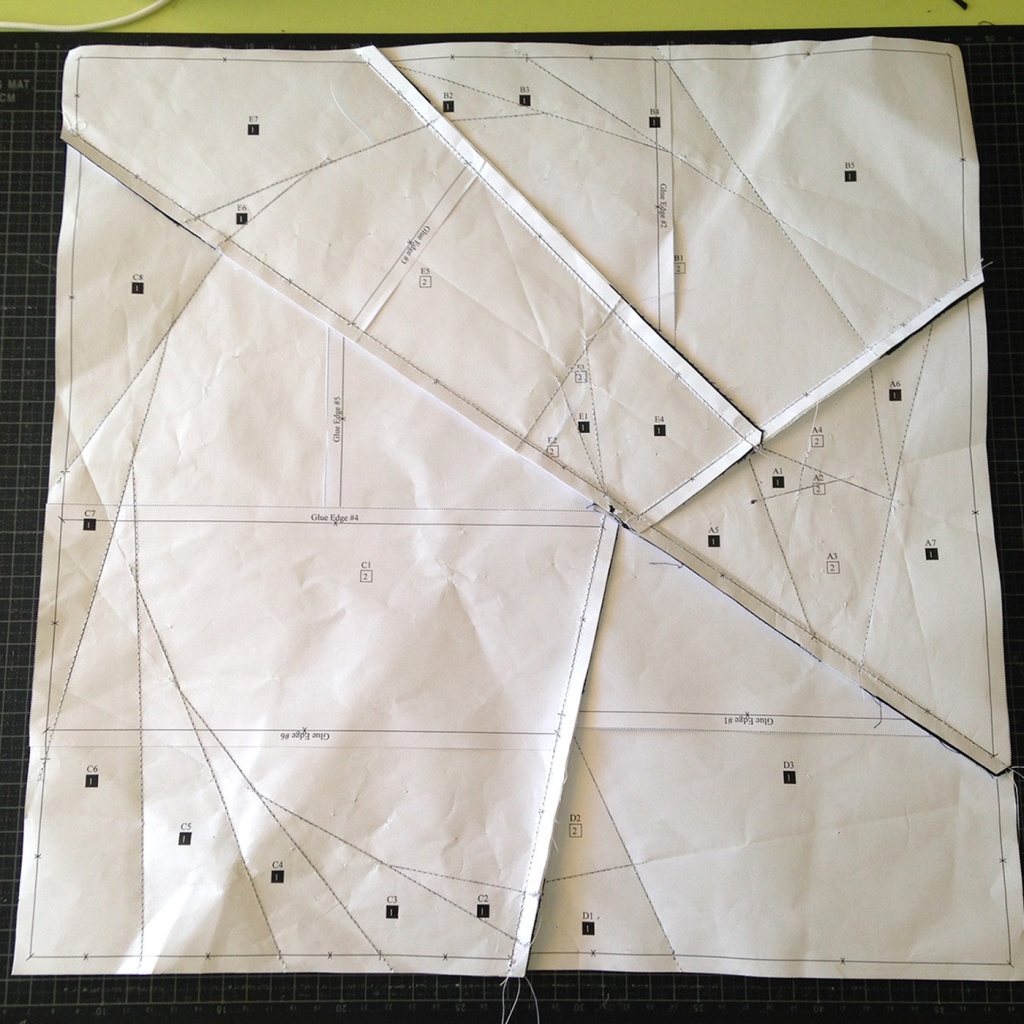
On the 3nd page of the document you will see that there is a drawing with the sections of the pattern. With the pieces of the pattern we have to obtain exactly those sections: from the A to the D.
And we already have the Sections to start sewing, now it is necessary to cut the fabrics.
Cutting the fabrics
First, you have to think what colors and fabrics you want your drawing to have. Some patterns have a diagram to colori which we can make the idea of the final result, but since this drawing is designed for two colors I have not included it in the document.
A suggestion for beginners: If you use solid fabrics where the straight and back of the fabric are the same, it will be easier for you to start the technique as you will not have to be careful to put the fabrics with the correct face at the time to cut and sew them.
To cut the fabrics you can do it with the templates in the document, and that we have already cutted and glued to those that need it, or by eye, measuring with the ruler each one of the figures and cutting them. I will do it with the templates.
In the instructions you will see the minimum fabrics requirements if you use the templates.
What we have to do is:
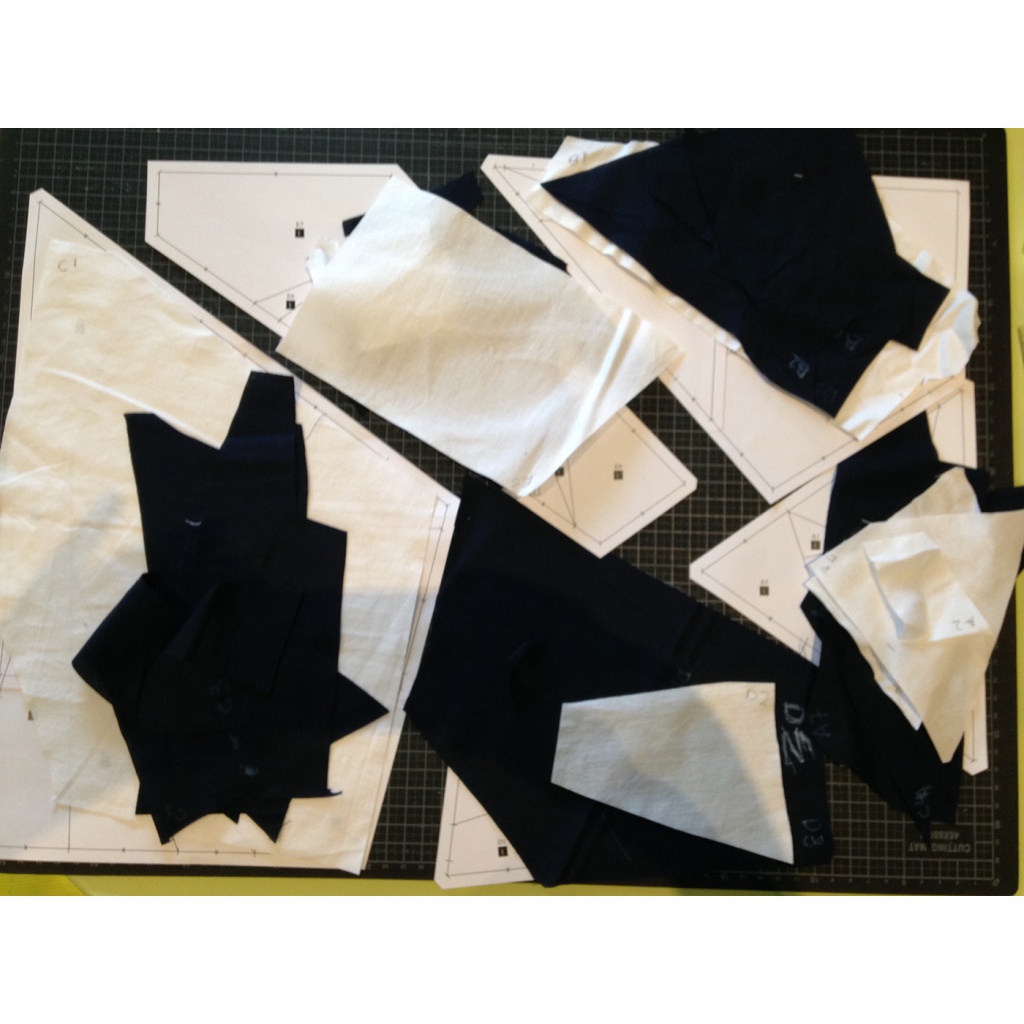
- Putting all the templates of the same color side by side over the base of the cut and the fabric that you want to use.
- IMPORTANT !!! These templates are mirroed like the parts of the sections so if you use them you have to cut the fabrics by the other way around, that is, by placing the paper on the back of the fabric.
- Cut between them with the rotary cutter, it doesn’t mind if it doesn’t remain exactly the same way as the paper. After that it is not seen.
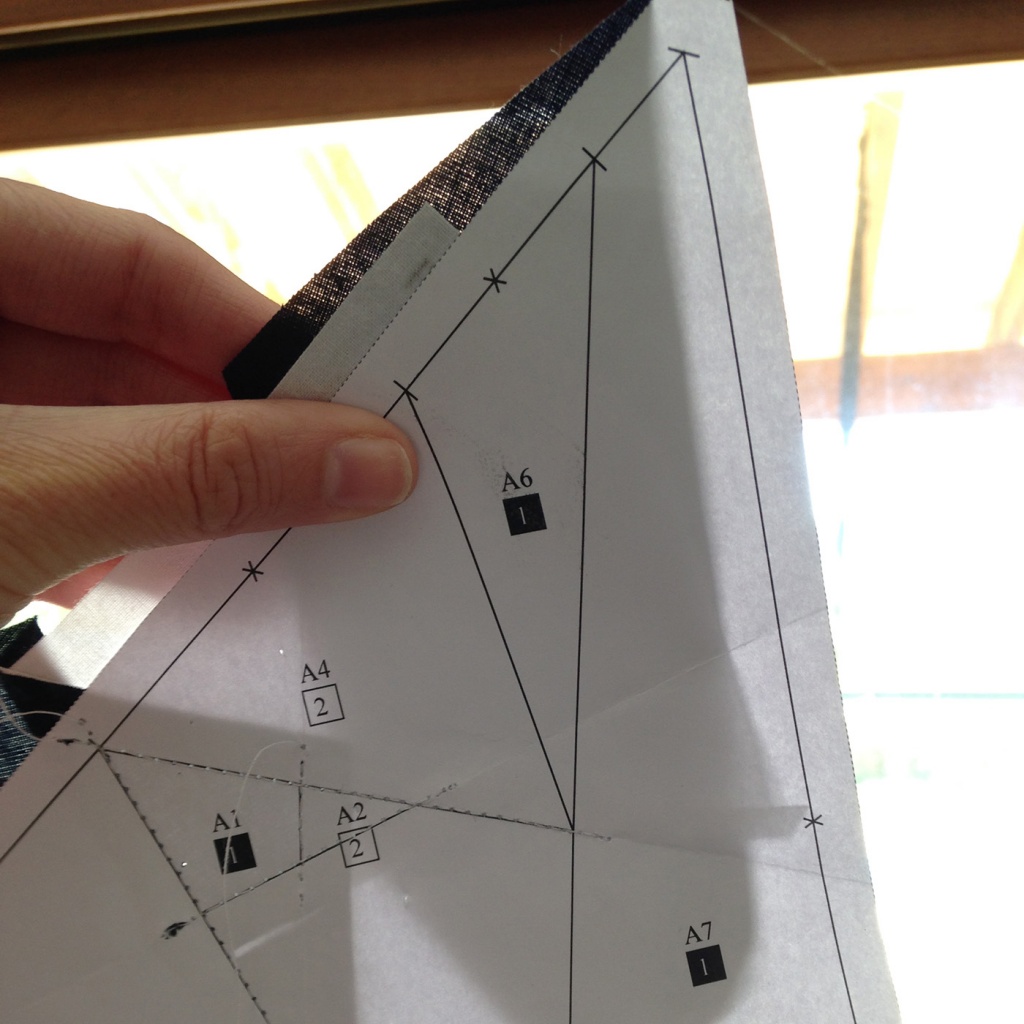
- IMPORTANT !!! Before removing each paper of the fabric thet we’ve cutted we have to mark with a soluble / erasable marker the letter + number that indicates the paper. If we do not do this and mix all the fabrics then we will not know which section they go, niether the order in which to sew them.
- We choose them by sections and we put them with the corresponding paper in each section.
And we are ready to start sewing.
Assembling the sections
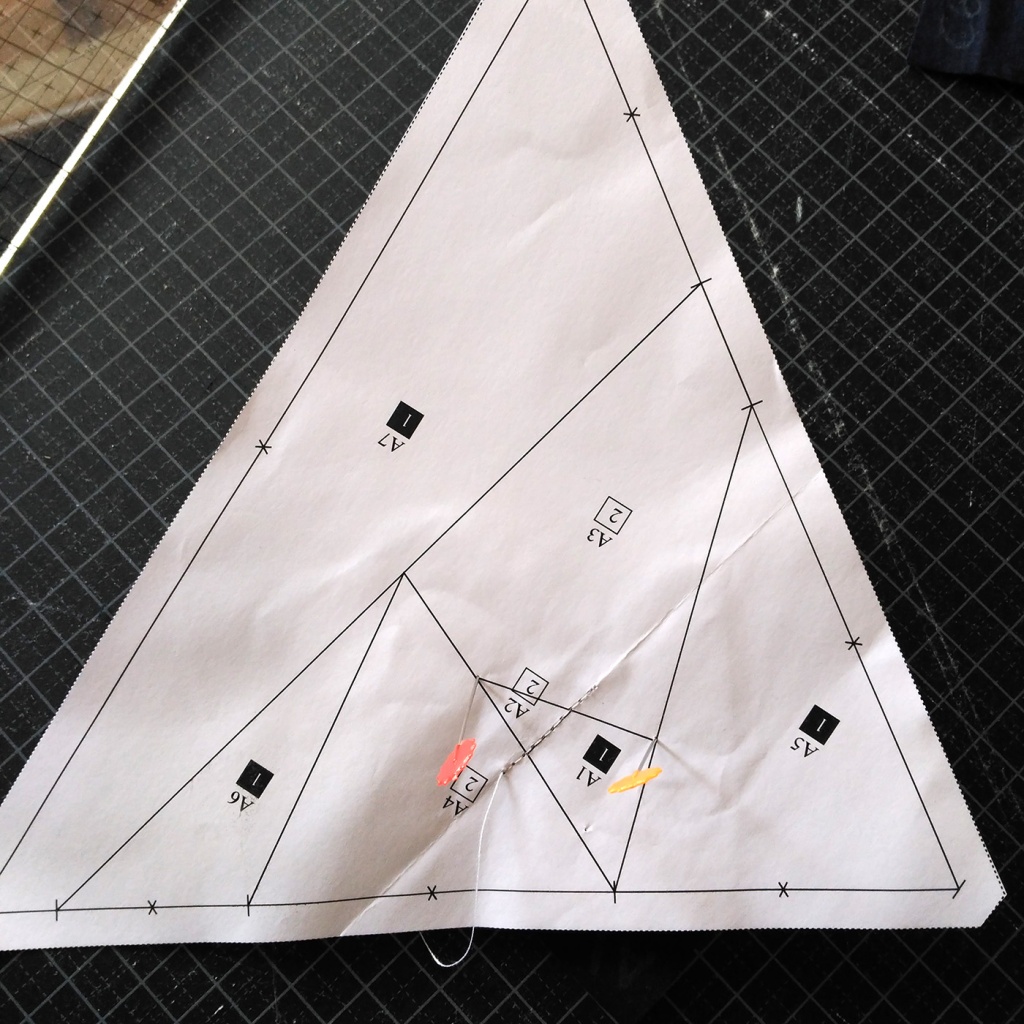
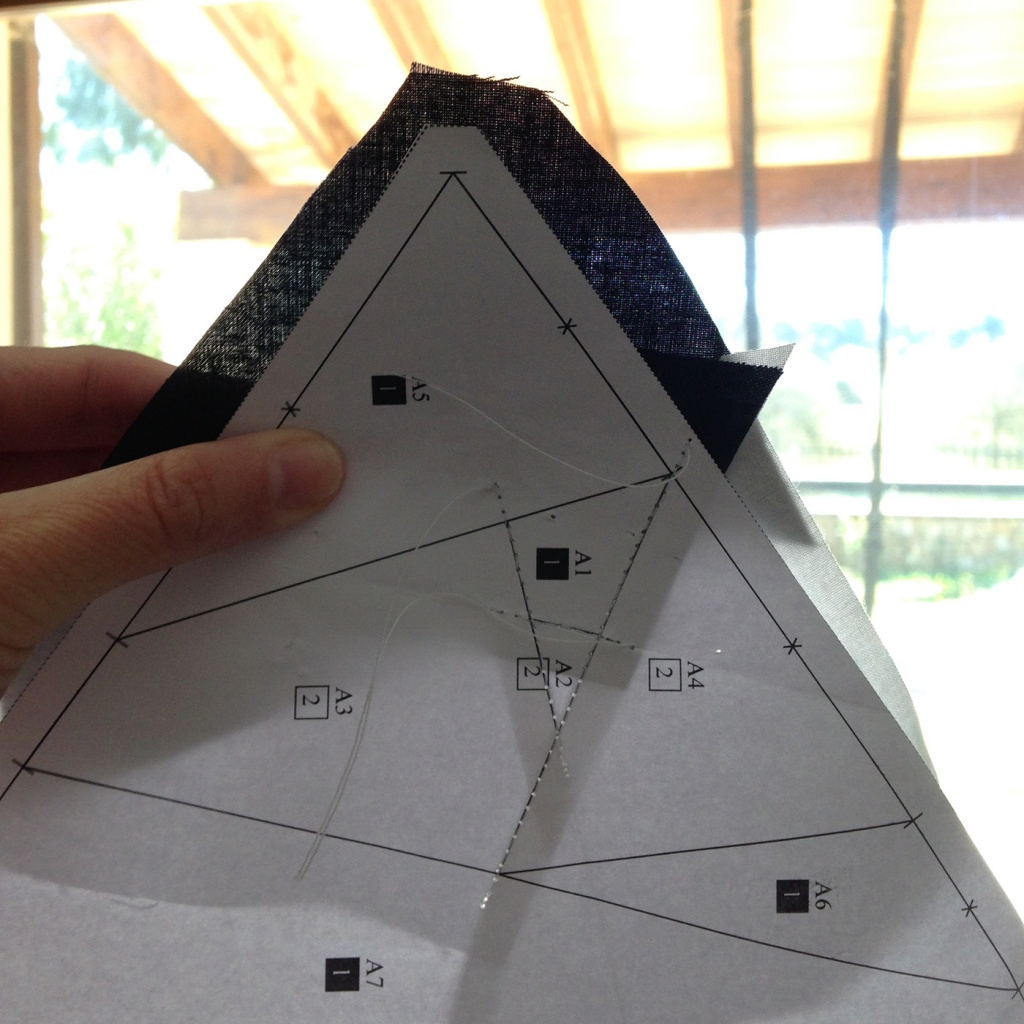
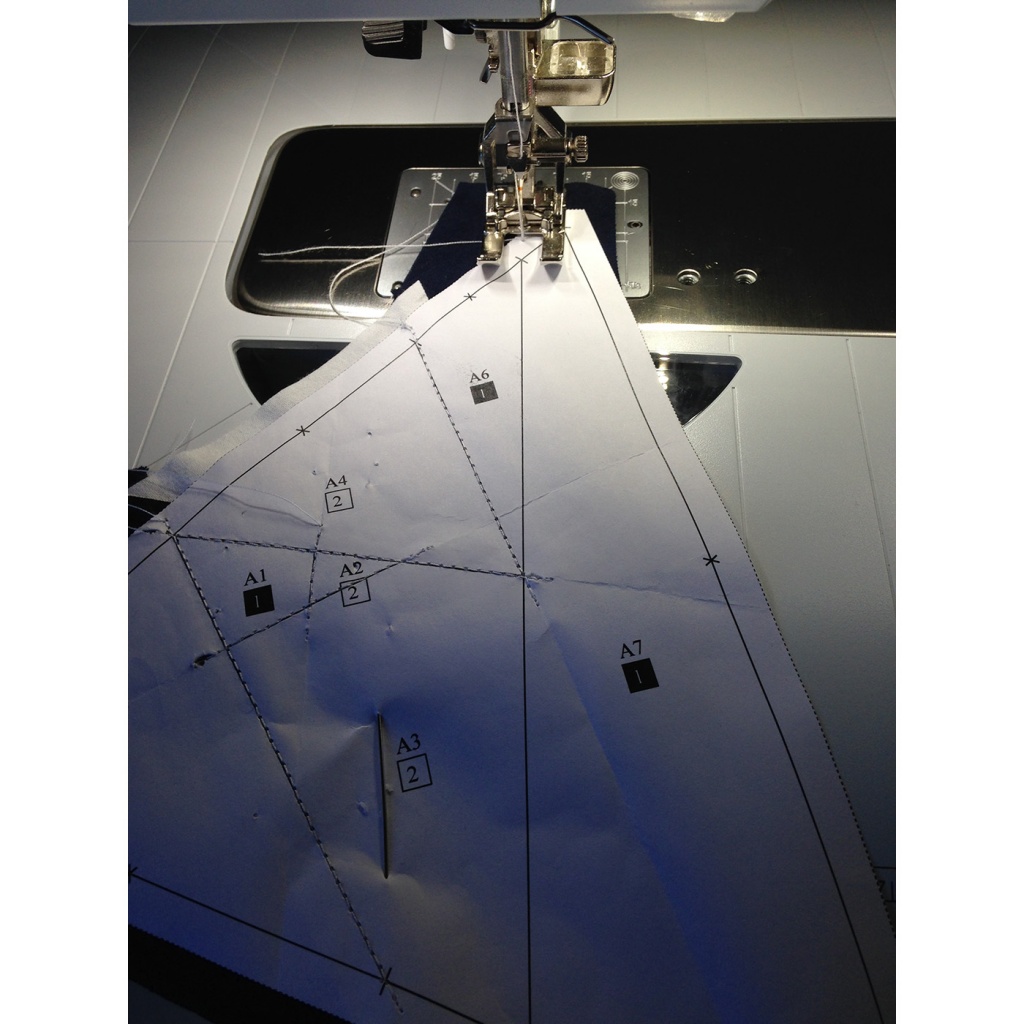
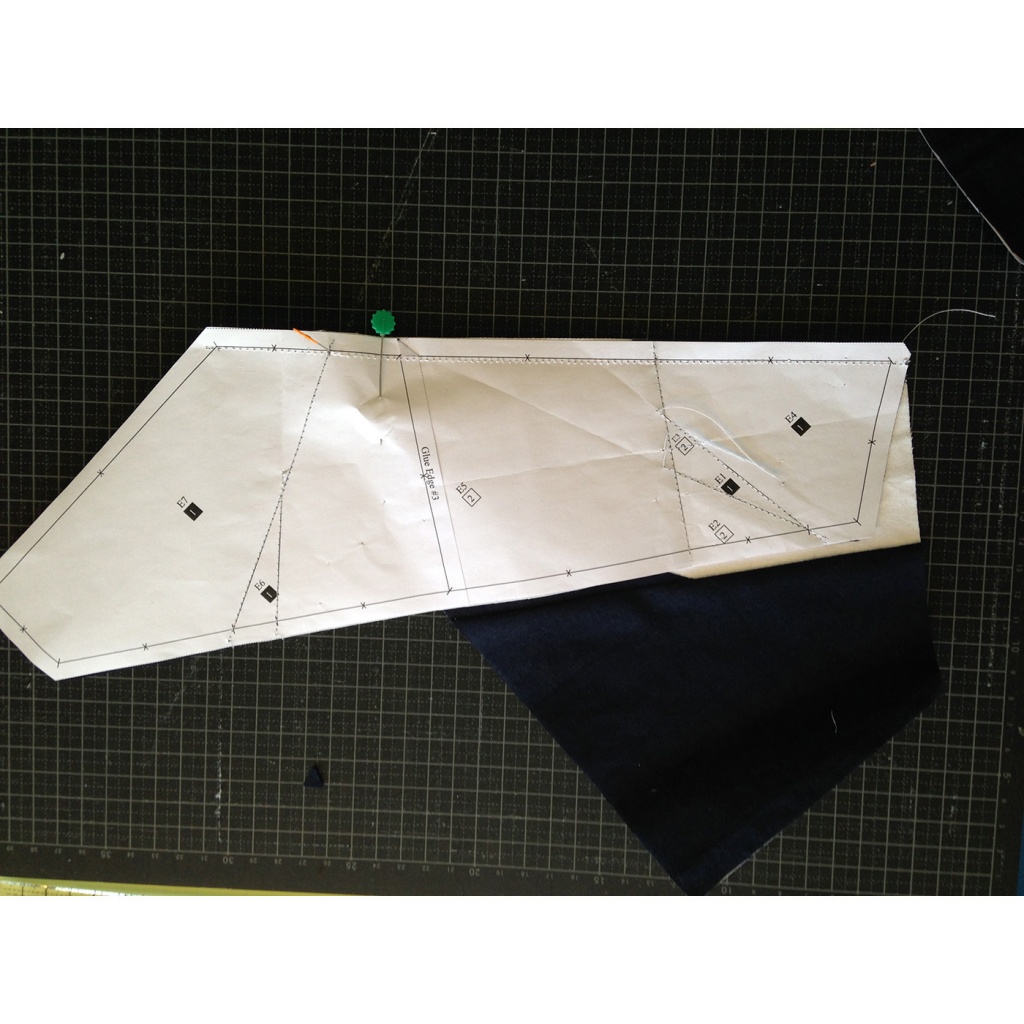
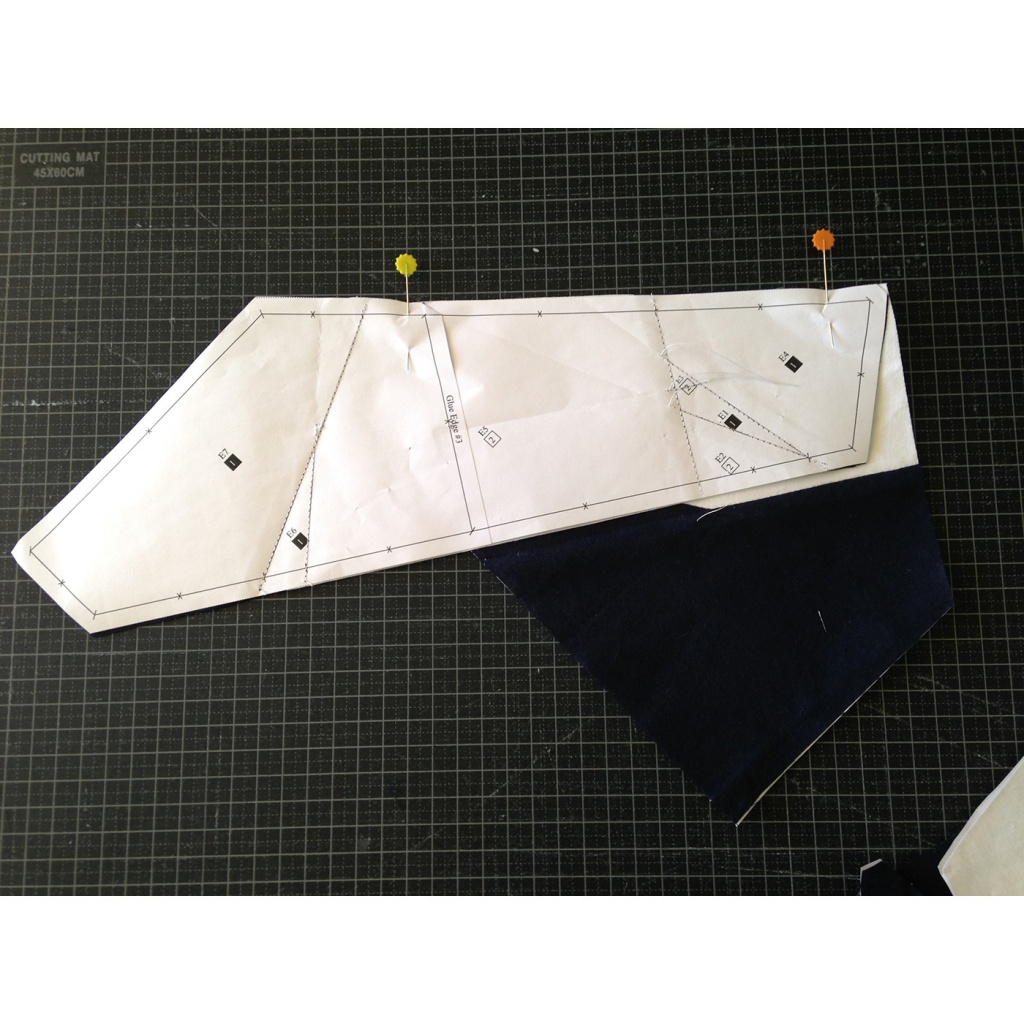
To explain how the fabrics are sewn in each of the sections, I will show you how I assemble the Section A, and then, with which you learn, you can assemble the other sections.
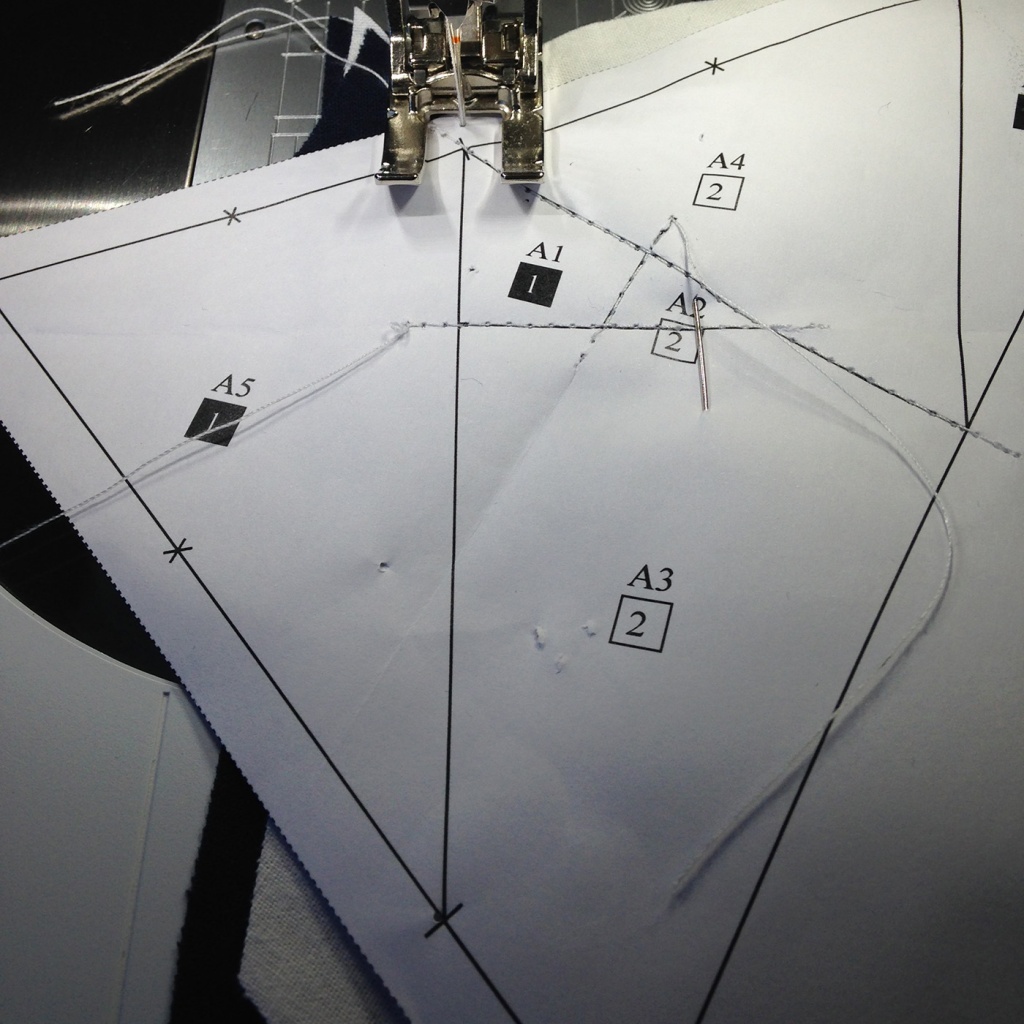
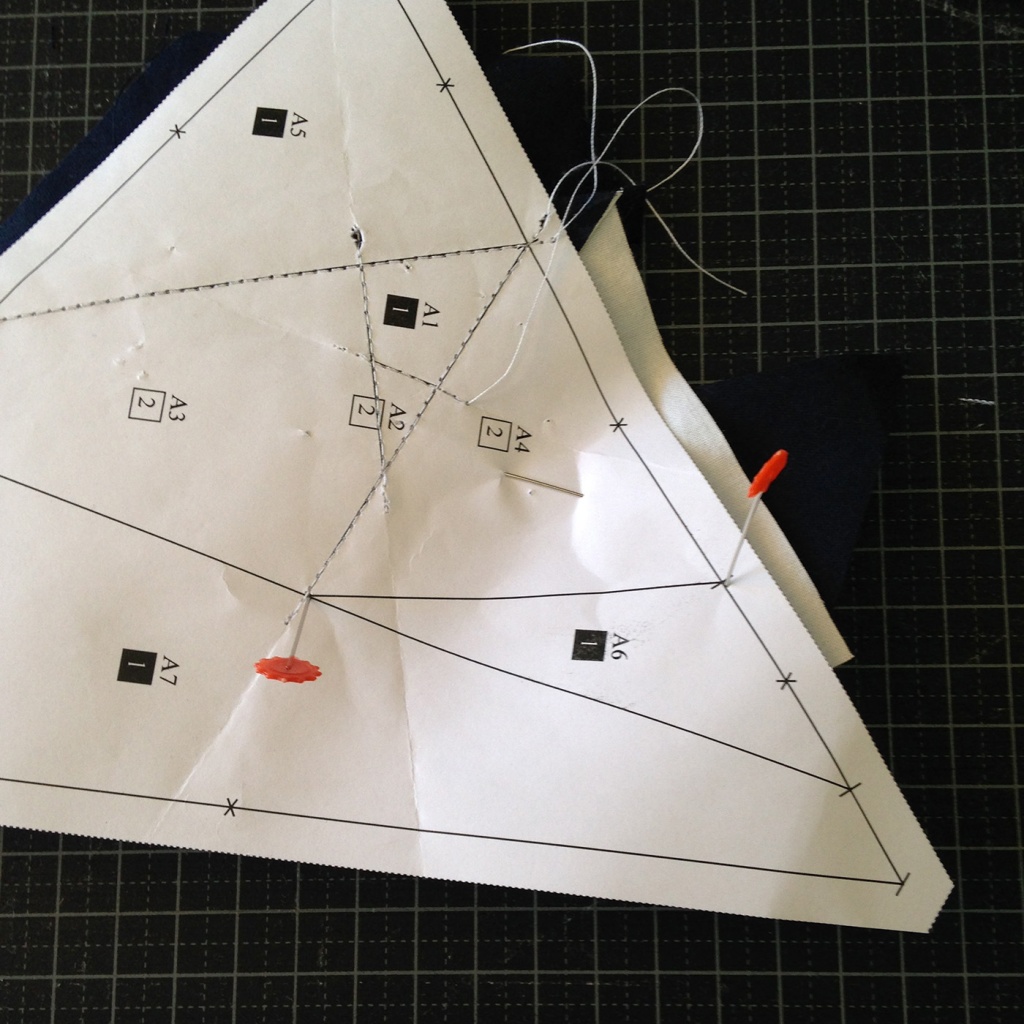
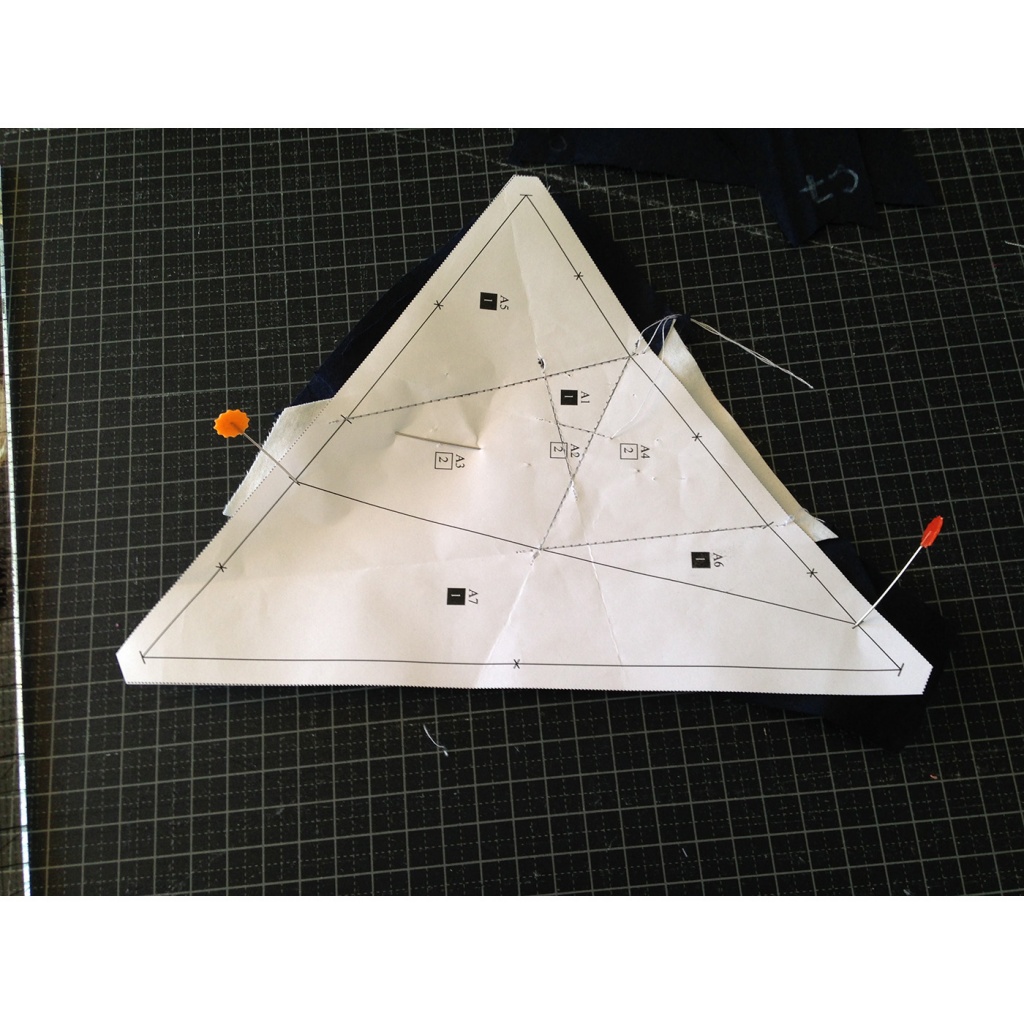
Take the paper of Section A and all the cloths that correspond to it. You will see that this section has 7 parts, so 7 cloths are needed: from A1 to A7, three of them white (A2-A3-A4) and 4 blue (the rest).
Let’s start !!!
Union of A1 and A2
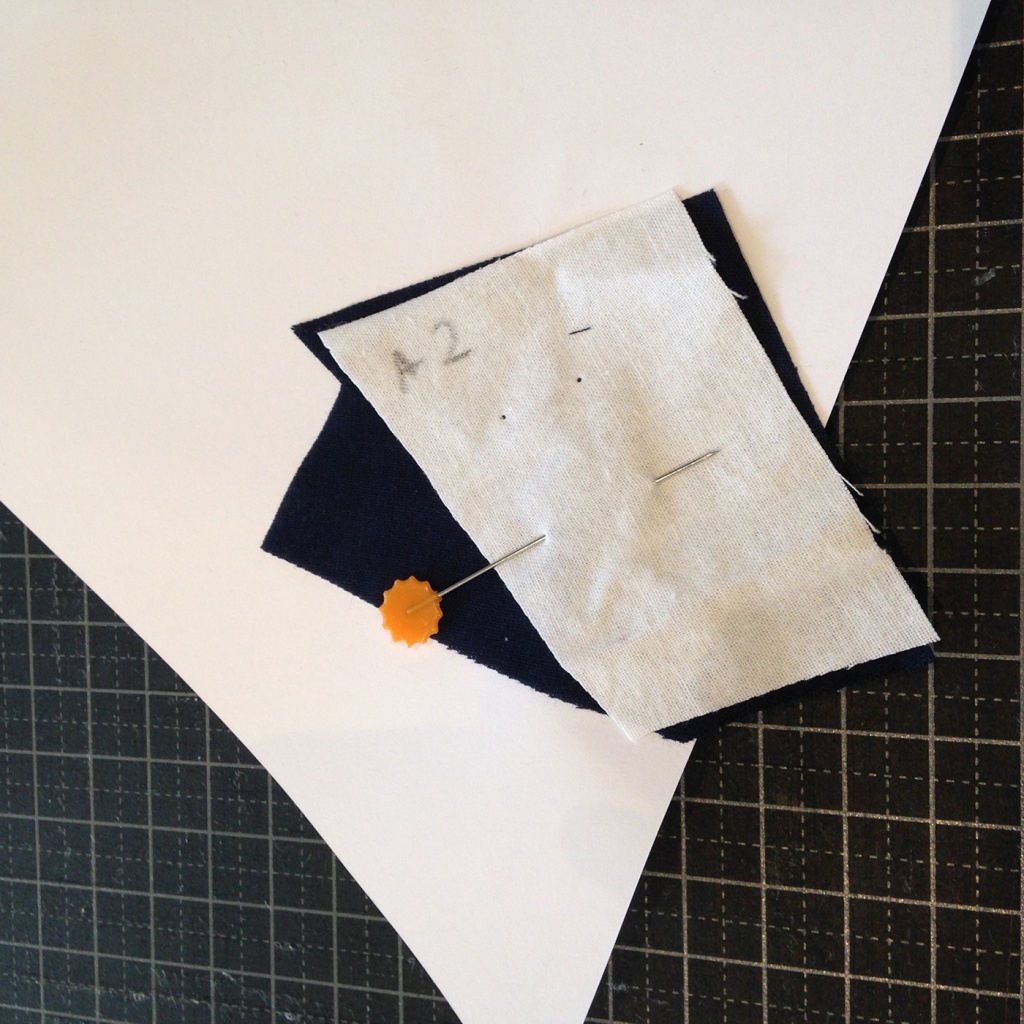
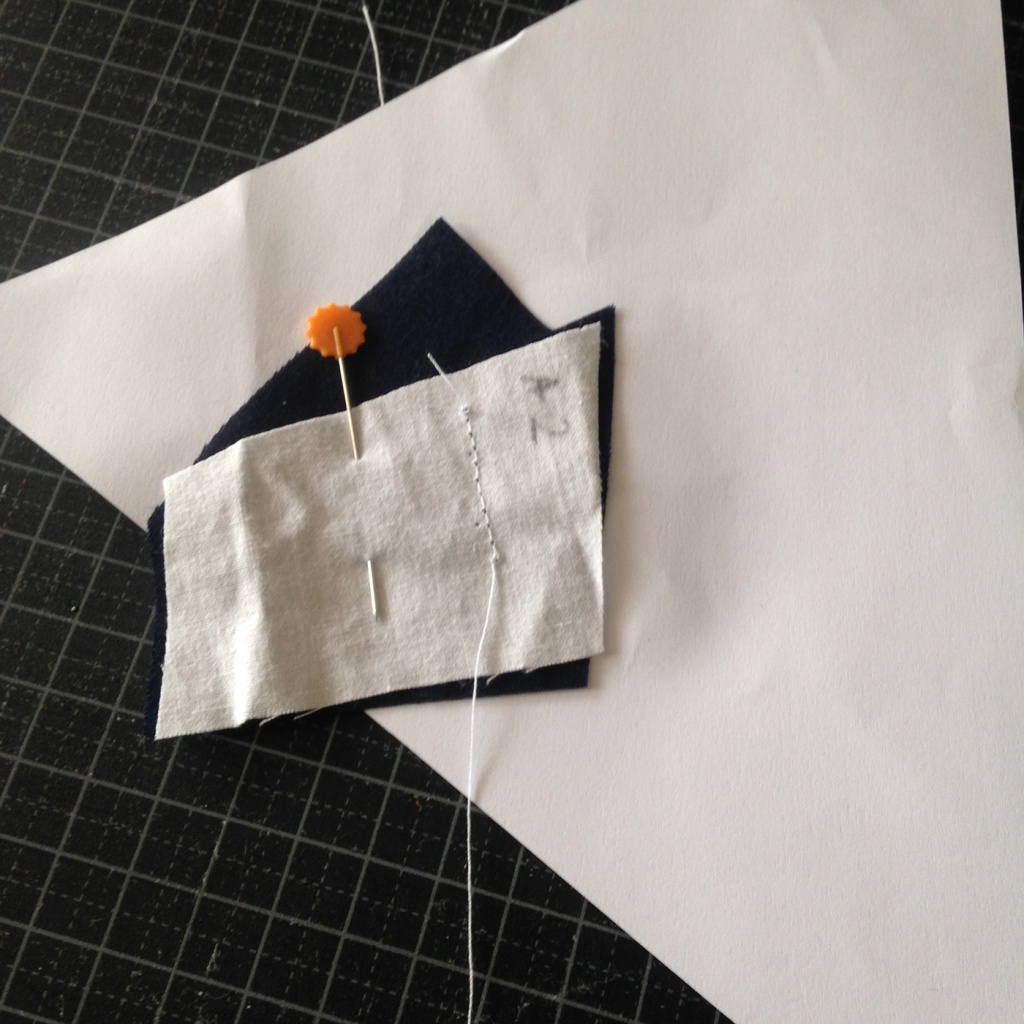
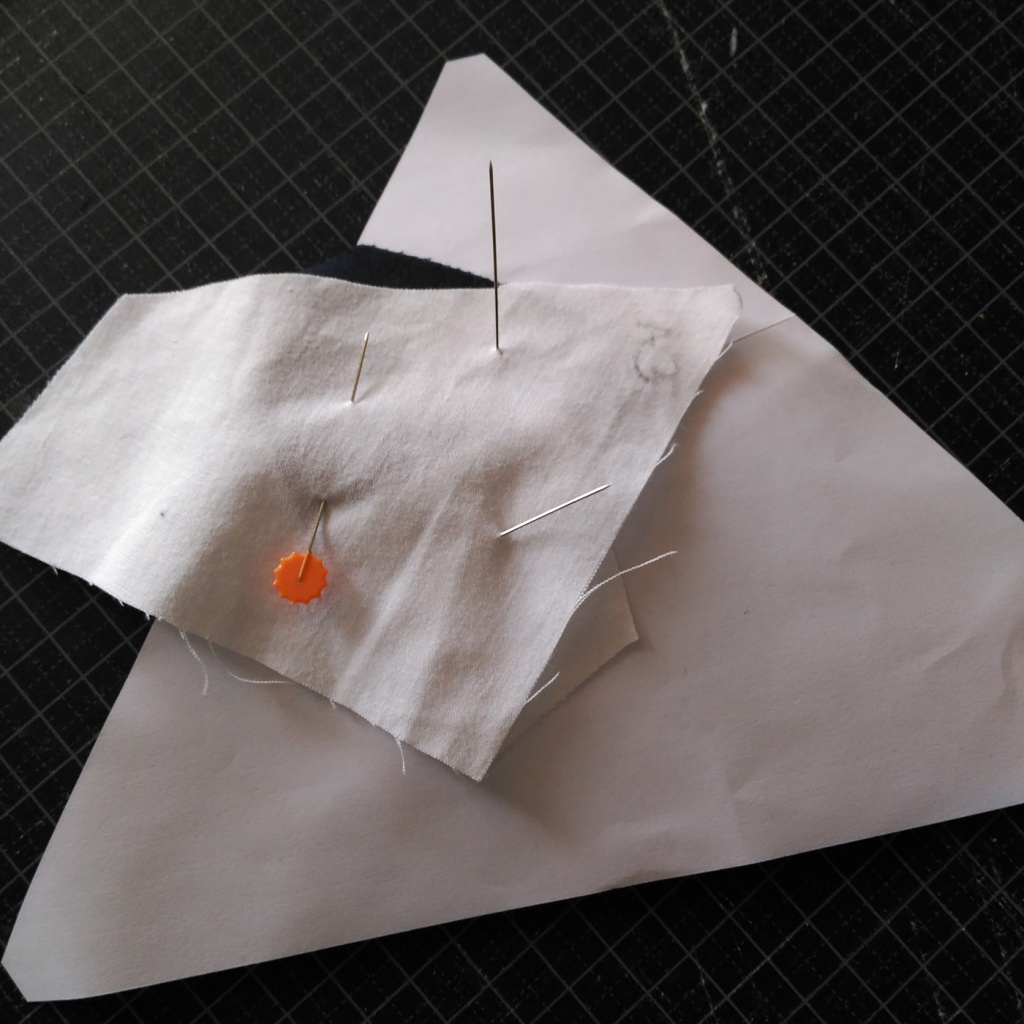
We take the paper and at backlit we put the fabric A1 behind it to see it with the figure A1 of the paper. In other words:
- We put the fabric A1 on the back of the paper.
- The right face of the fabric must be the one that is NOT in contact with the paper, so, the back of the fabric in contact with the paper.
- The cloth has to “cover” all the figure A1 of the paper and the remaining sidewalks must be well distributed all around. It should be left at least 1/4″ all around. (The templates are designed so that they are at least 1/2″).
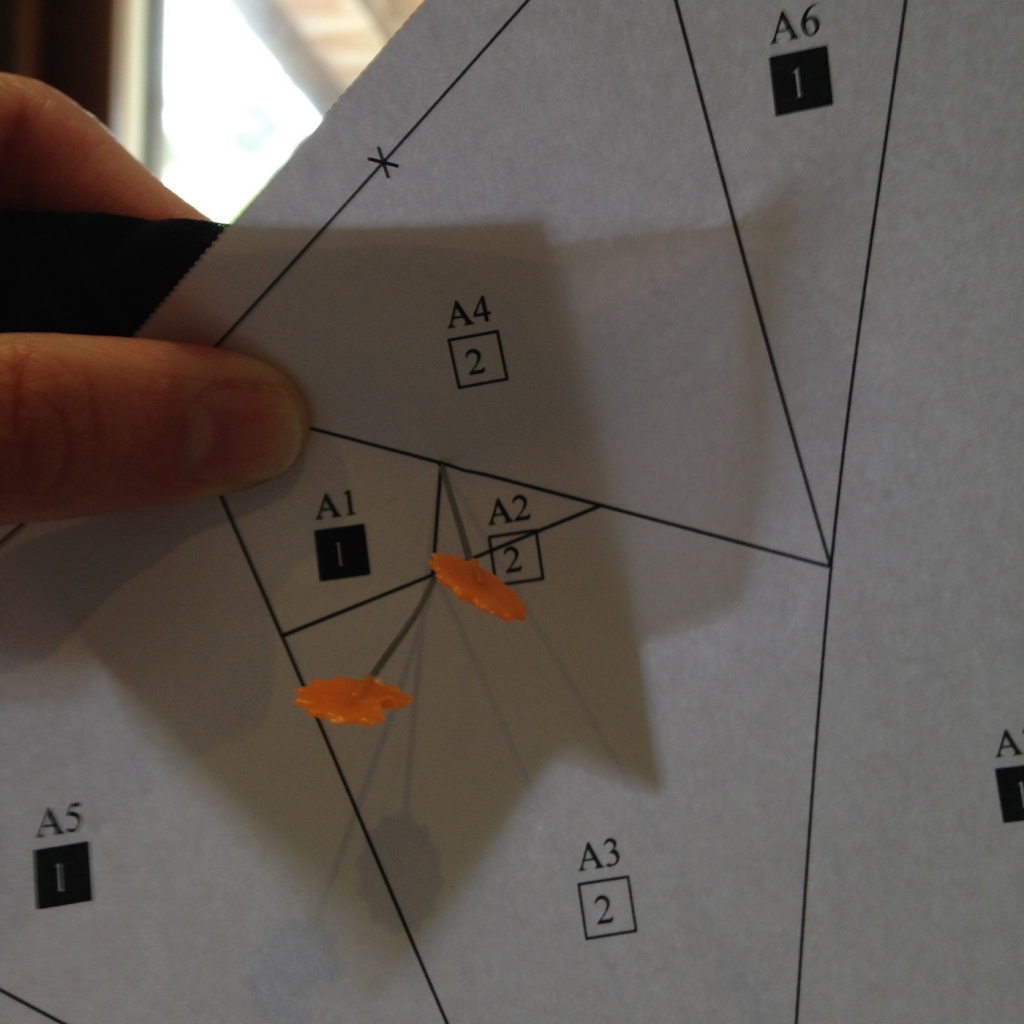
- We can attach the fabric with a needle if it should be easier.
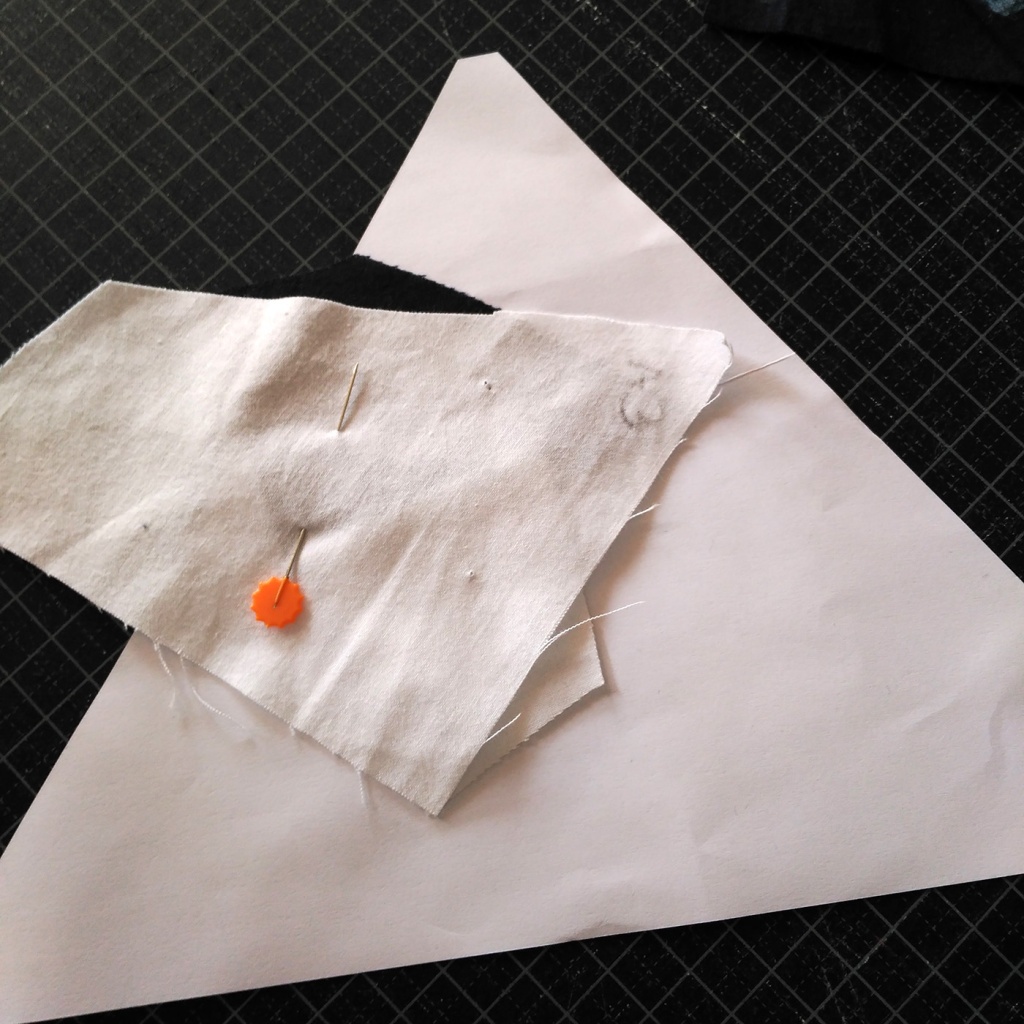
We have to combine two pieces of fabric, so we will now place the cloth A2 without moving the A1, which we have placed before. And just like before:
- We put fabric A2 on the back of the paper.
- The right face of the fabric must be the one that is NOT in contact with the paper, that is, the back of the fabric in contact with the paper.
- The cloth has to “cover” all the figure A2 of the paper and the remaining sidewalks must be well distributed around. It should be left at least 1/4″ all around.
- And we put needles at each end of the line between the figures A1 and A2.
(This technique, of the needles to place the fabrics, is completely mine, surely there are others and better ones, but to me it works so well and that’s why I want to share it with you)
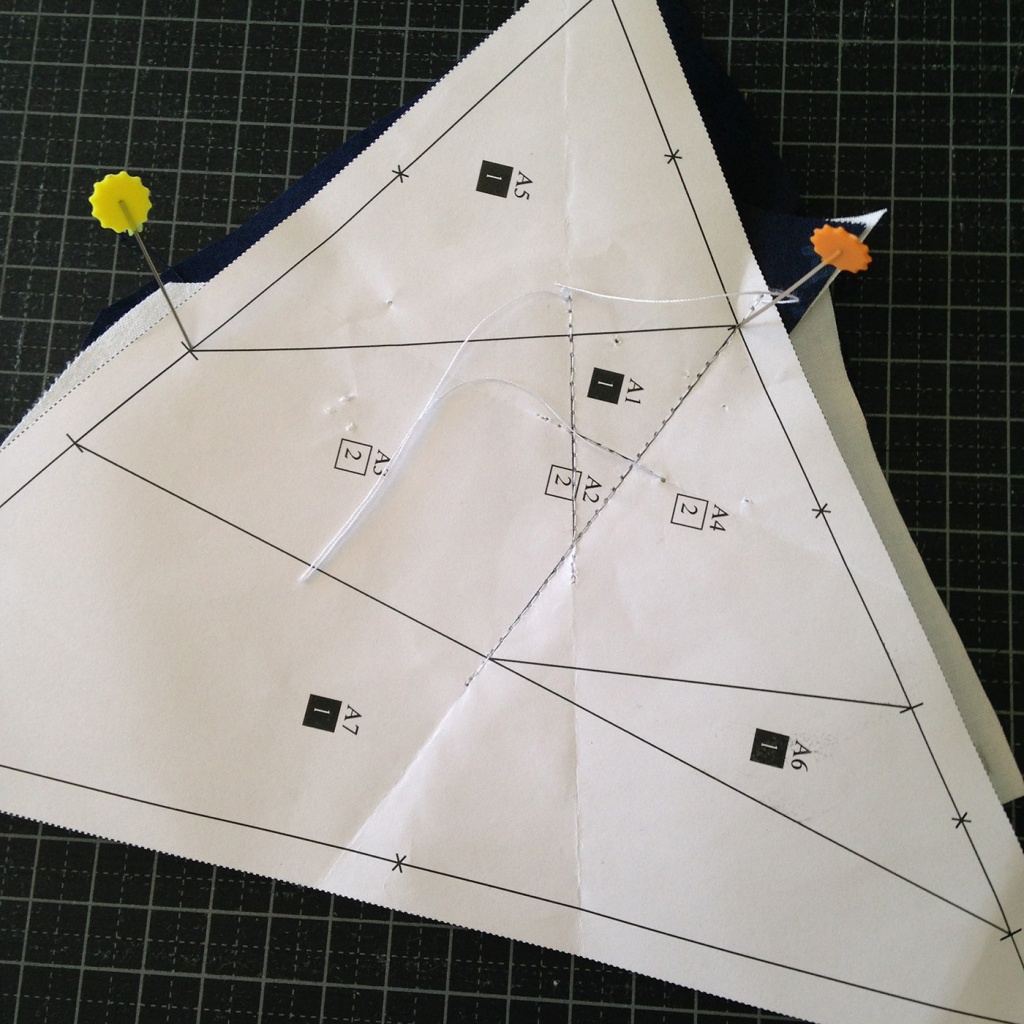
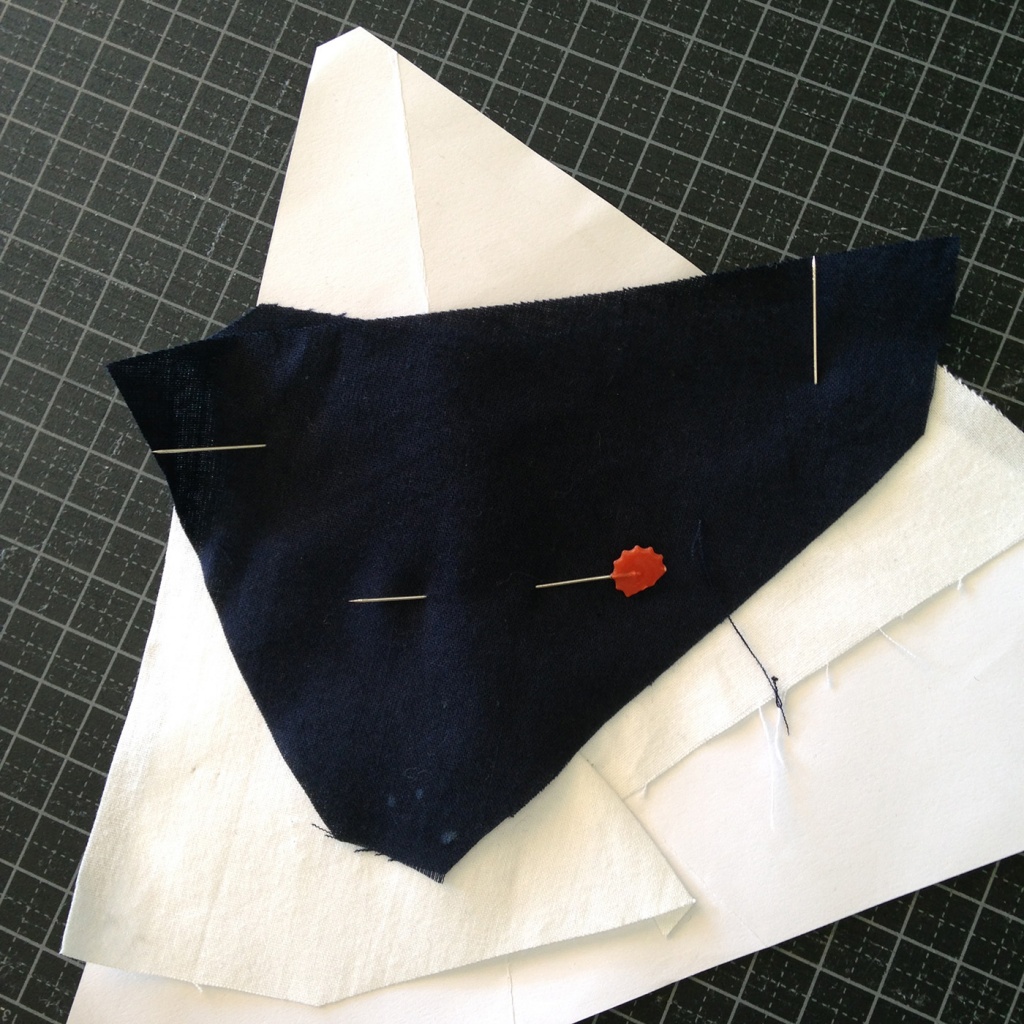
Now, without moving the fabrics, we carry the needles and you will see that the holes in the paper and fabric needles remain. I use these holes to turn the fabric we have added and know exactly where to place it. So the steps to follow will be:
- Because we have to join A1 and A2 we have to face them right side with right side, so we turn A2 on A1 matchong the needle holes. We can do it by inserting the needles back into the holes we had done before but with a rotated A2. What I do is remove only the cloth that I add, A2, turn it over, and turn it into the holes made by the needles but vice versa.
- We attach the two fabrics to the paper with needles, attending carefully that the needle does not pass through the line joining A1 and A2.
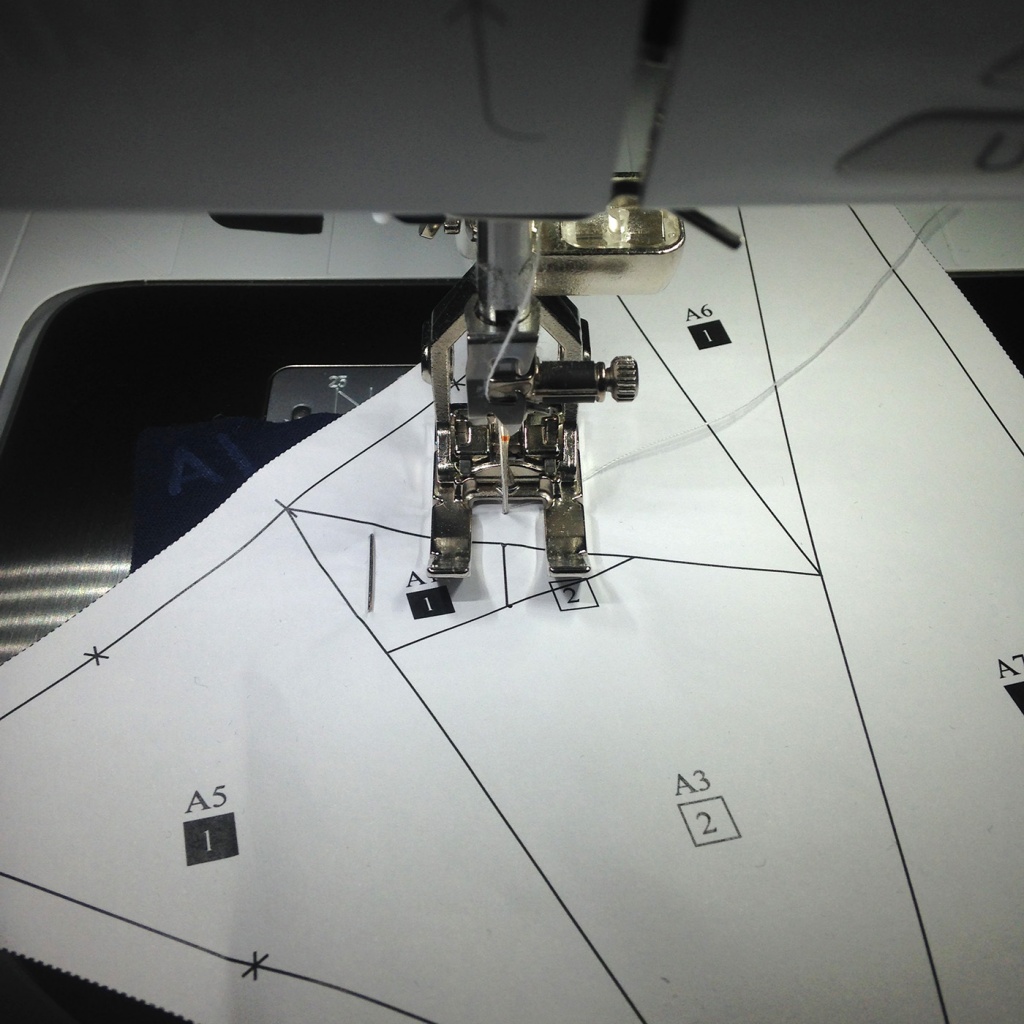
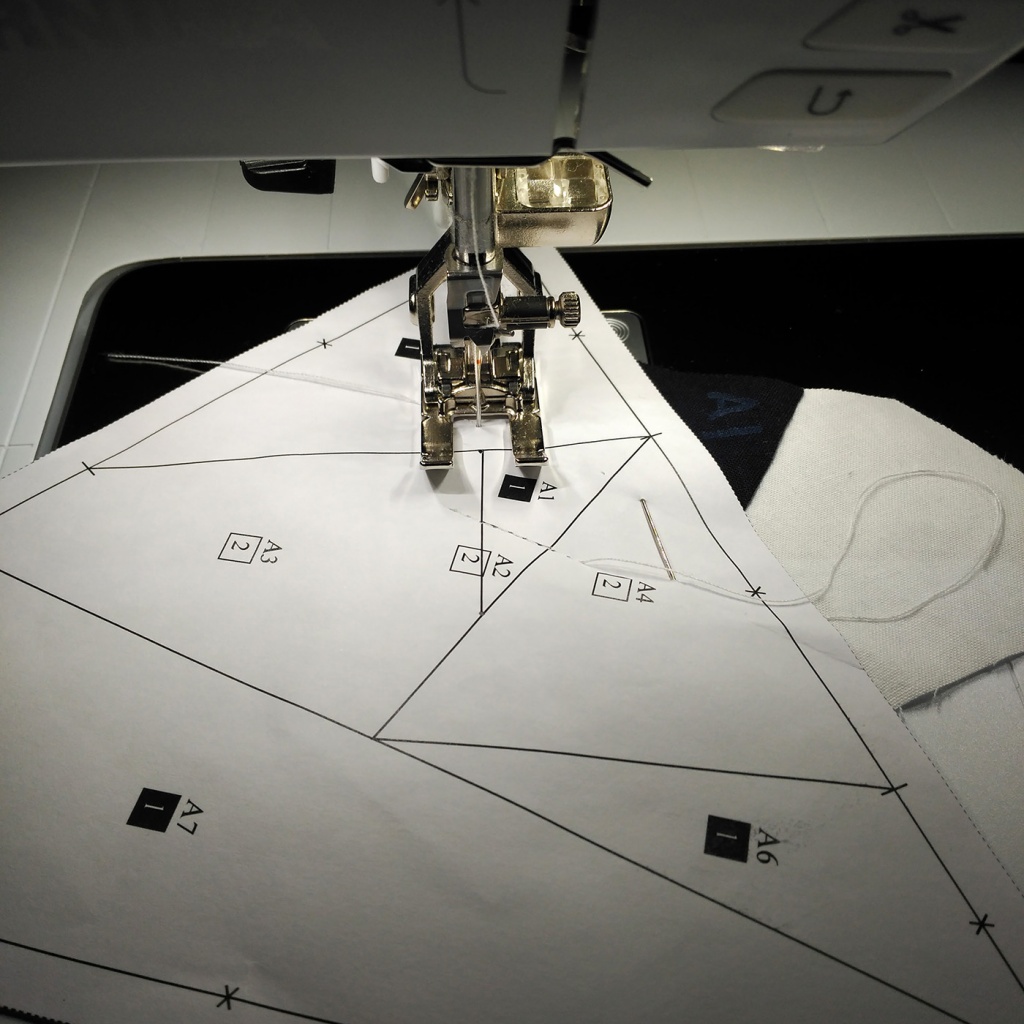
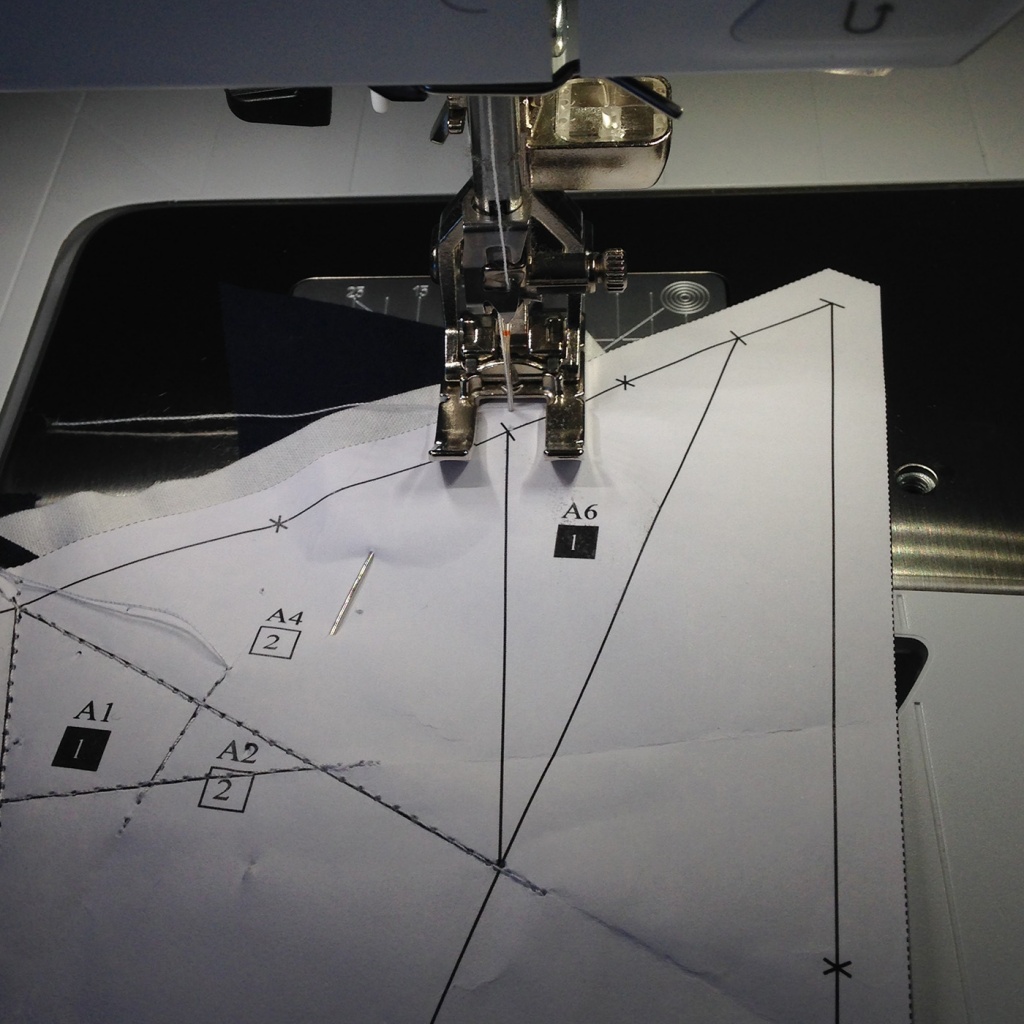
And now we can sew the two fabrics:
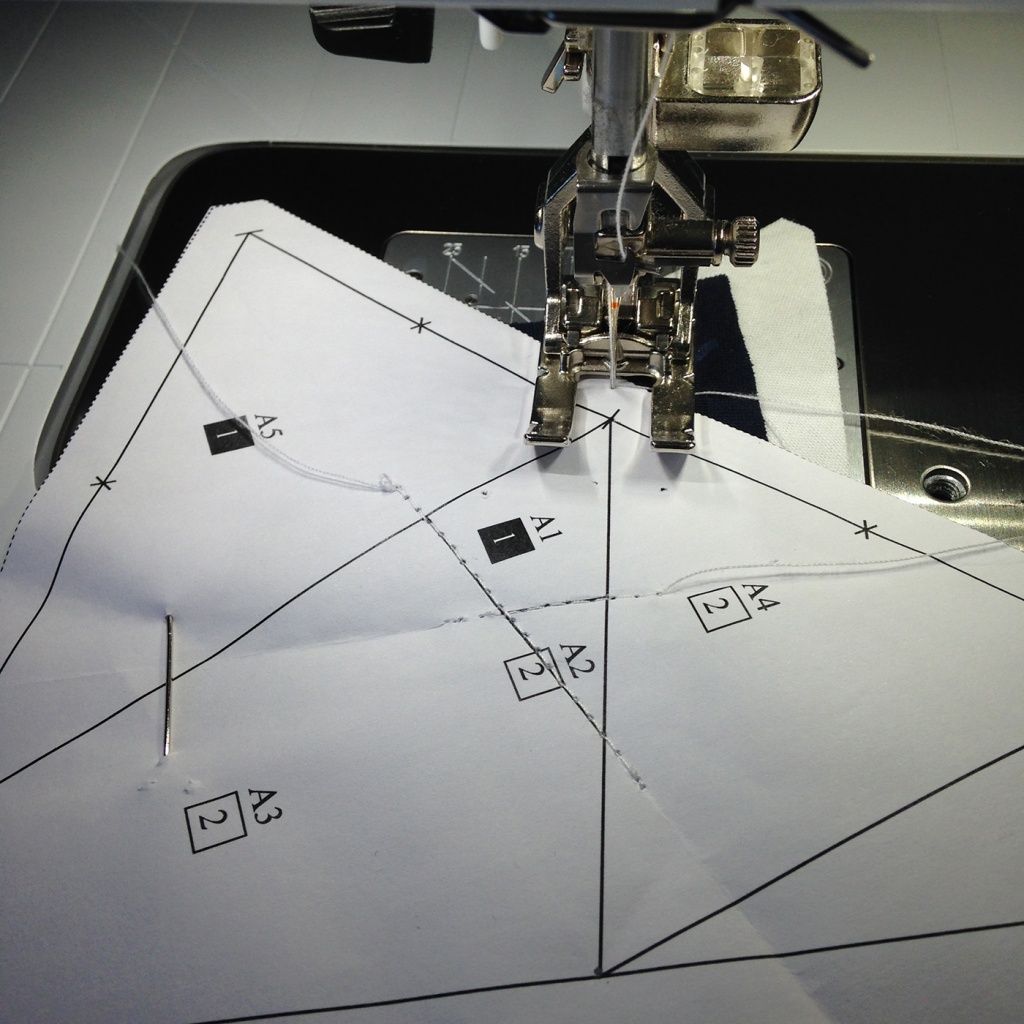
- We made a seam on the paper over the line that joins A1 and A2 with the fabrics in the other part.
- We have to start a little bit before the start of the line and finish a little bit after the end of the line.
- If you make a short stitch, 2-2.5, it will be easier to take out the paper after finishing.
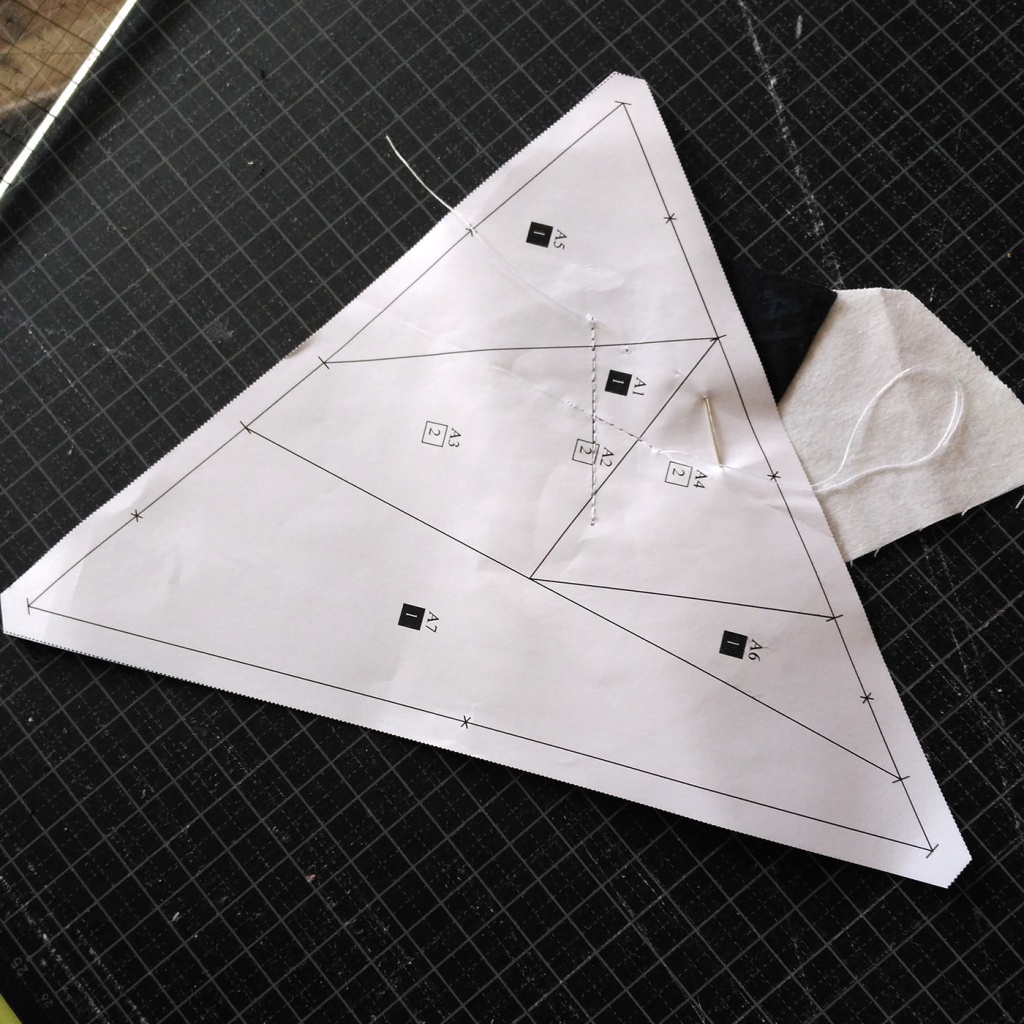
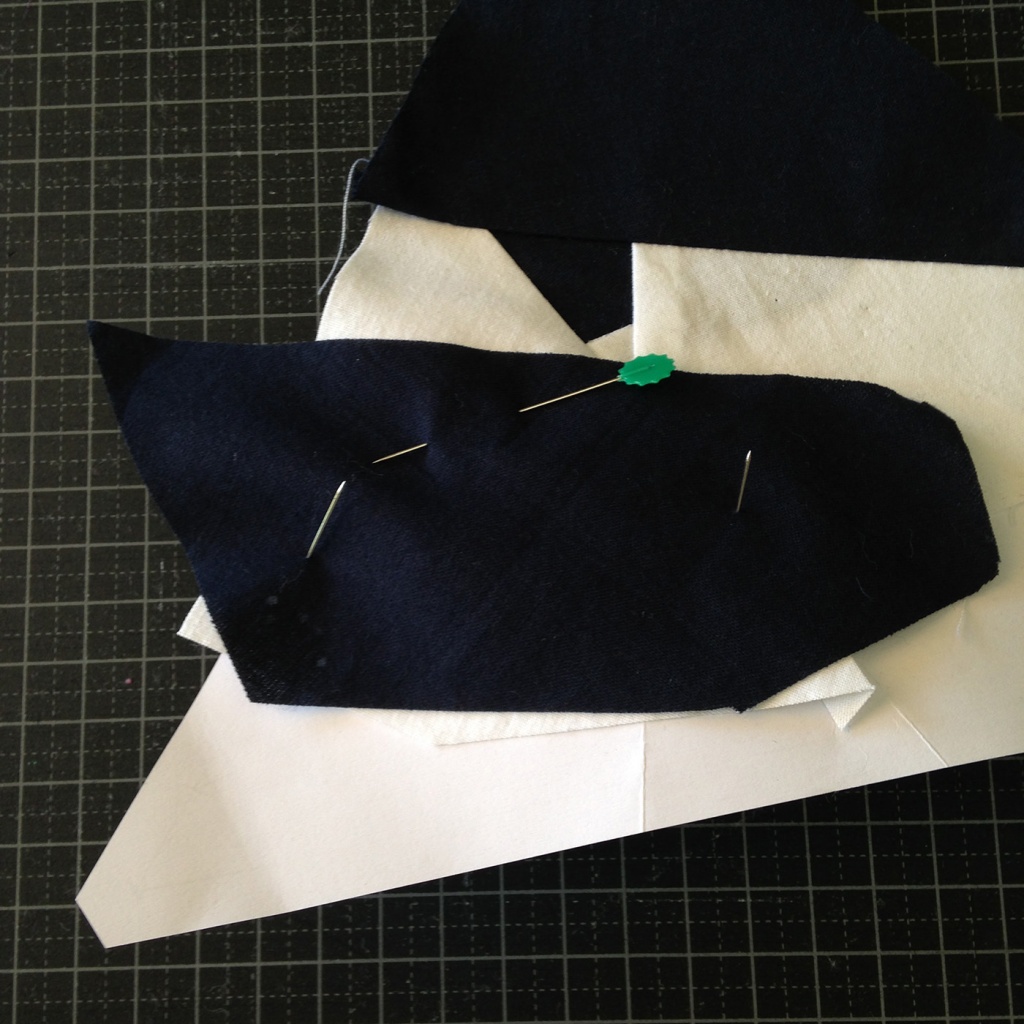
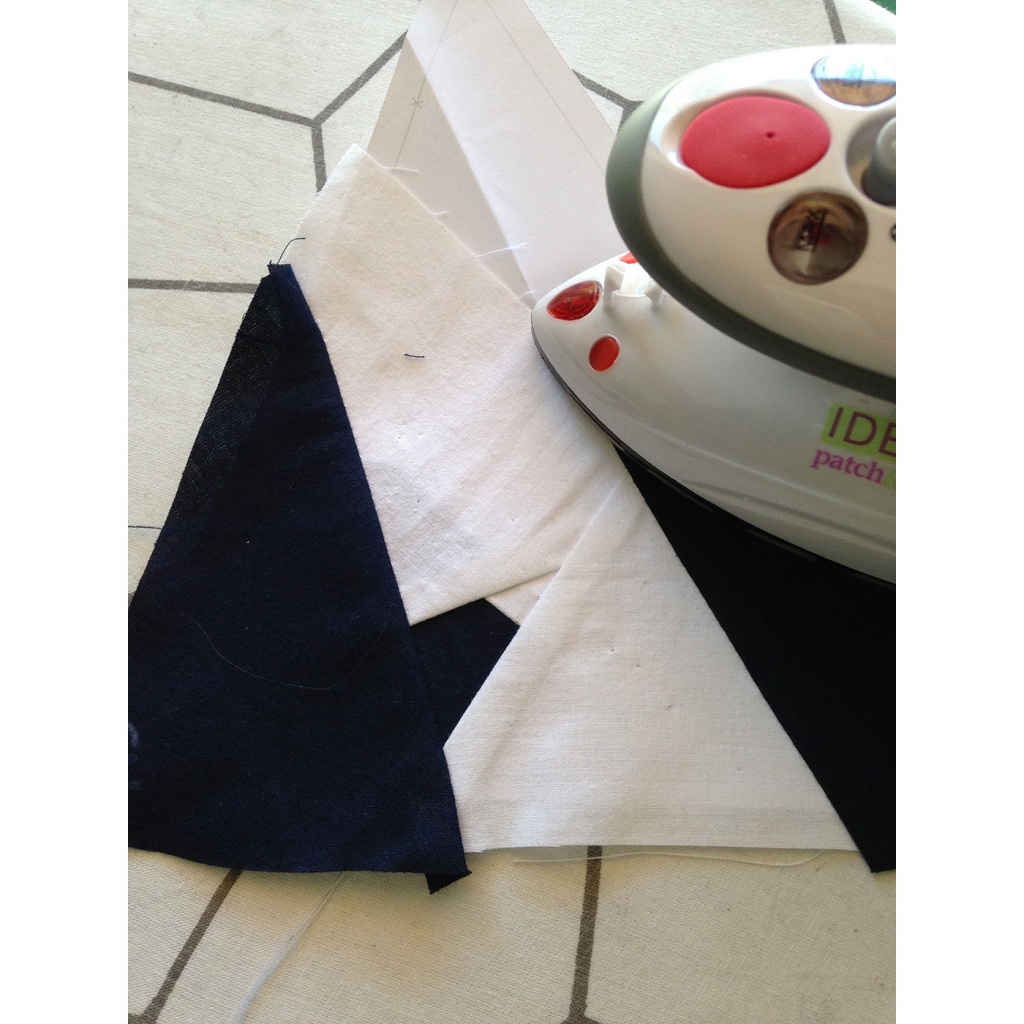
Now we check against the light that the fabric has been sewn to the right place:
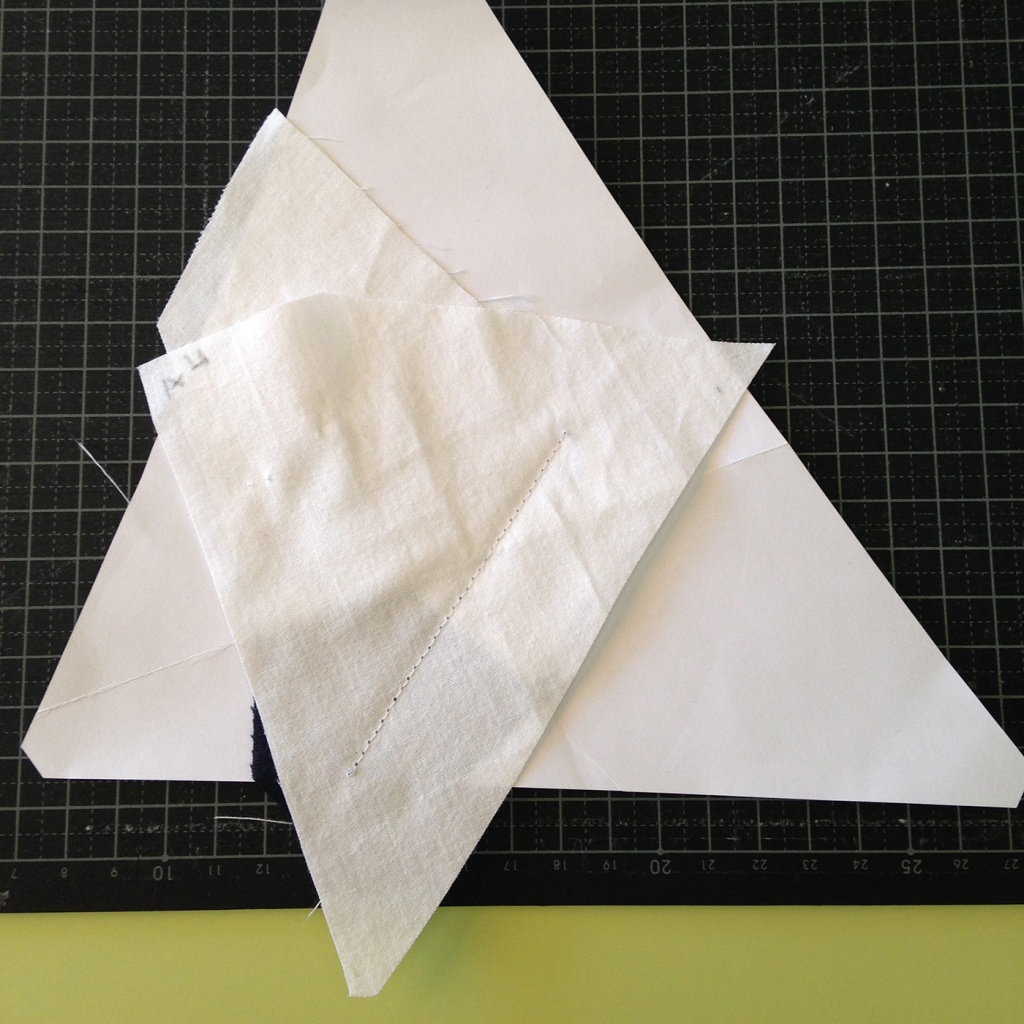
Now it’s time to take away the surplus of fabric besides the seam that we just made:
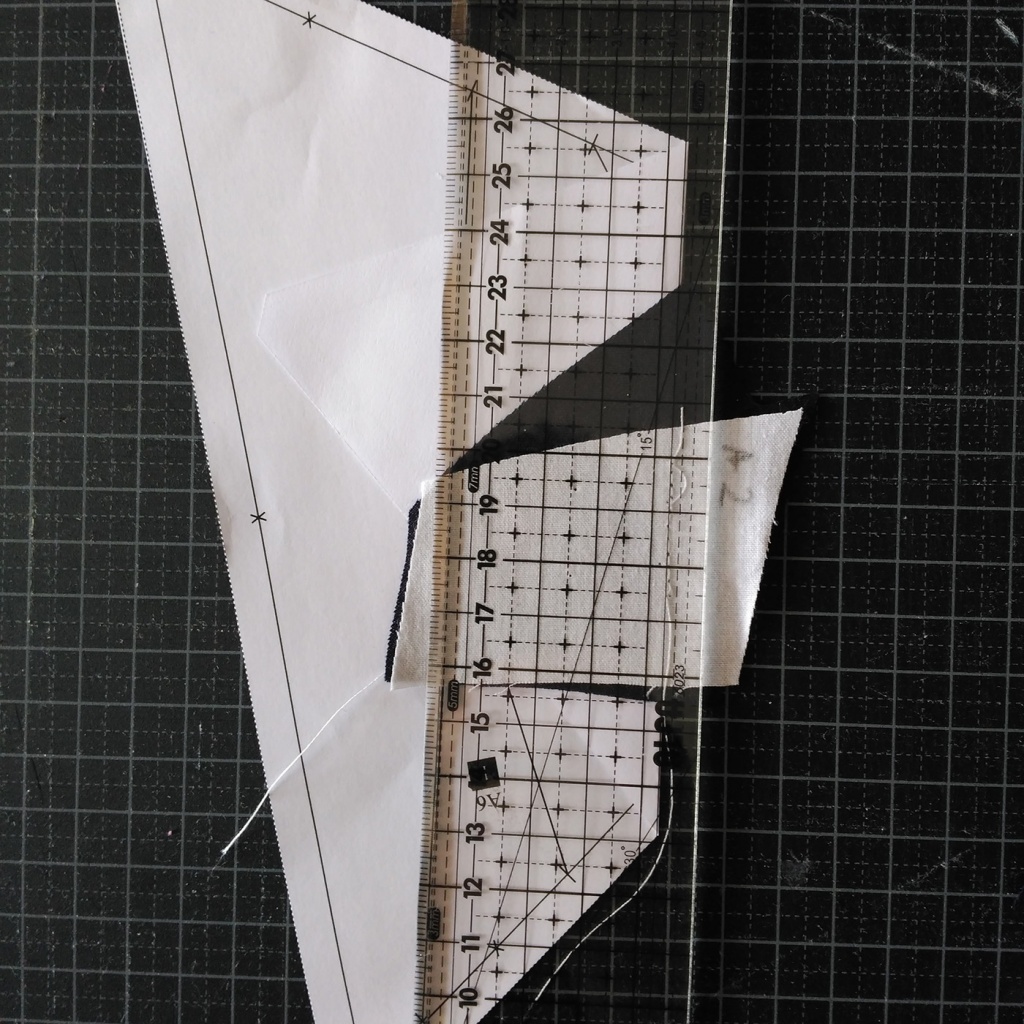
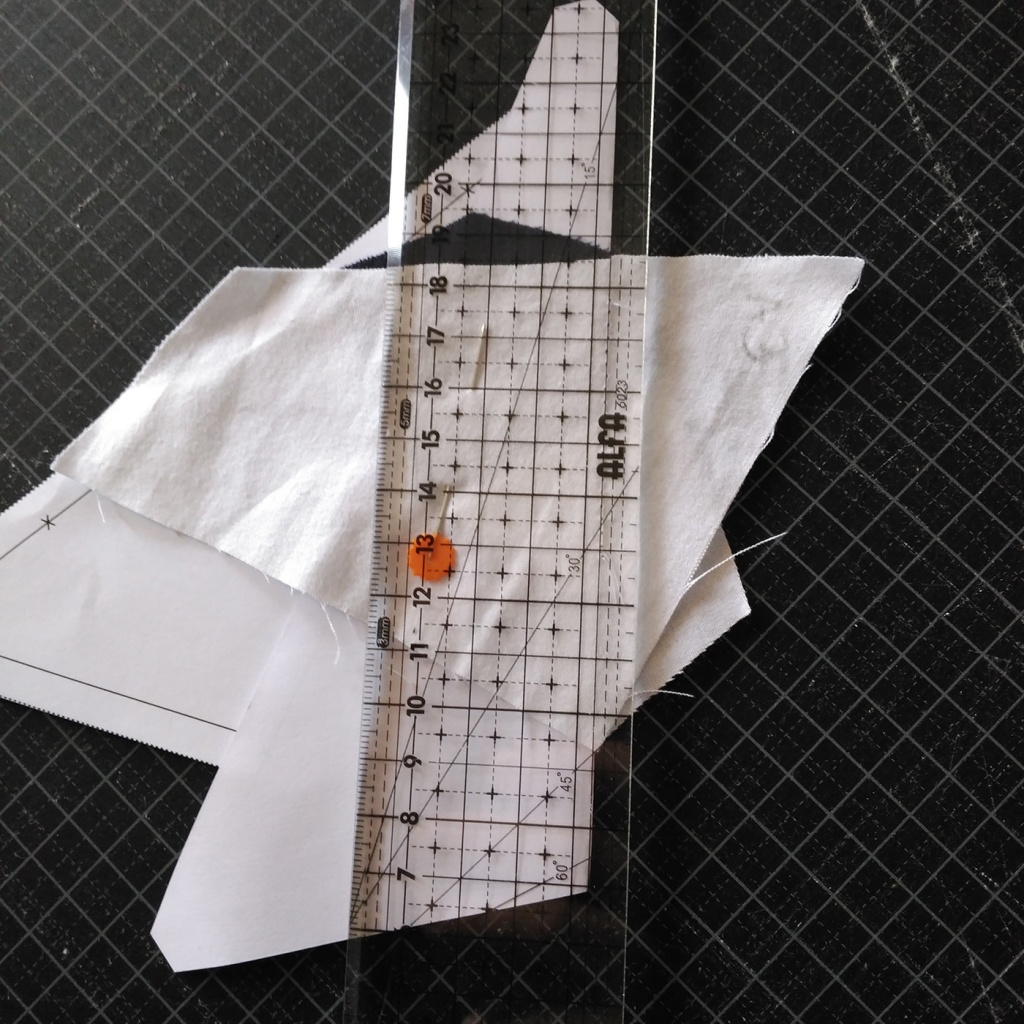
- Fold the paper by de seam to the bottom (see next picture), so that we only left the leftovers in one part.
- Warning with the good fabrics that have to stay in the other side.
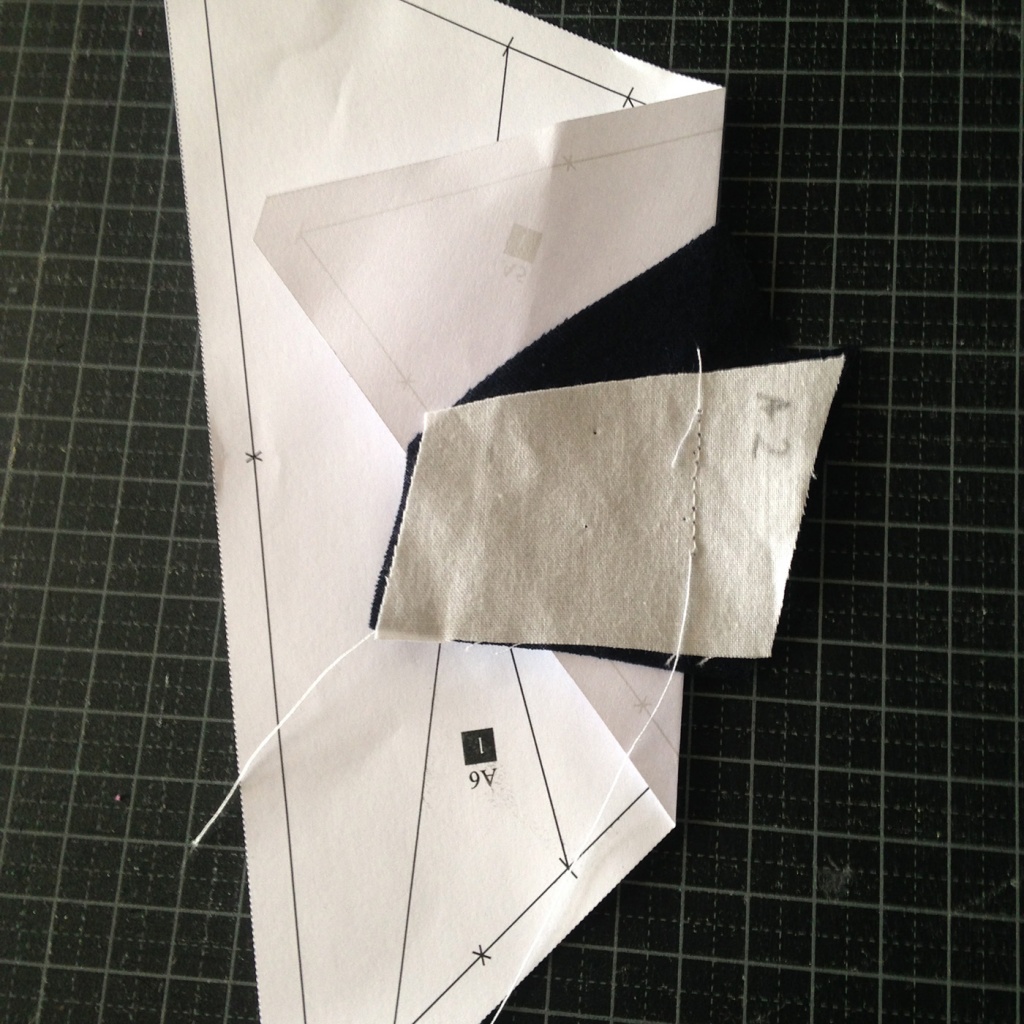
- We put the ruler parallel to the seam that we’ve made and cut to 1/4″ of the seam. In that way we will have a edge of 1/4″.
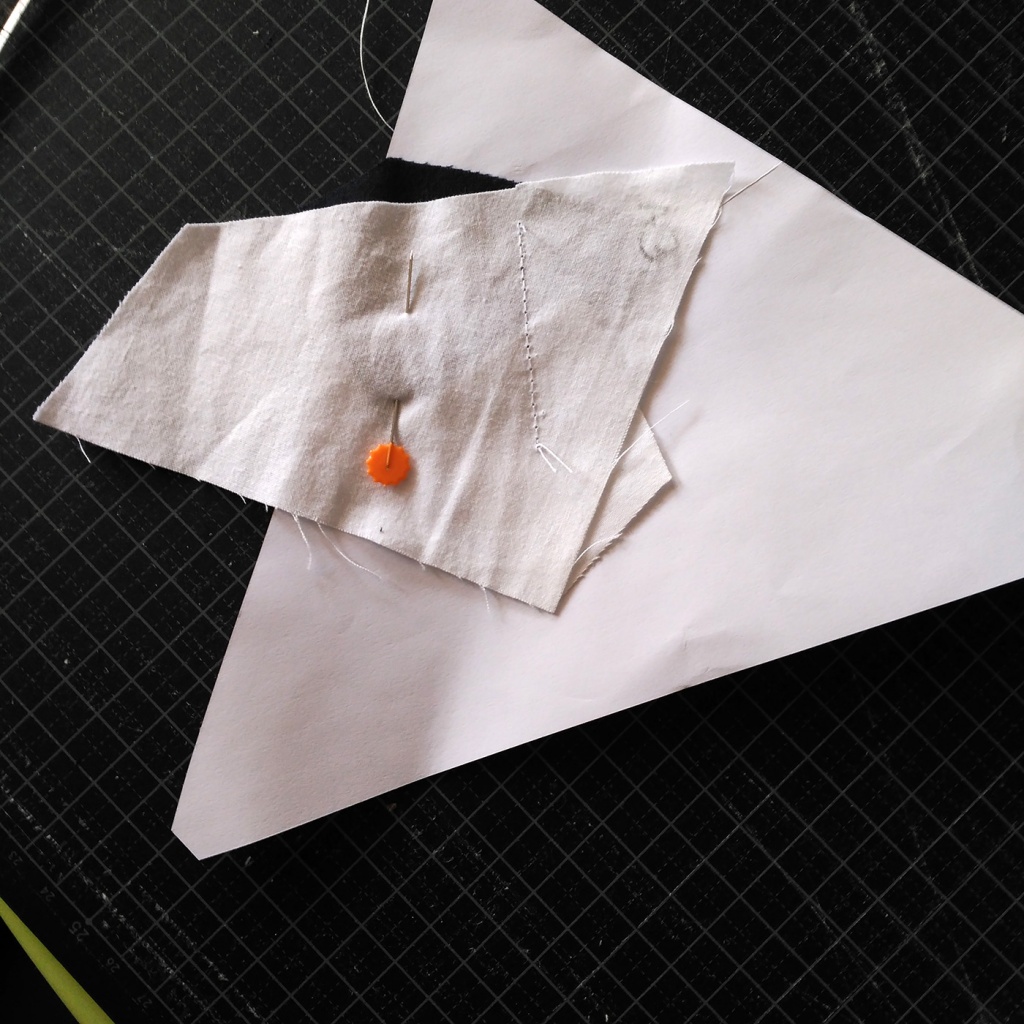
To finish the first two fabrics, A1 and A2:
- We remove the fold of paper.
- We fold the fabric A2, by the seam, with the right face up.
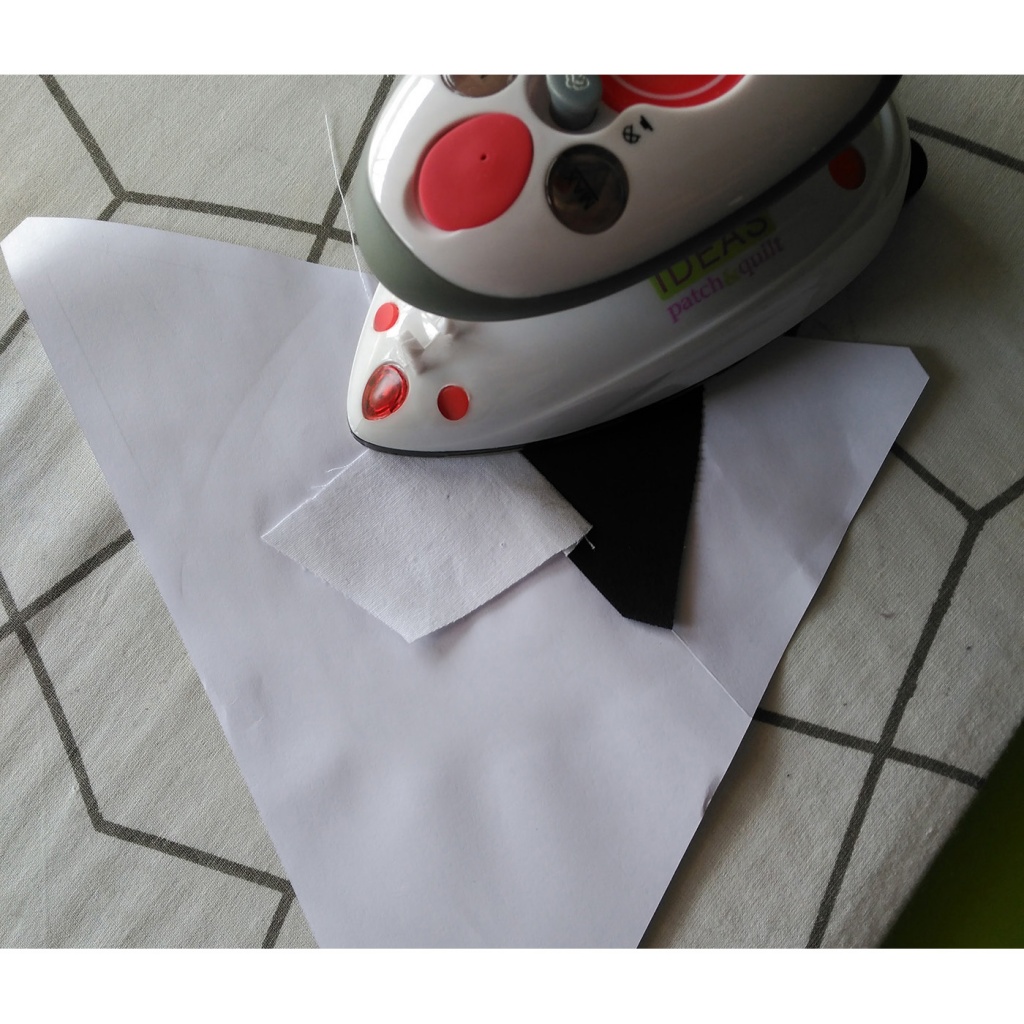
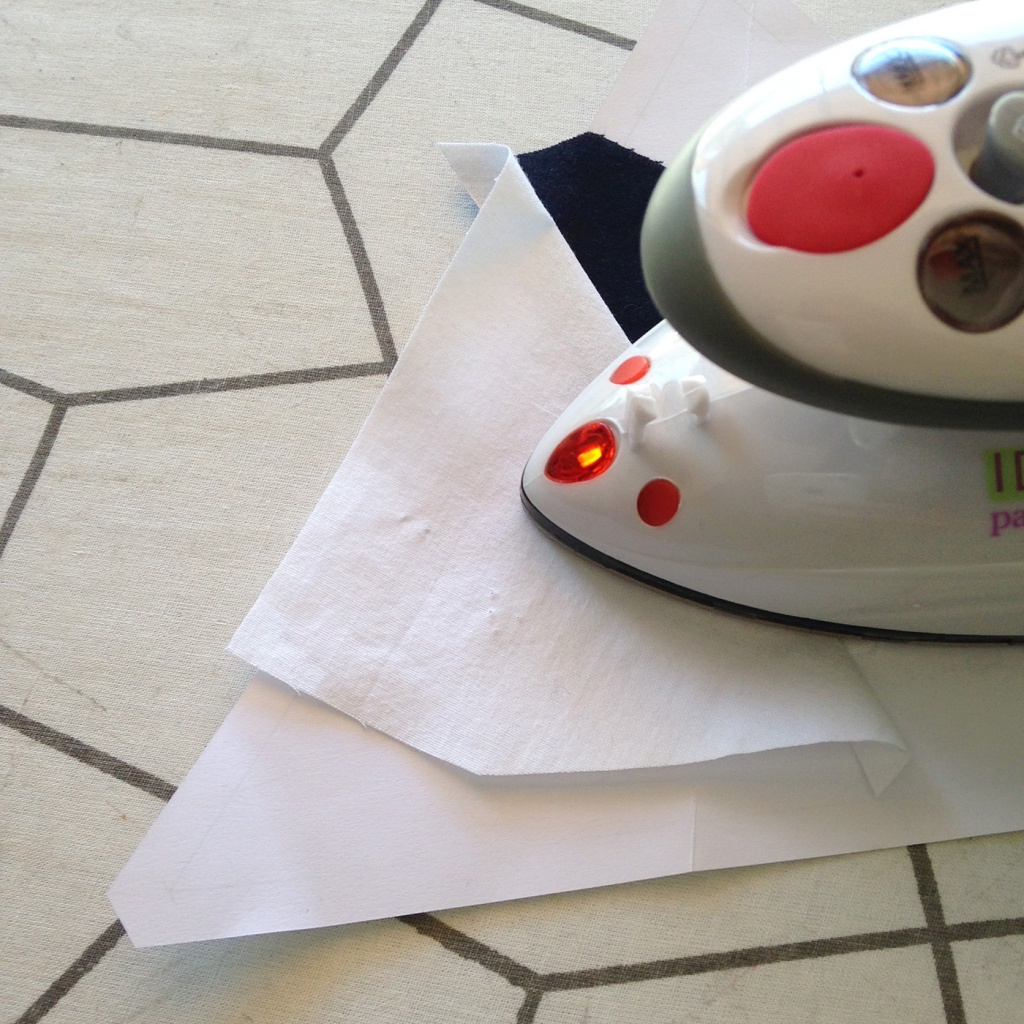
- We iron the union of the two fabrics well so they are flat and stretched.
Joining A3
Now, we have to repeat the same process wich we have done with A1 and A2 for each fabric in Section A. I will show you more schematically and with pictures the steps (the photographs may aren’t exactly the same for each piece of fabric).
- Put the A3 fabric on the back of the paper.
- The right face of the fabric must be the one that is NOT in contact with the paper, so, the back of the fabric in contact with the paper.
- The fabric must “cover” the entire A3 figure of the paper and the remaining sides of it must be well distributed around. It should be left at least 1/4″ all around.
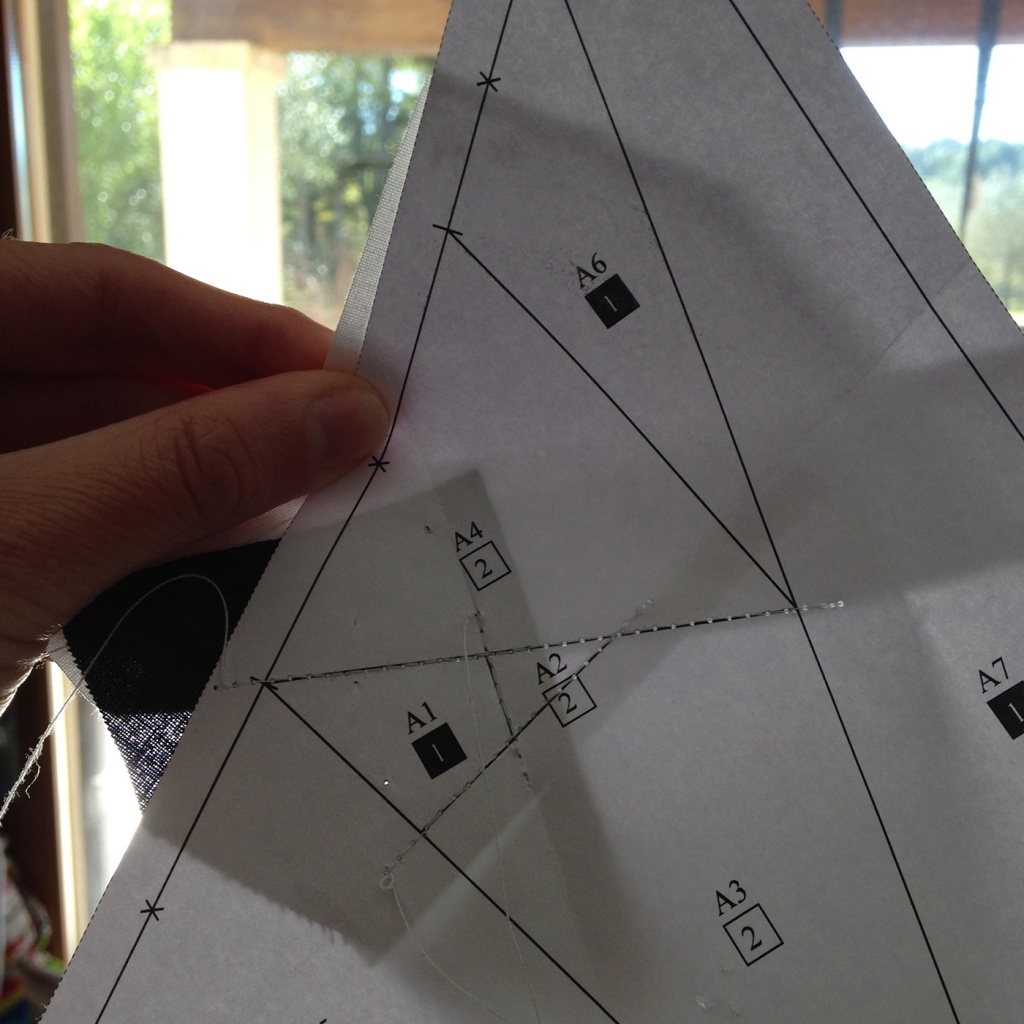
- And we put needles at each end of the line between the figures A2 and A3. You will see that this line also includes A1.

- We have to join A1-A2 and A3: we have to face them for the right sides, so we turn A3 on A1-A2 by pushing the holes in the needles. We can do it by inserting the needles back into the holes we had done before but with A3 turned. What I do is remove only the fabric A4, turn it around, and turn it into the needles by the holes made before.
- We attach the fabric A3 to the paper with needles, attending that the needle does not cross through the line A1-A2 and A3.
- We made a seam on the paper over the line that joins A1-A2 and A3 with the fabrics in the other part. Note that one side also takes A1, but since we have put it first there is no problem. This is the pattern, it tells us the order of the fabrics in such a way that we can sew them all.
- We have to start a little bit before the start of the line and finish a little bit after the end of the line..
- We fold the fabric A3 by the seam that we have done, in order to all the good fabric faces A1-A2 and A3, are up.
- We check against the light that A3 fabric occupies the entire A3 space of the paper and there are the necessary margins to add the remaining fabrics in the surrounding area. (If this is not the case, it should be removed, r and sewed again and make sure it is ok).

- Fold the paper by de seam to the bottom (see next picture), so that we only left the leftovers in one part
- Warning with the good fabrics that have to stay in the other side.
- We put the ruler parallel to the seam that we’ve made and cut to 1/4″ of the seam. In that way we will have a edge of 1/4″.
- We remove the fold of paper.
- We fold the fabric A3, by the seam, with the right face up.
- We iron the union of the two fabrics well so they are flat and stretched.
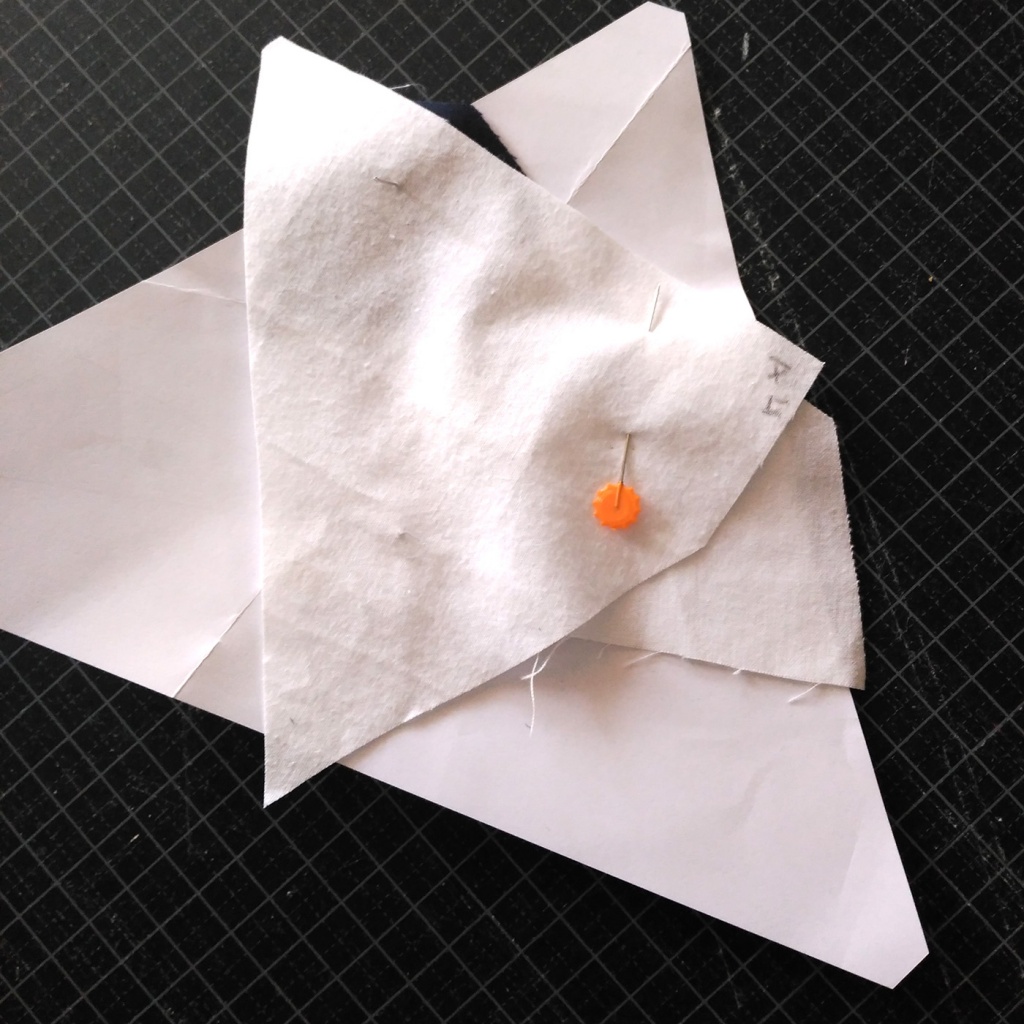
Joining A4
- Put the A4 fabric on the back of the paper.
- The right face of the fabric must be the one that is NOT in contact with the paper, so, the back of the fabric in contact with the paper.
- The fabric must “cover” the entire A4 figure of the paper and the remaining sides of it must be well distributed around. It should be left at least 1/4″ all around. You will see that in some photographs there is much more fabric, this is because when I cut between the templates I go through the middle of the two fabrics and sometimes the figures are not exactly the same as the papers and a little more big.
- And we put needles at each end of the line between the figures A3 and A4. See that this line includes A1 and A2, but as we have commented it is normal. The problem would be if it includes some of the later figures, from A5 to A7.
- We have to join A1-A2-A3 and A4: we have to face them for the right sides, so we turn A4 on A1-A2-A3 by pushing the holes in the needles. We can do it by inserting the needles back into the holes we had done before but with A4 turned. What I do is remove only the fabric A4, turn it around, and turn it into the needles by the holes made before.
- We attach the fabric A4 to the paper with needles, attending that the needle does not cross through the line A1-A2-A31 and A4.
- We made a seam on to the paper over the line joining A1-A2-A3 and A4 with the fabrics in the other side.
- We have to start a little bit before the start of the line and finish a little bit after the end of the line.
- We fold the fabric A4 by the seam that we have done, in order to all the good fabric faces are up..
- We check against the light that the fabric A4 occupies the entire A4 space of the paper and there are the necessary margins to add the remaining fabrics in the surrounding area.
- We fold the paper by the sema to the bottom or top (see next picture), so that we only left the leftovers in one part.
- Warning with the good fabrics that tehy have to stay to the other side.
- We put the ruler parallel to the seam that we’ve made and cut to 1/4″ of the seam. In that way we will have an edge of 1/4″.
- We remove the fold of paper.
- We fold the fabric A4, by the seam, with the right face up.
- We iron the union of the two fabrics well so they are flat and stretched.
Joining A5
- Put the A5 fabric on the back of the paper.
- The right face of the fabric must be the one that is NOT in contact with the paper, so, the back of the fabric in contact with the paper.
The cloth has to “cover” all the A5 figure of the paper and the remaining sides must be well distributed all around. It should be left at least 1/4″ all around. - And we put needles at each end of the line between the figure A5 and those we have already put before, in this case A1 and A3.
- To join the fabrics we have to face the fabrics with their right side, so we turn A5 over the rest already sewn matching the neddels holes. We can do it by inserting the needles back into the holes we had done before but with A5 turned. What I do is remove only the fabric A5, turn it around, and turn it into the needles by the holes made before.
- We attach the fabric A4 to the paper with needles, attending that the needle does not cross through the line A5 and A1-A3.
- We made a seam on to the paper over the line joining A5 and A1-A3 with the fabrics in the other side.
- We have to start a little bit before the start of the line and finish a little bit after the end of the line.
- We fold the fabric A5 by the seam that we have done, in order to all the good fabric faces are up..
- We check against the light that the fabric A5 occupies the entire A5 space of the paper and there are the necessary margins to add the remaining fabrics in the surrounding area.

- We fold the paper by the sema to the bottom or top (see next picture), so that we only left the leftovers in one part.
- Warning with the good fabrics that tehy have to stay to the other side.
- We put the ruler parallel to the seam that we’ve made and cut to 1/4″ of the seam. In that way we will have an edge of 1/4″.
- We remove the fold of paper.
- We fold the fabric A5, by the seam, with the right face up.
- We iron the union of the two fabrics well so they are flat and stretched.
(I did not think about taking the picture after finishing the A5 fabric)
Joining A6
- Put the A6 fabric on the back of the paper.
- The right face of the fabric must be the one that is NOT in contact with the paper, so, the back of the fabric in contact with the paper.
- The fabric must “cover” the entire A6 figure of the paper and the remaining sides of it must be well distributed around. It should be left at least 1/4″ all around
- We put needles at each end of the line between the figure A6 and those we have already put before, in this case A4.
- To join the fabrics we have to face the fabrics with their right side, so we turn A6 over the rest already sewn matching the neddels holes. We can do it by inserting the needles back into the holes we had done before but with A6 turned. What I do is remove only the fabric A6, turn it around, and turn it into the needles by the holes made before.
- We attach with needles A6 to the paper, with attention that the needle does not pass through the line joining A6 and A4.
- We made a seam on to the paper over the line joining A6 and A4 with the fabrics in the other side.
- We have to start a little bit before the start of the line and finish a little bit after the end of the line.
- We fold the fabric A6 by the seam that we have done, in order to all the good fabric faces are up.
- We check against the light that the fabric A6 occupies the entire A56 space of the paper and there are the necessary margins to add the remaining fabrics in the surrounding area.
- We fold the paper by the sema to the bottom or top (see next picture), so that we only left the leftovers in one part.
- Warning with the good fabrics that tehy have to stay to the other side.
- We put the ruler parallel to the seam that we’ve made and cut to 1/4″ of the seam. In that way we will have an edge of 1/4″.
- We remove the fold of paper.
- We fold the fabric A6, by the seam, with the right face up.
- We iron the union of the two fabrics well so they are flat and stretched.
Joinig A7
- Put the A7 cloth on the back of the paper.
- The right face of the fabric must be the one that is NOT in contact with the paper, so, the back of the fabric in contact with the paper.
- The cloth has to “cover” all the A7 figure of the paper and the remaining sides must be well distributed all around. It should be left at least 1/4″ all around.

- We put needles at each end of the line between figure A7 and those that we have already sewn before, in this case A3 and A6.
- To join the fabrics we have to face the fabrics with their right side, so we turn A7 over the rest already sewn matching the neddels holes. We can do it by inserting the needles back into the holes we had done before but with A7 turned. What I do is remove only the fabric A7, turn it around, and turn it into the needles by the holes made before.
- We attach with needles A7 to the paper, attending that the needle does not cross through the line joining A7 and A3-A6.
- We made a seam on to the paper over the line joining A7 and A3-A6 with the fabrics in the other side.
- We have to start a little bit before the start of the line and finish a little bit after the end of the line.
- We fold the fabric A7 by the seam that we have done, in order to all the good fabric faces are up..
- We check against the light that the fabric A7 occupies the entire A7 space of the paper and there are the necessary margins to add the remaining fabrics in the surrounding area.
- We fold the paper by the sema to the bottom or top (see next picture), so that we only left the leftovers in one part.
- Warning with the good fabrics that tehy have to stay to the other side.
- We put the ruler parallel to the seam that we’ve made and cut to 1/4″ of the seam. In that way we will have an edge of 1/4″.
- We remove the fold of paper.
- We fold the fabric A7, by the seam, with the right face up.
- We iron the union of the two fabrics well so they are flat and stretched.
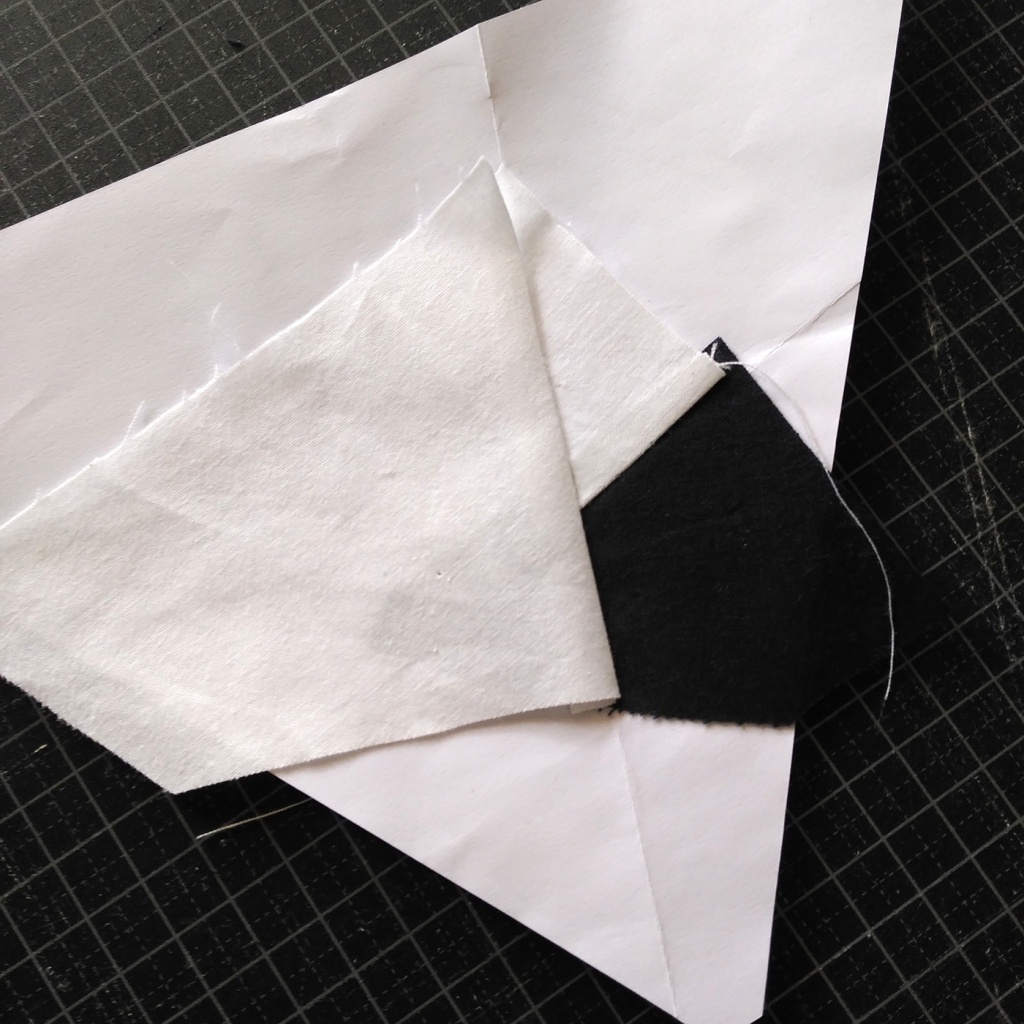
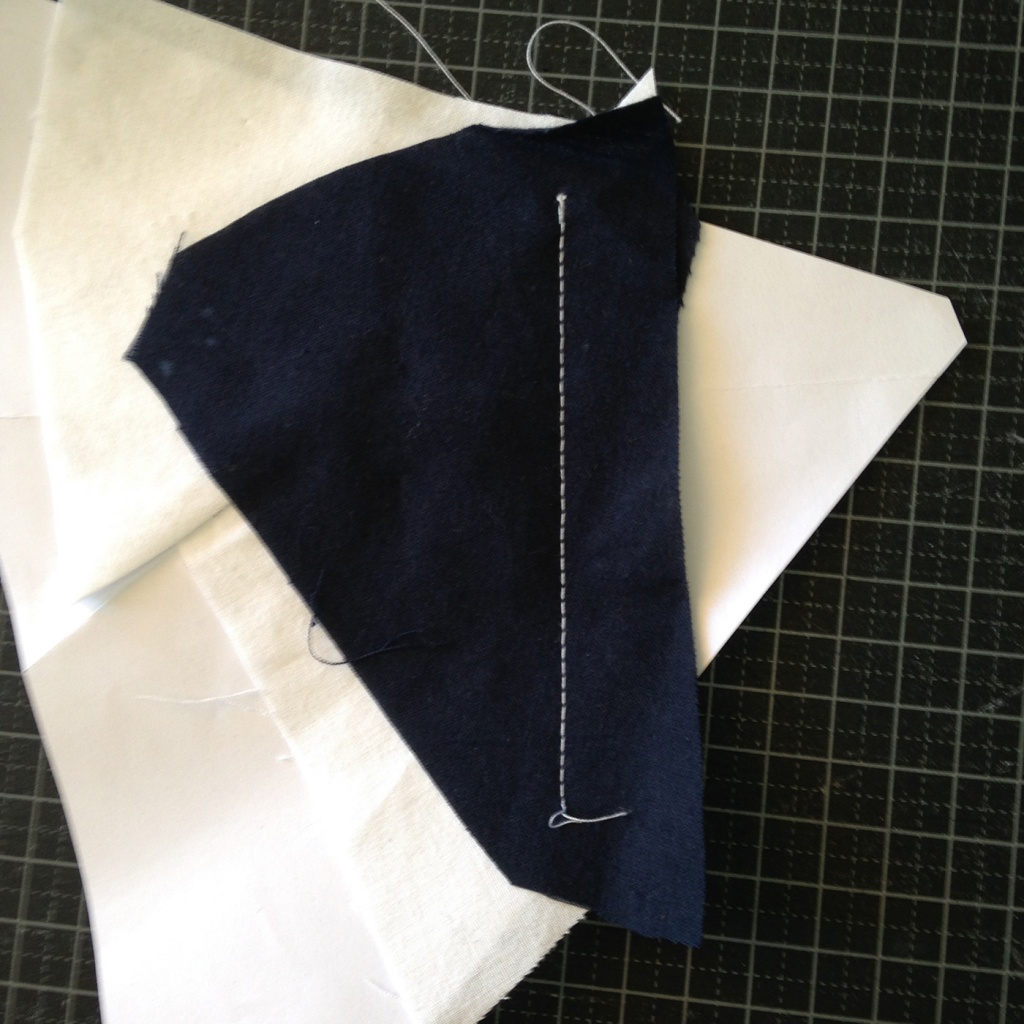
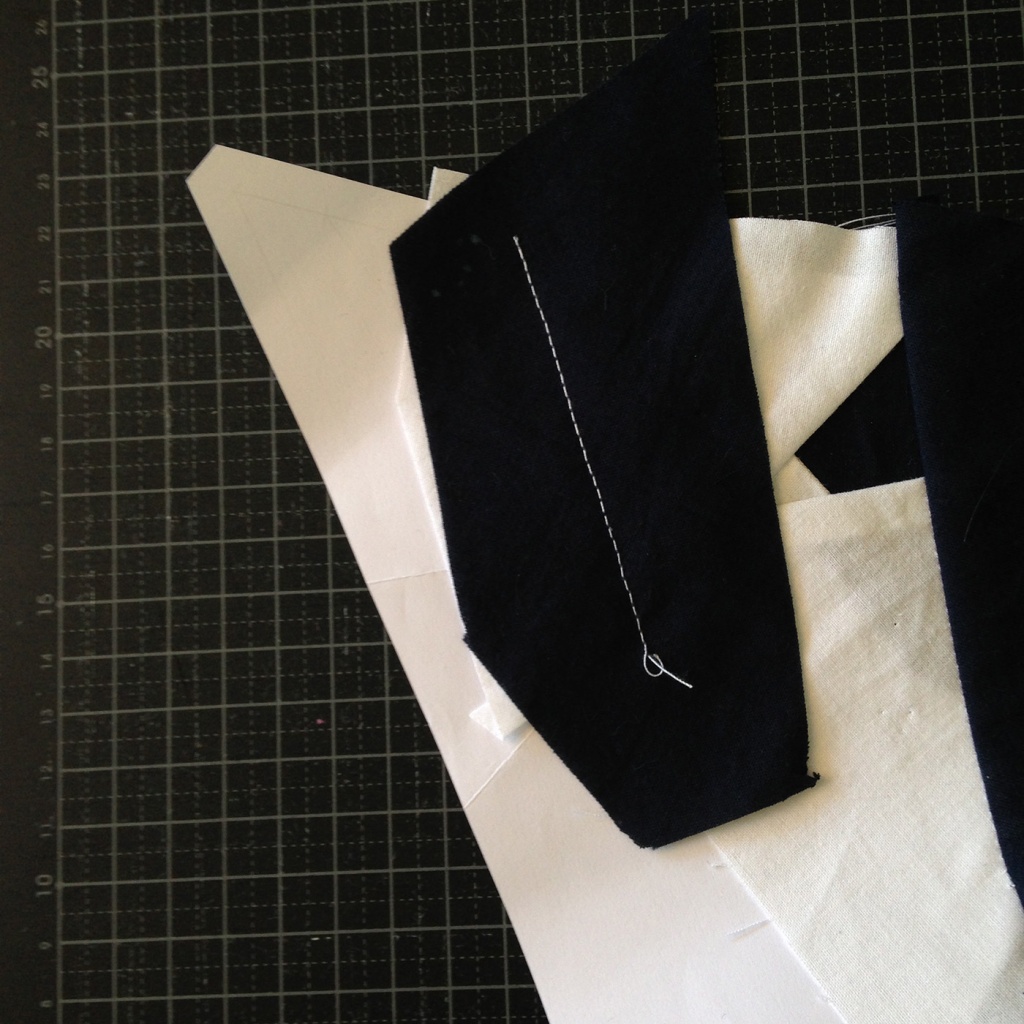
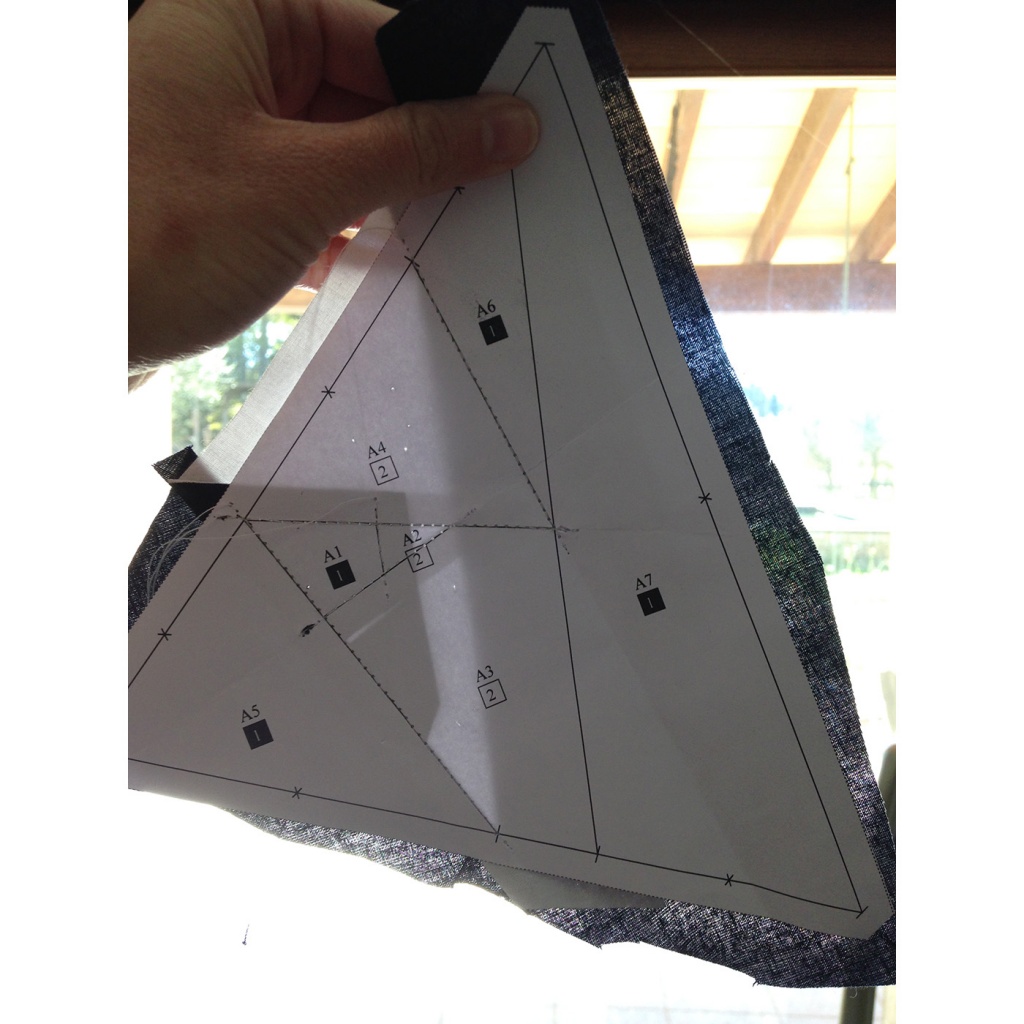
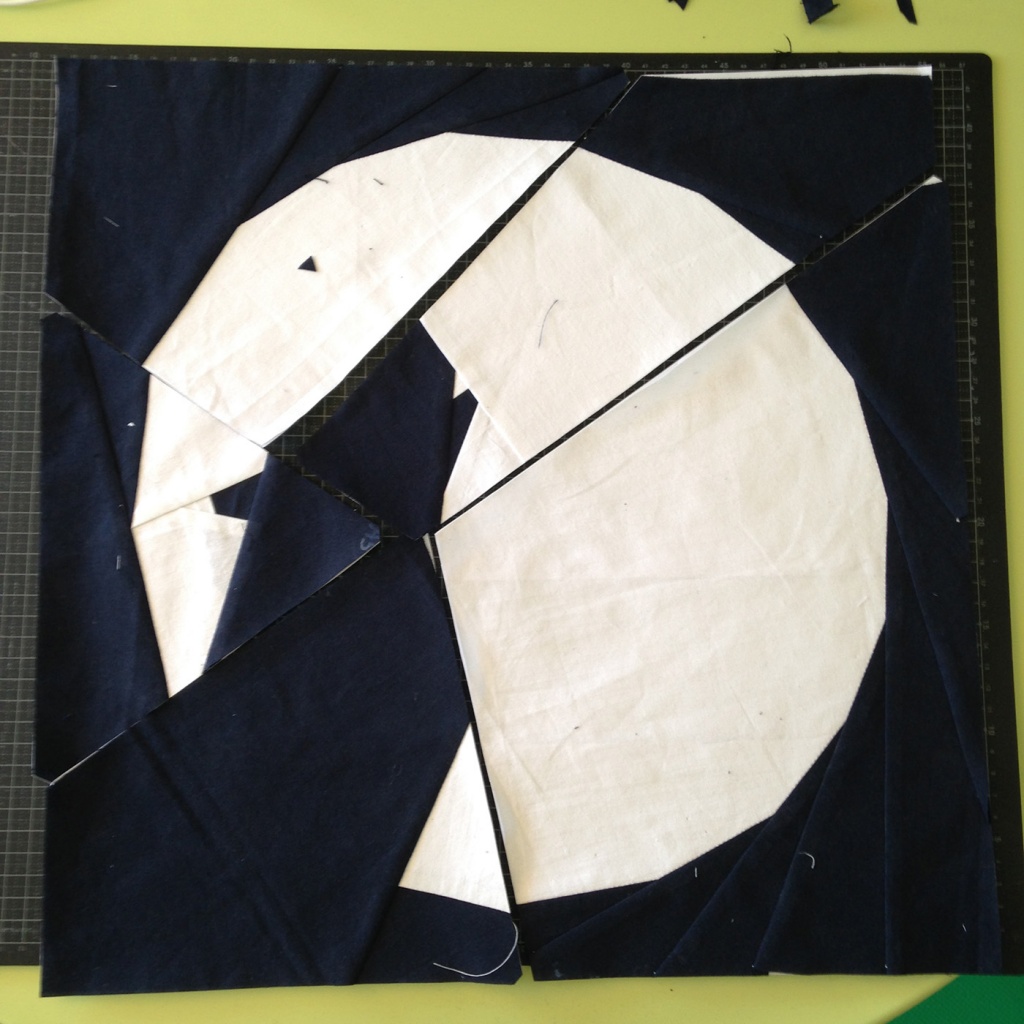
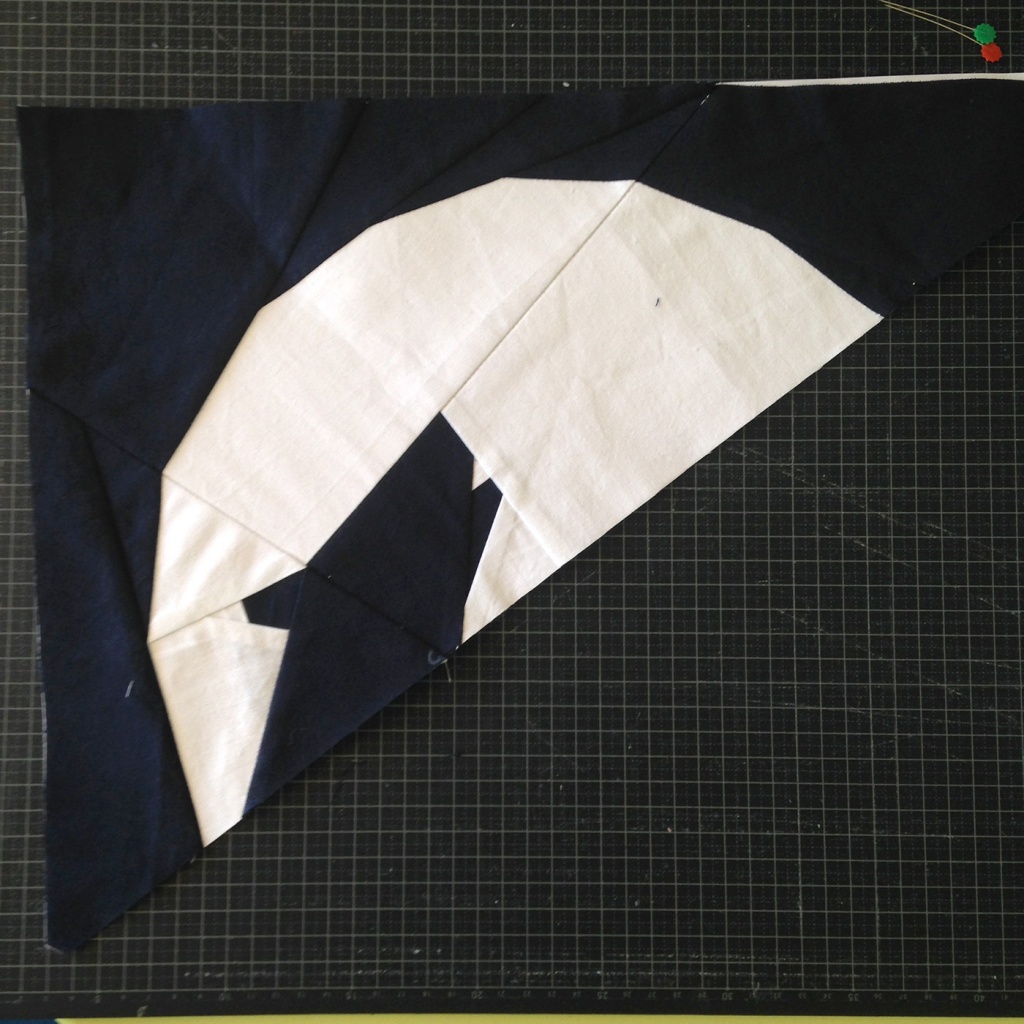
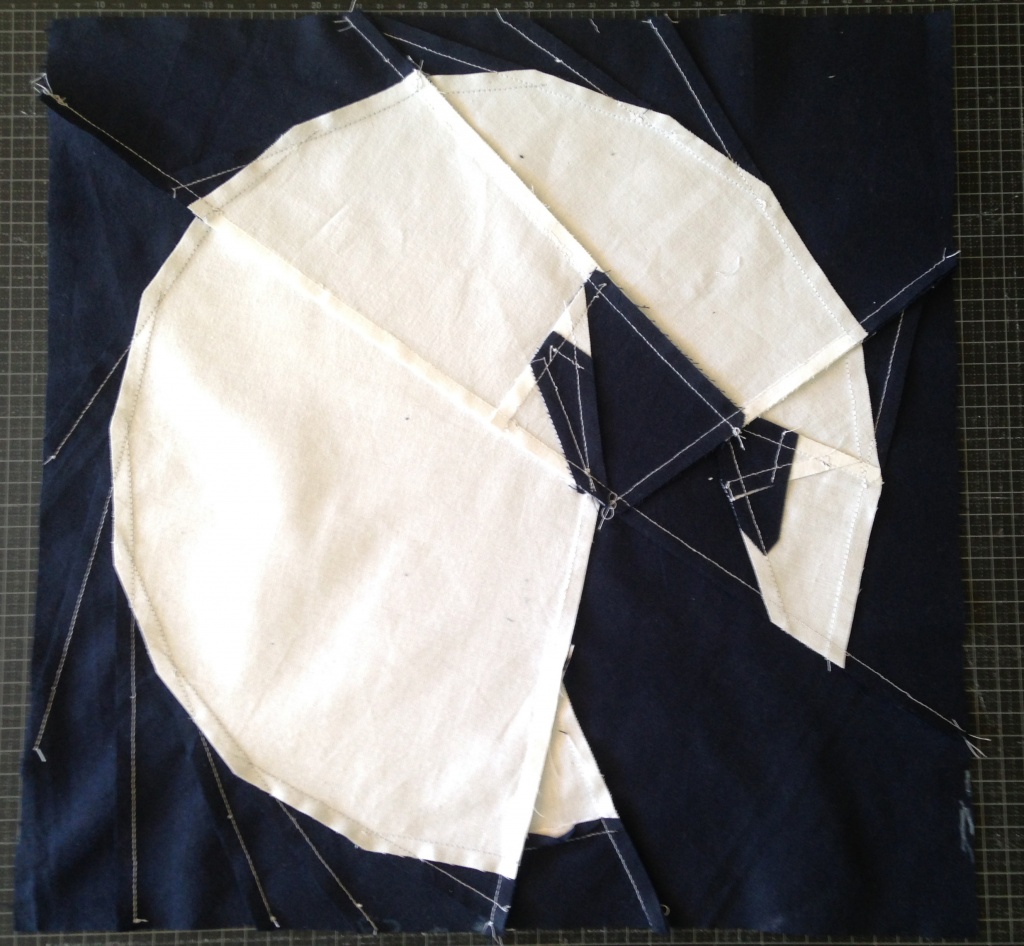
Cutting out fabric leftovers Section A
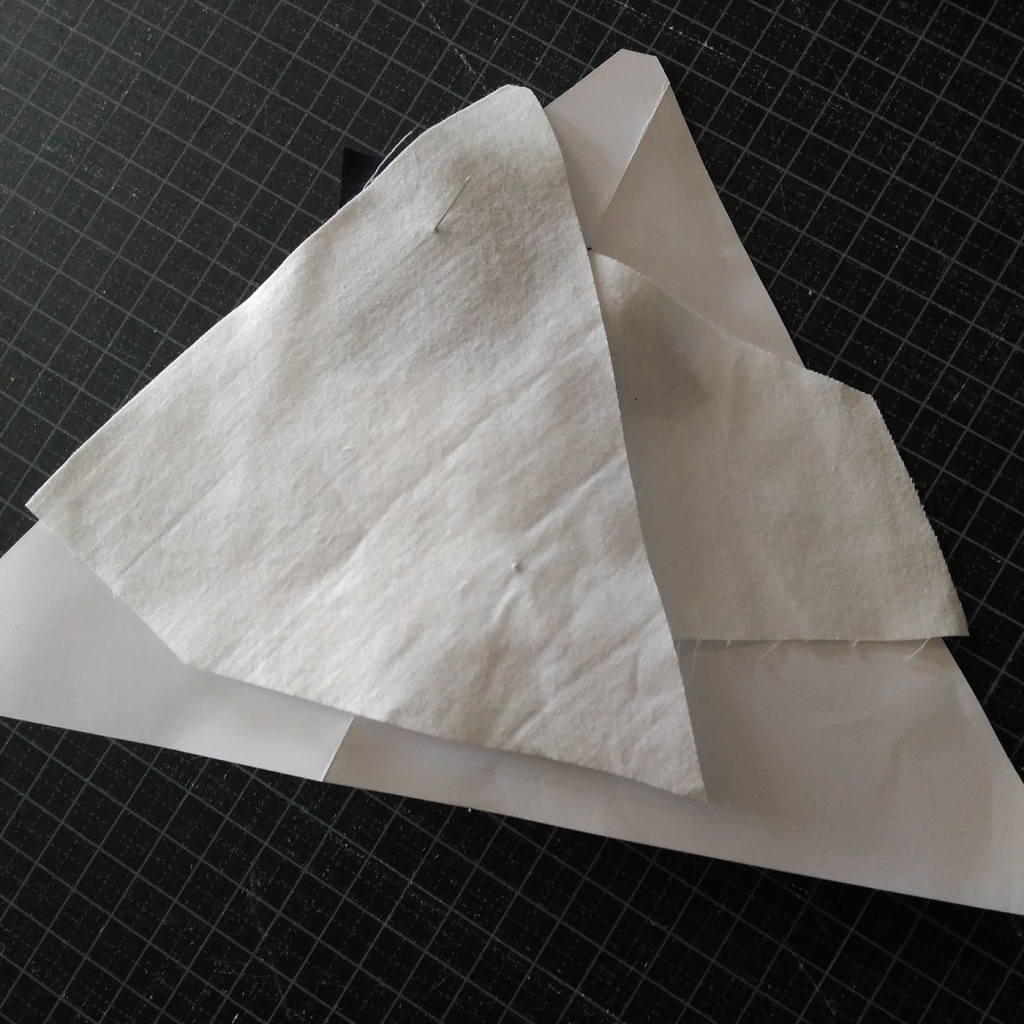
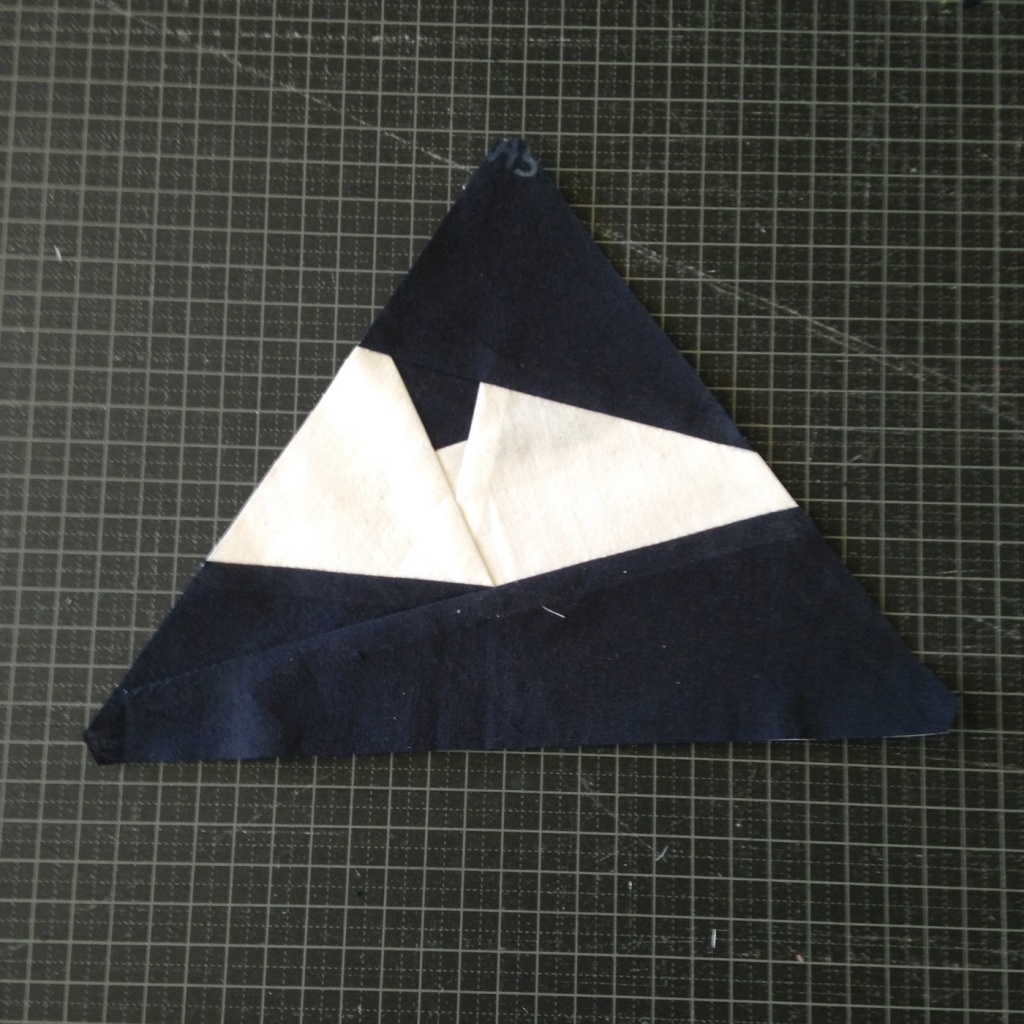
The result after having sewn all the fabrics in Section A is:
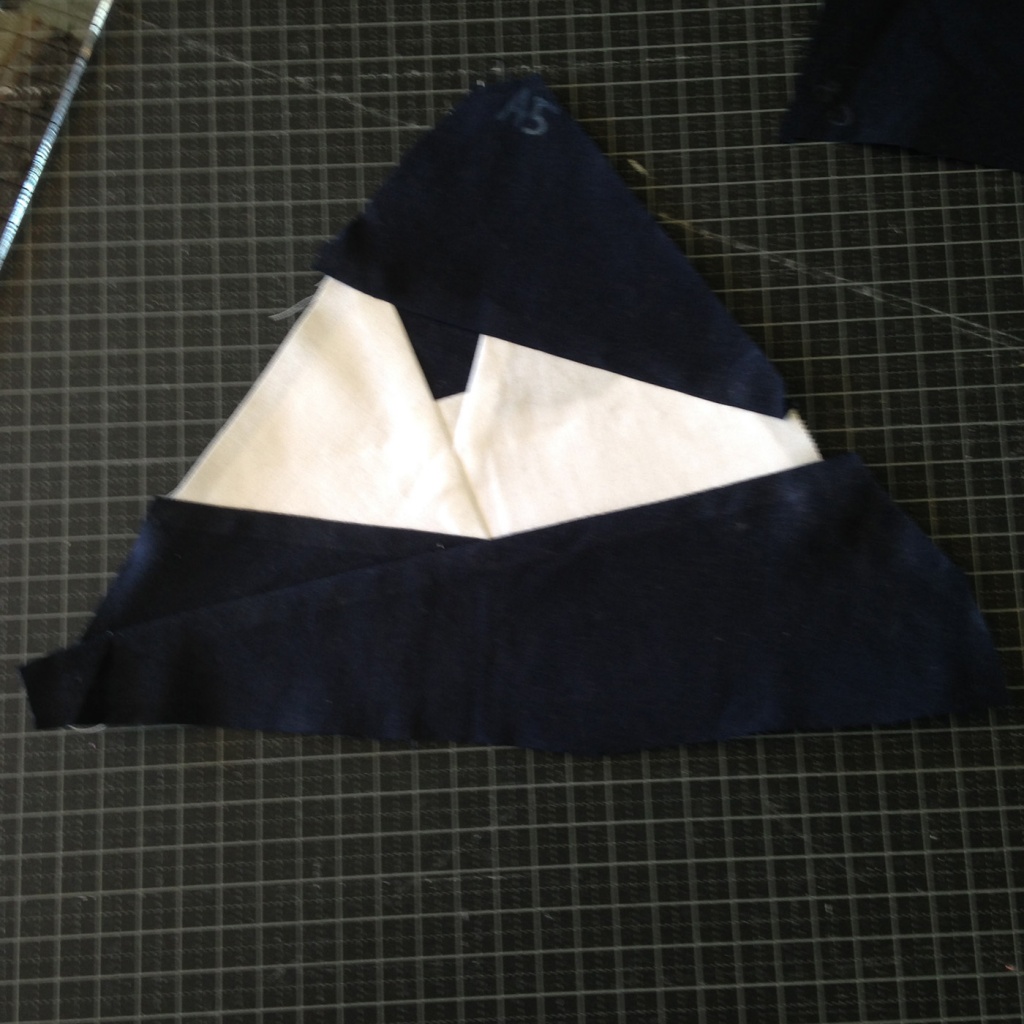
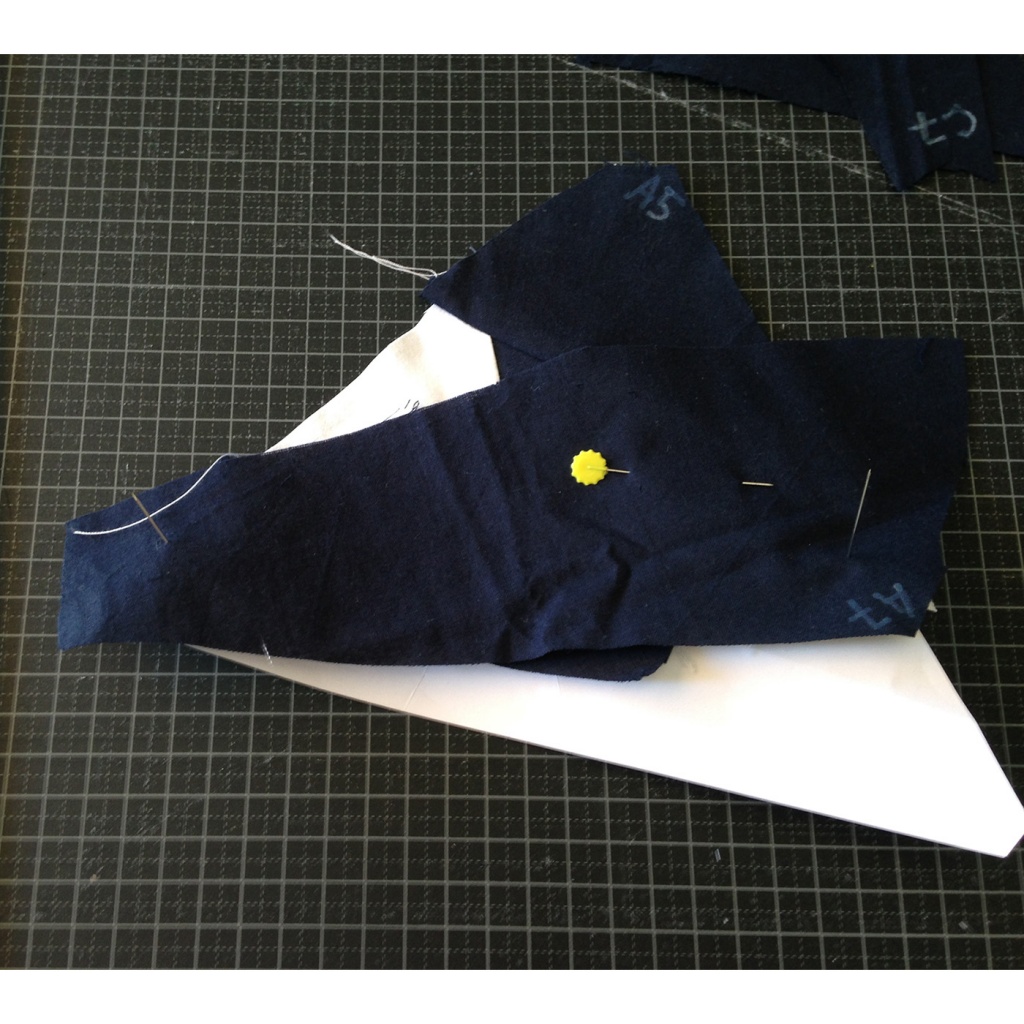
Now we have to remove the fabric surplus from the outside of the paper:
- Put the ruler just on the side of the paper and cut the surplus fabric.
- Let’s repeat on all sides of the section.
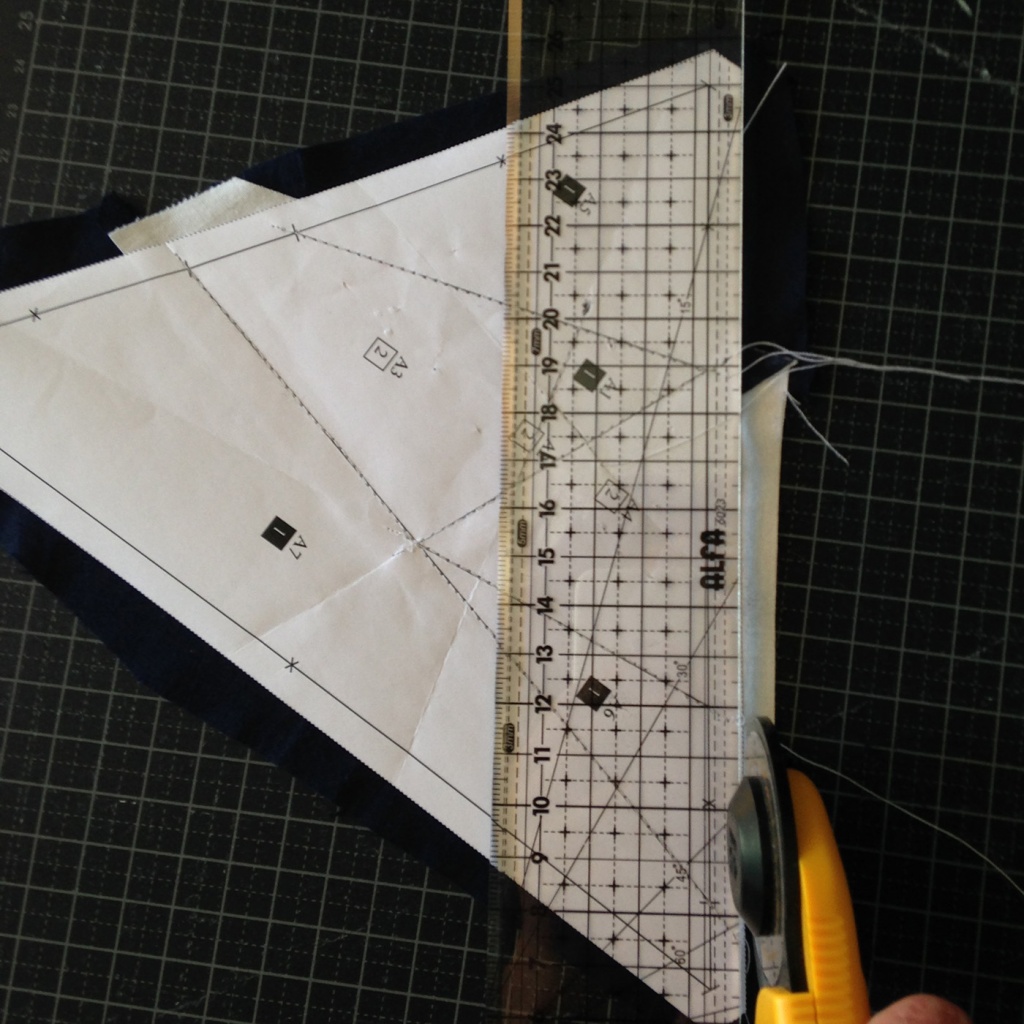
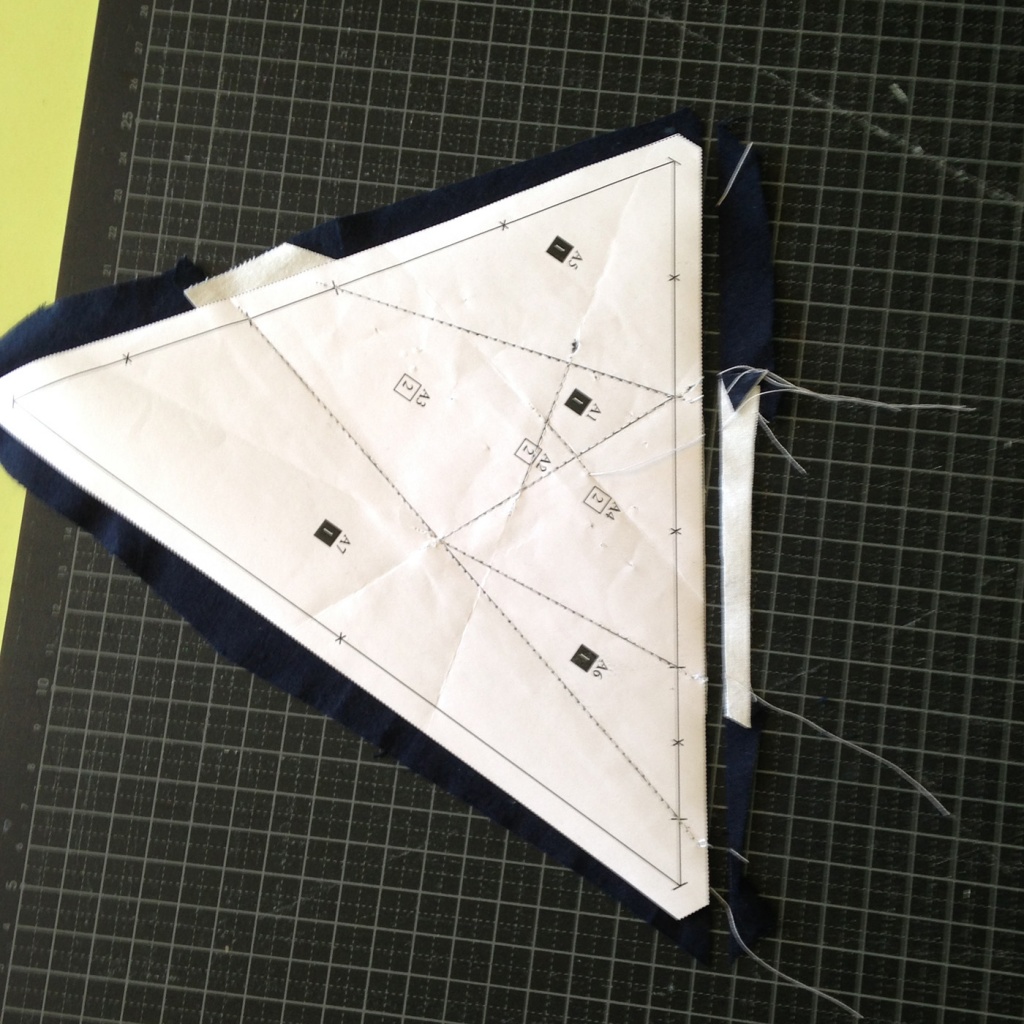
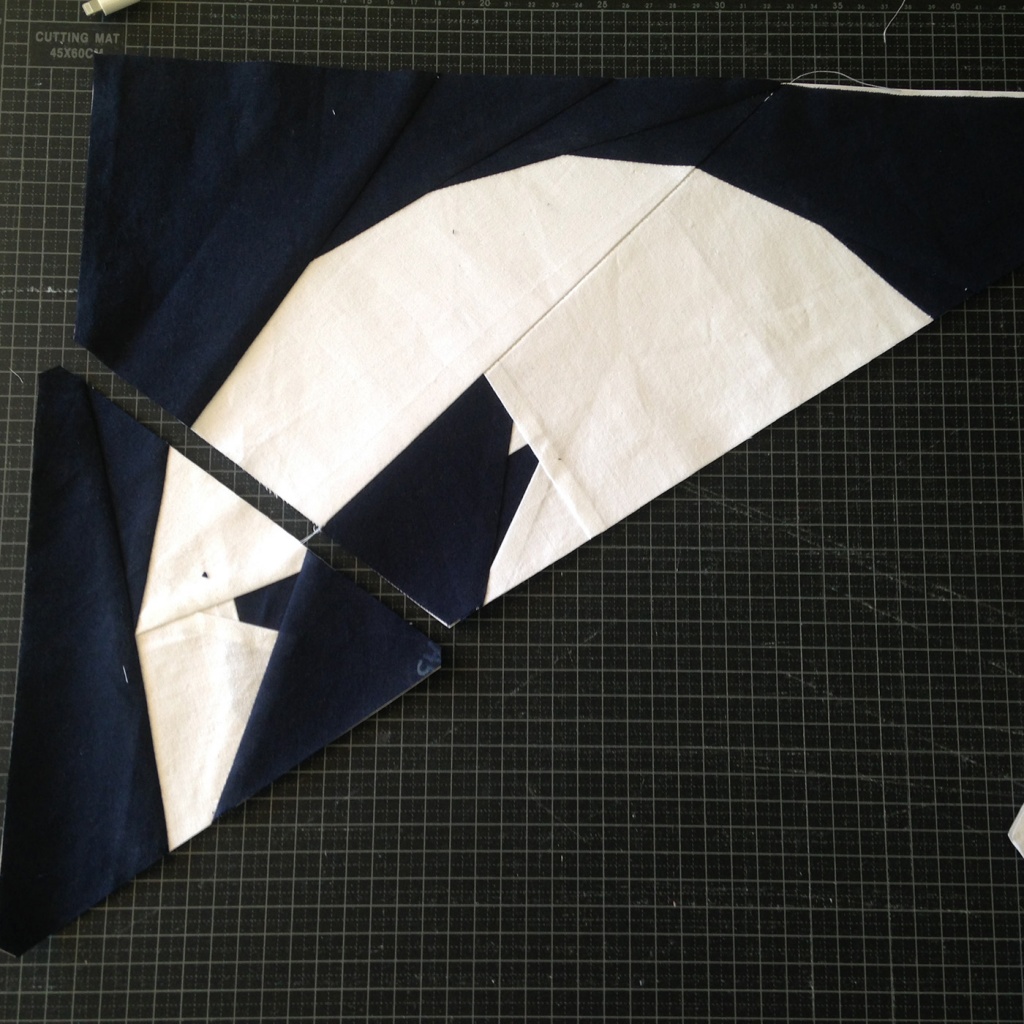
And the final result of this Section will be:
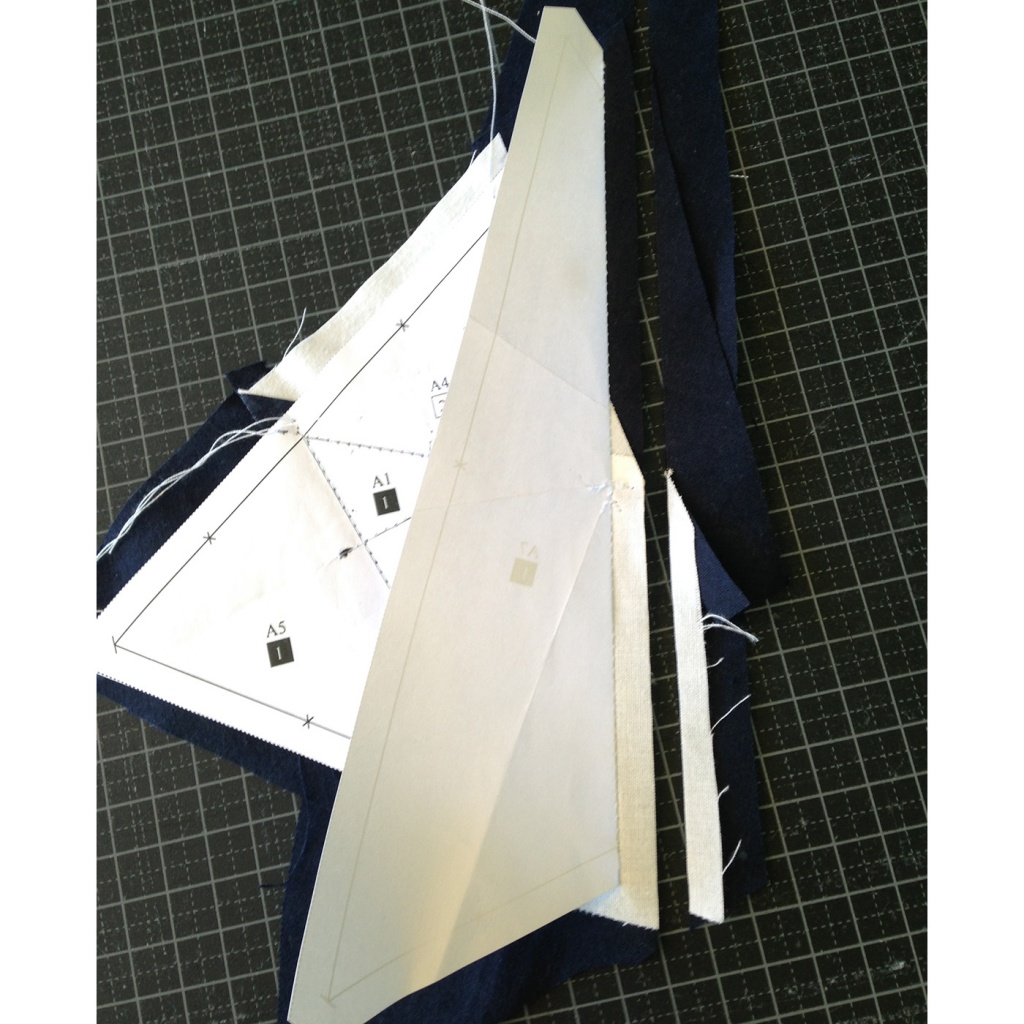
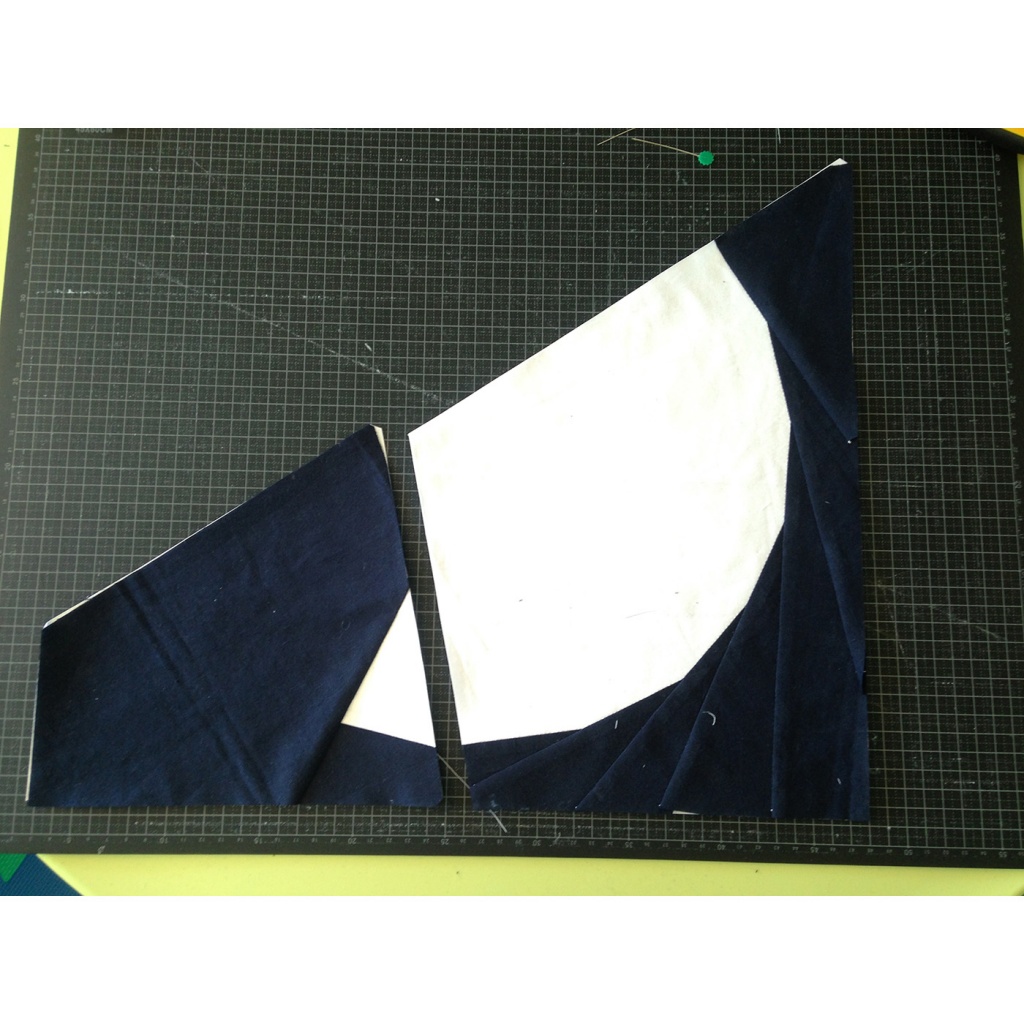
Assembling other sections
Now, with the same procedure that Section A you have to do the assembly of the other sections.
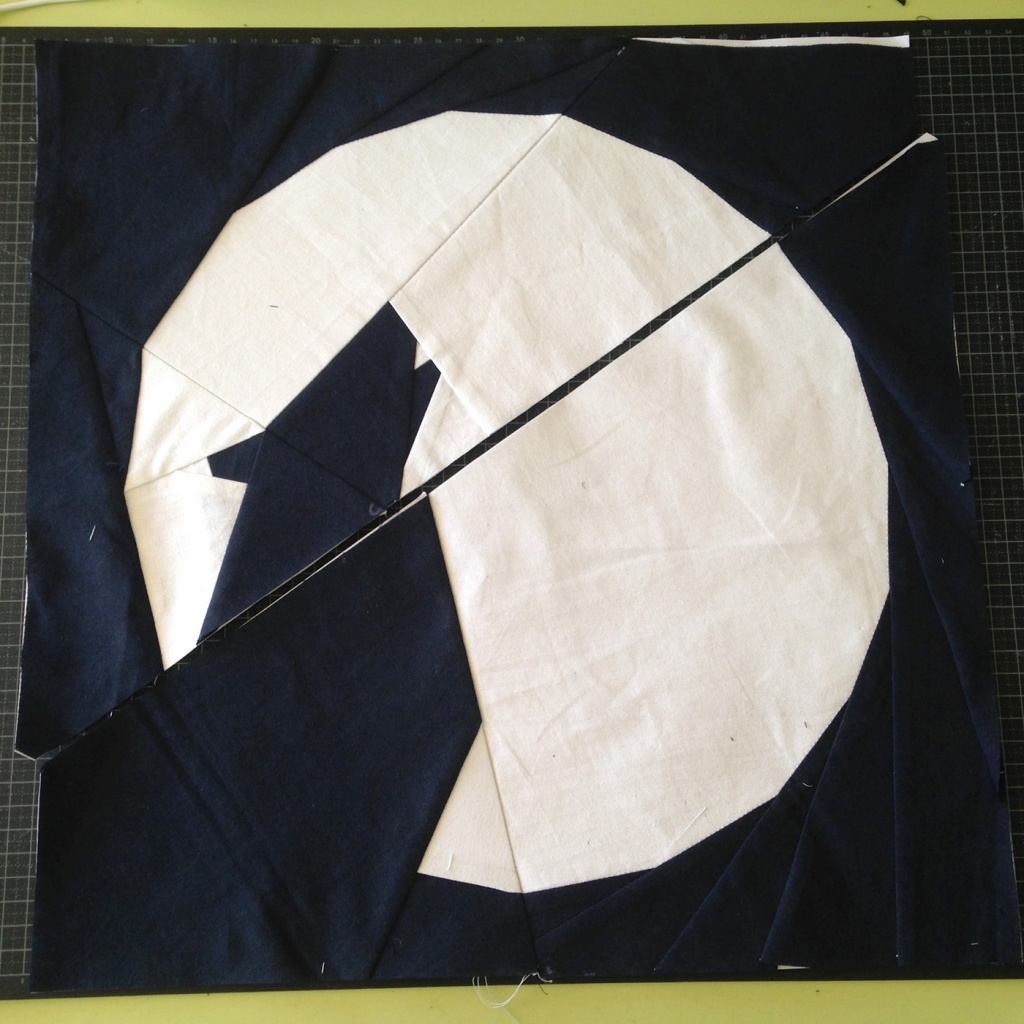
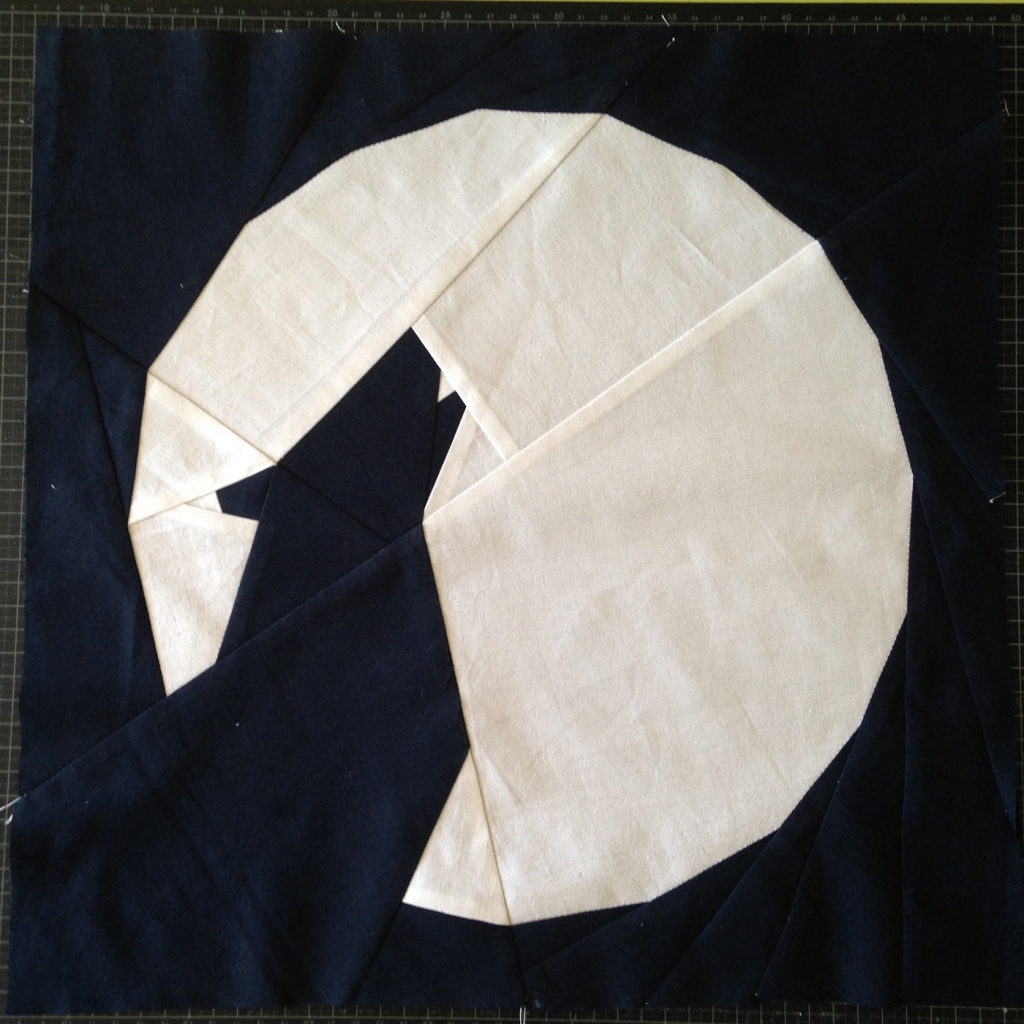
And the final result by placing all the sections according to the drawing that I have already shown at the beginning will be:
You can see that on the part of the paper the drawing is mirroed but when we put the fabrics on top we already see what will be the final result.
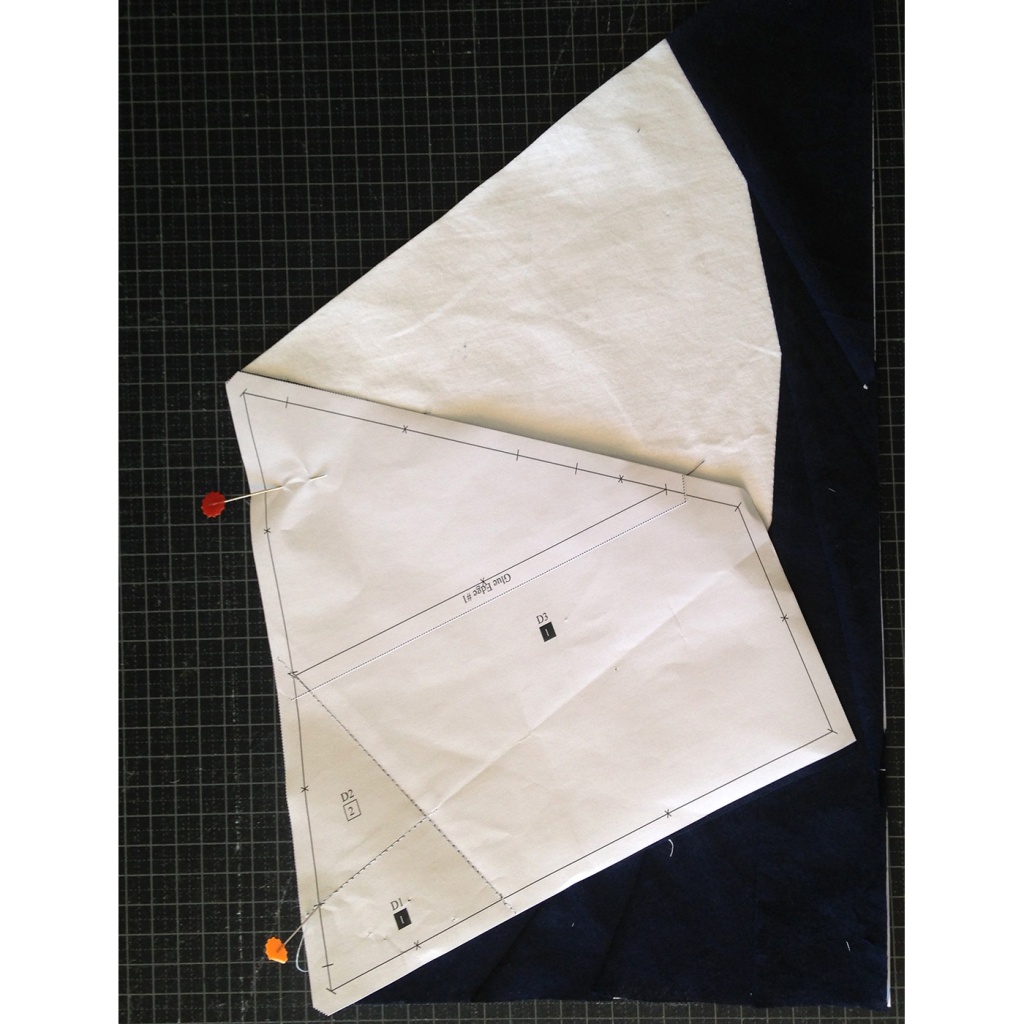
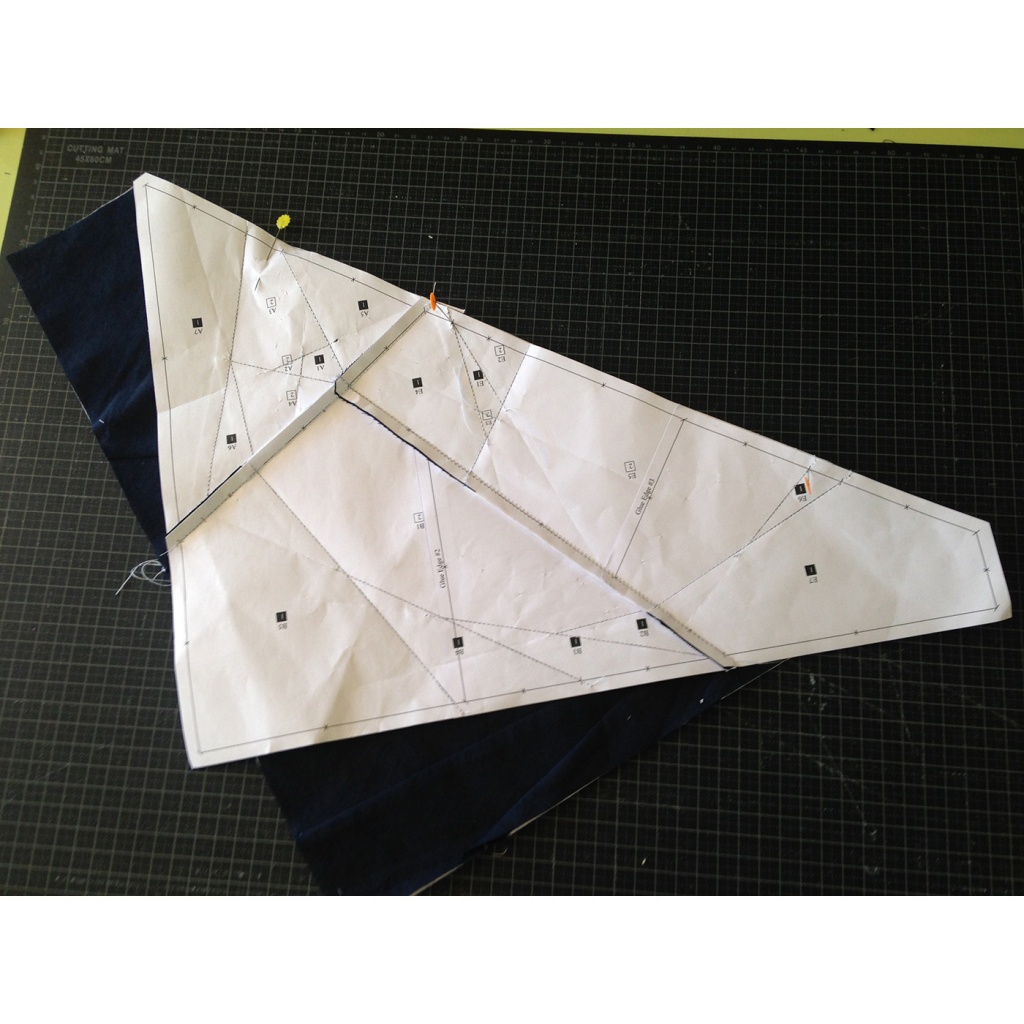
Joining the Sections
To finish, we have to join the Sections as indicated in the instructions on page 3 of the pattern document.
In paper piecing, due to the shape shape of the sections, like a puzzle, they must be united in a certain order. In our case the order will be:
- Joining E to B. (fold the seam margin on B)
- Joining A to E + B. (fold the seam margin on A)
- Joining C to D. (fold the seam margin on D)
- Joining A + (E + B) to C + D. (fold the seam margin on C + D)
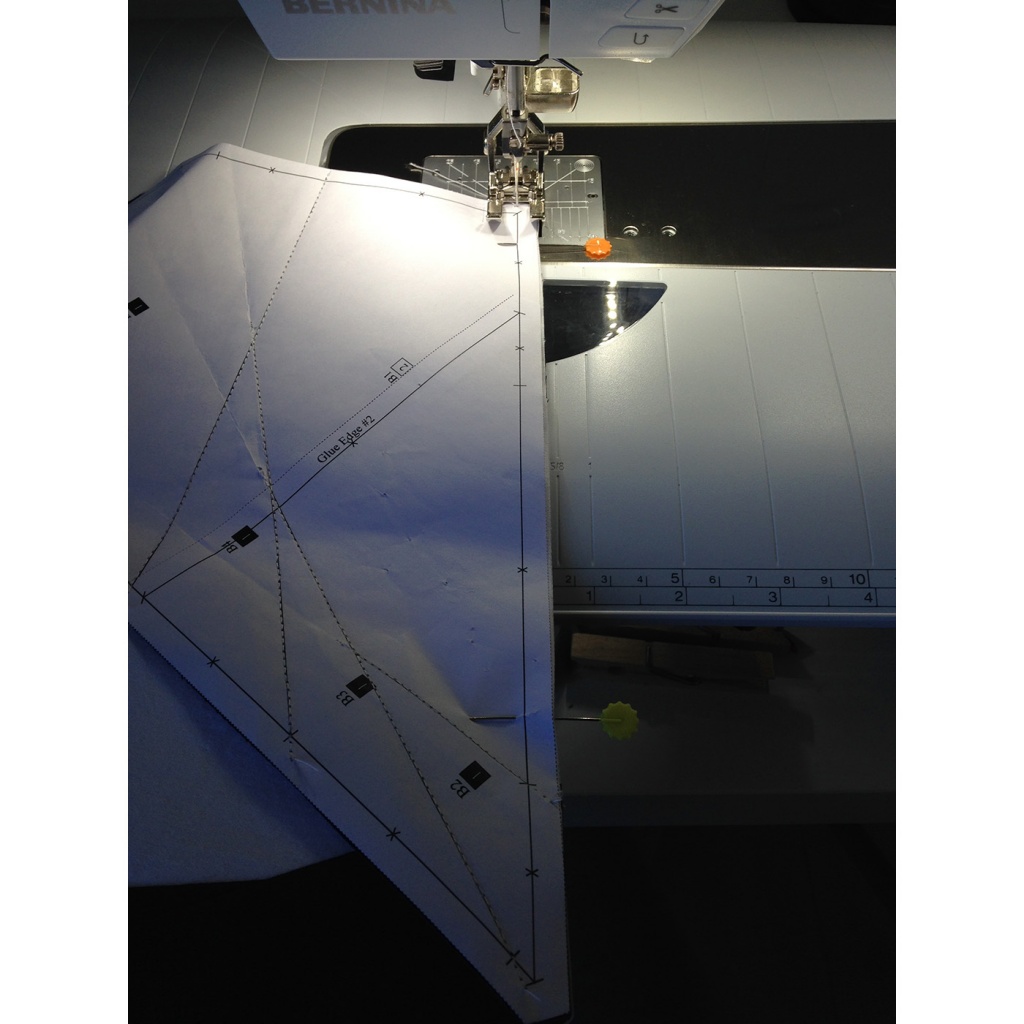
Joinig E to B
The first sections we have to join are E and B.
- We put sections E and B side by side like the instructions diagram indicates and turn around one of them so that they are good face with good face. In this case, E over B.
- Take special care at the unions marked with a cercle on the diagram of the instructions. They are where are attached two different colors in a section that must be coupled with a similar point in the other section. For this, I introduced a vertical needle that goes through the two unions, one of each section, and this defines a little the position of one section towards the other.
- We hold it all with needles or tweezers.
- We made a seam over the 1/4″ line margin.
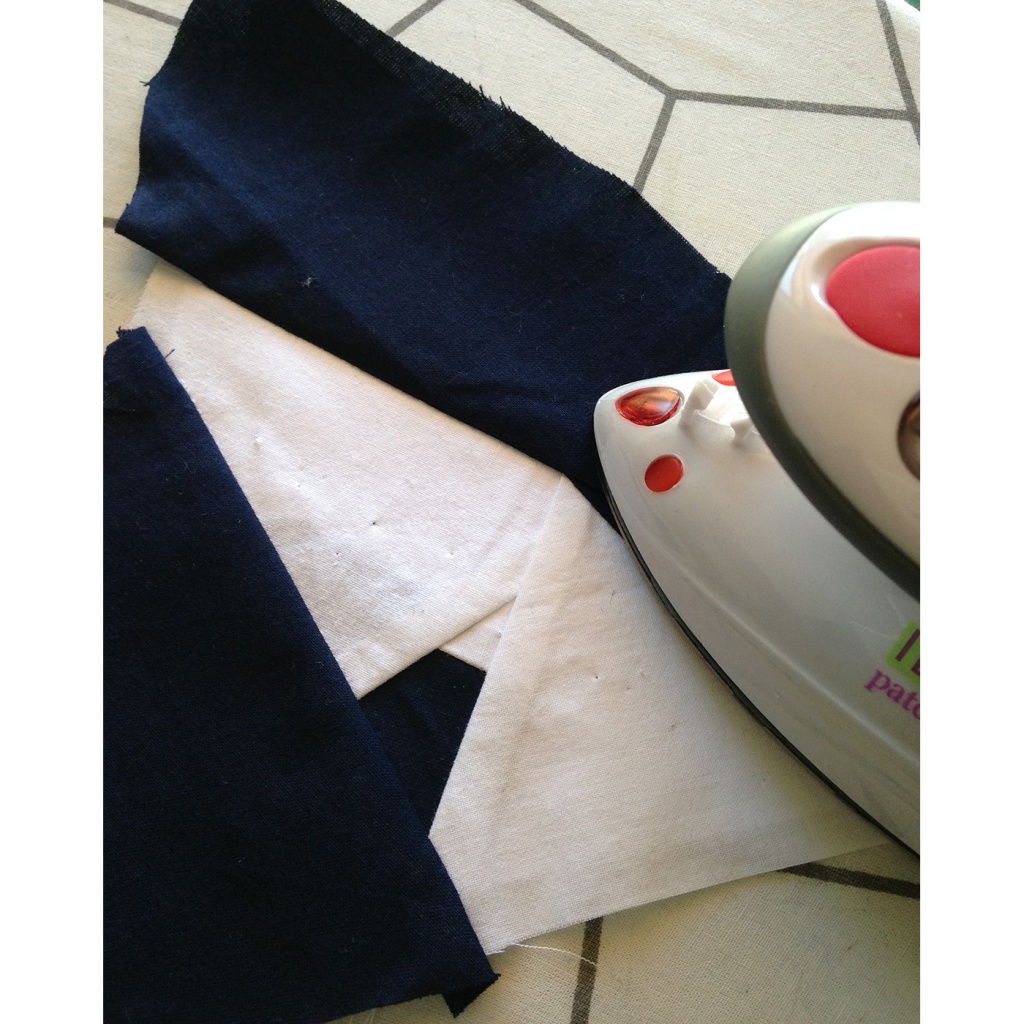
- We open the sections and fold the seam margin over Section B. Given the thickness of this margin, we will have to iron it well.
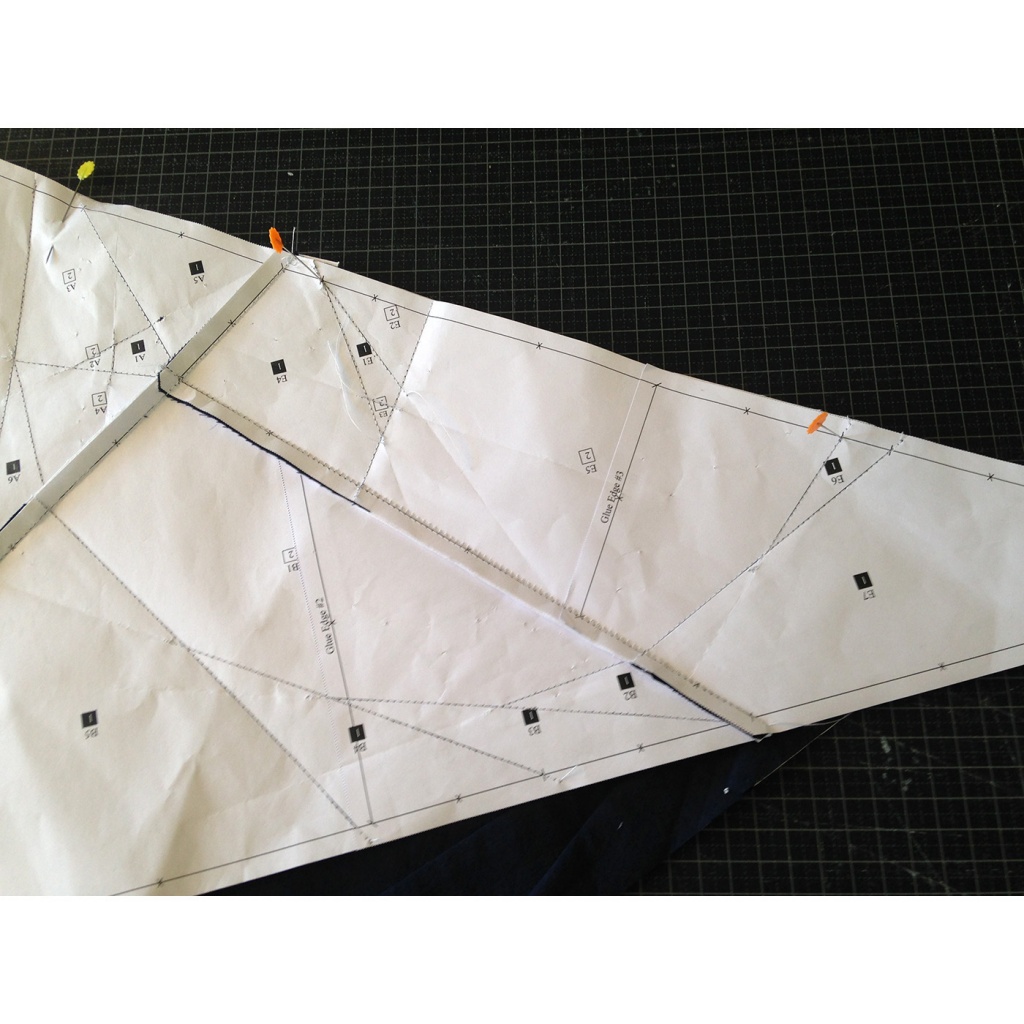
Join A to E + B
- We put sections A and E+B side by side like the instructions diagram indicates and turn around one of them so that they are good face with good face. In this case, I put A over the other two.
- Take special care at the unions marked with a cercle on the diagram of the instructions. In this case, there are two. They are where are attached two different colors in a section that must be coupled with a similar point in the other section. For this, I introduced a vertical needle that goes through the two unions, one of each section, and this defines a little the position of one section towards the other.
- We hold it all with needles or tweezers.

- We made a seam over the 1/4″ line margin.
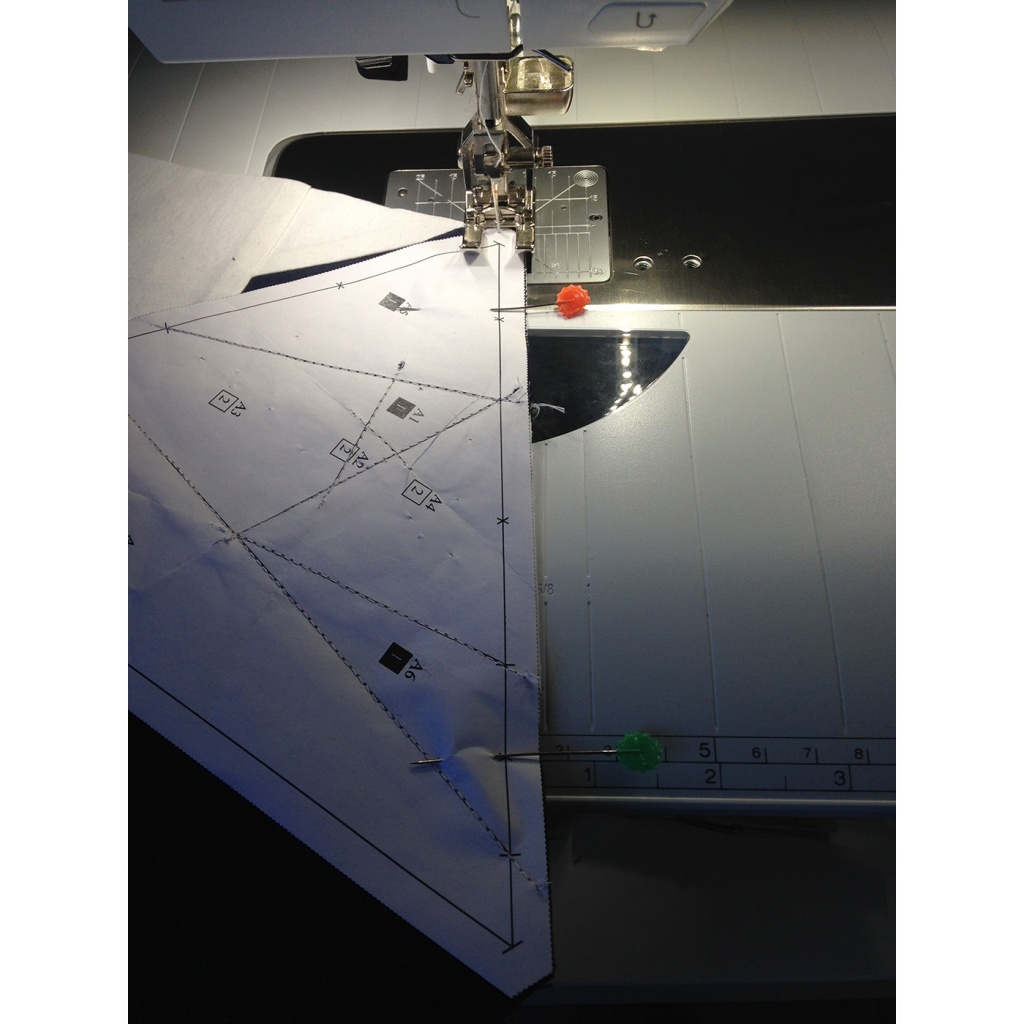
- We open the sections and fold the seam margin over Section A. Given the thickness of this margin, we will have to iron it well.
Joining C to D
- We put sections C and D side by side like the instructions diagram indicates and turn around one of them so that they are good face with good face. In this case, I put D over C.
- Take special care at the unions marked with a cercle on the diagram of the instructions. In this case, there is one. They are where are attached two different colors in a section that must be coupled with a similar point in the other section. For this, I introduced a vertical needle that goes through the two unions, one of each section, and this defines a little the position of one section towards the other.
- We hold it all with needles or tweezers.
- We made a seam over the 1/4″ line margin.
- We open the sections and fold the seam margin over Section D.
Joining A + (E + B) and C + D
- We put sections A + (E + B) and C + D side by side like the instructions diagram indicates and turn around one of them so that they are good face with good face. In this case, I put A + (E + B) over the C + D.
- Take special care at the unions marked with a cercle on the diagram of the instructions. In this case, there are two. They are where are attached two different colors in a section that must be coupled with a similar point in the other section. For this, I introduced a vertical needle that goes through the two unions, one of each section, and this defines a little the position of one section towards the other.
- We hold it all with needles or tweezers.
- We made a seam over the 1/4″ line margin.

- We open the sections and fold the seam margin over Section C + D.

Replace paper and it’s finished!
We already have everything sewn! Now we just have to remove the paper. A boring job but if you have children around they will enjoy !!
And it’s finished. Now you can quilt it, use it to make a pillow case or whatever you want!
I hope this tutorial has been useful for you to start or refresh the “foundation paper piecing” technique. There are many ways to do things and here I’ve exposed you mine.
I would love you to give me your opinion on the tutorial and if you find something missing or that should be changed, please let me know. That’s how we help each other!
I hope you have started a new hobby and you will surely enjoy a lot this technique that is very entertaining!