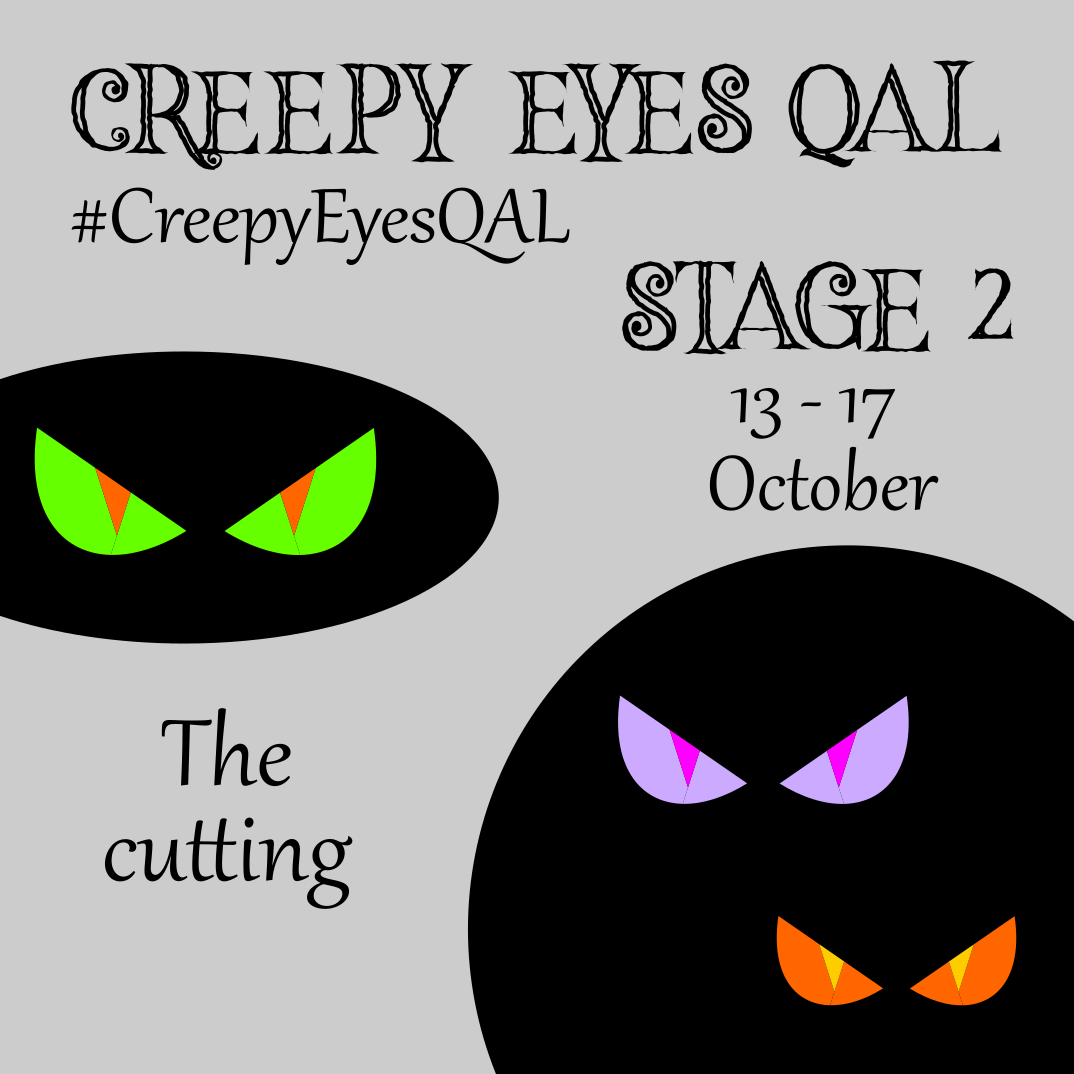
Welcome to the Stage 2 of the Creepy Eyes Quilt-Along: The cutting!!
Do you have the Creepy Eyes Quilt pattern, fabrics and materials ready to start cutting? Sure you have! I’ve seen some amazing shares on Instagram! Keep sharing your progress and you will have more options to win the amazing prize from Quilt Pattern Mart at the end of this Stage 2. And as many pictures you share, more numbers to win!
Let’s cut!
Every one of us has our ways in the quilting process, and my way with the cutting is that I like to cut ALL before starting to sew. I love the feeling of starting to sew and don’t stop until I have all the pieces assembled, and having all cut and organised at the beginning gives me the basis to do that and full enjoy the sewing part.
So, what do we need to cut in a Creepy Eyes project before starting to sew?
- Templates
- Organising labels
- Fabrics
Before I start, I want you to make a reflection about the fabrics. I forgot to mention it in the previou stage and I think it is a good moment now: Starch or not starch the fabrics? Some people go to the fabric shop, buy the fabrics and go home to start cutting the fabrics and others prefer to pre-wash the fabrics, dry them, starch them and then start cutting, all like another part of the quilting process. I don’t starch the fabrics and I can’t tell you a lot about it. I use to pre-wash my fabrics, not fully dry them and then iron them. What do you do? Does it depend on the project or the kind of fabric? (for example linen or woven) Tell me in the comments!!
If you want to know more info about the starch process, Suzy Quilts has a blog post with some information about it.
1. The templates!
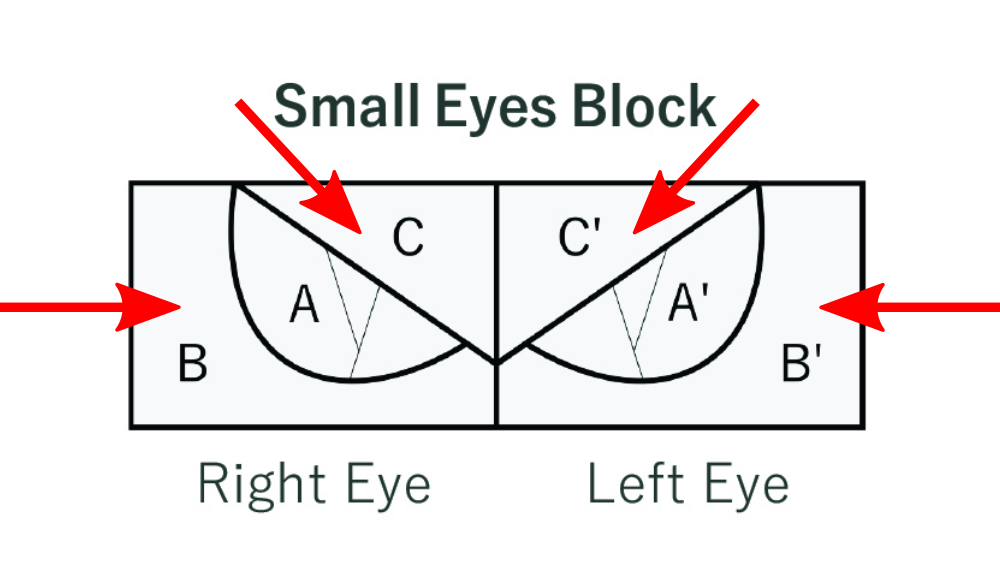
The Creepy Eyes Pattern has 3 different sewing parts: the foundation paper piecing and the curved piecing for the Eye Blocks, and the traditional piecing for the final top assembly.
For the two different techniques in the Eyes Blocks, we need 2 different kinds of templates.
- The Eyes: that will be sewn with foundation paper piecing, and we need one foundation paper piecing template for every eye (unless you are using the freezer paper technique. Check this tutorial to know more about it).
- The background of the Eye blocks, every eye has 2 background pieces, one curved piece. For those 2 pieces we need cutting templates. Since those pieces are mirrored in the 2 eyes of a block eye, we just need 1 of every one of every background piece. You will see below when we cut the fabrics.
So, we need as many FPP eyes templates as many eyes we want to sew, and only one cutting template for the 2 Eyes block background pieces per size. It means, for example in the baby size we will sew:
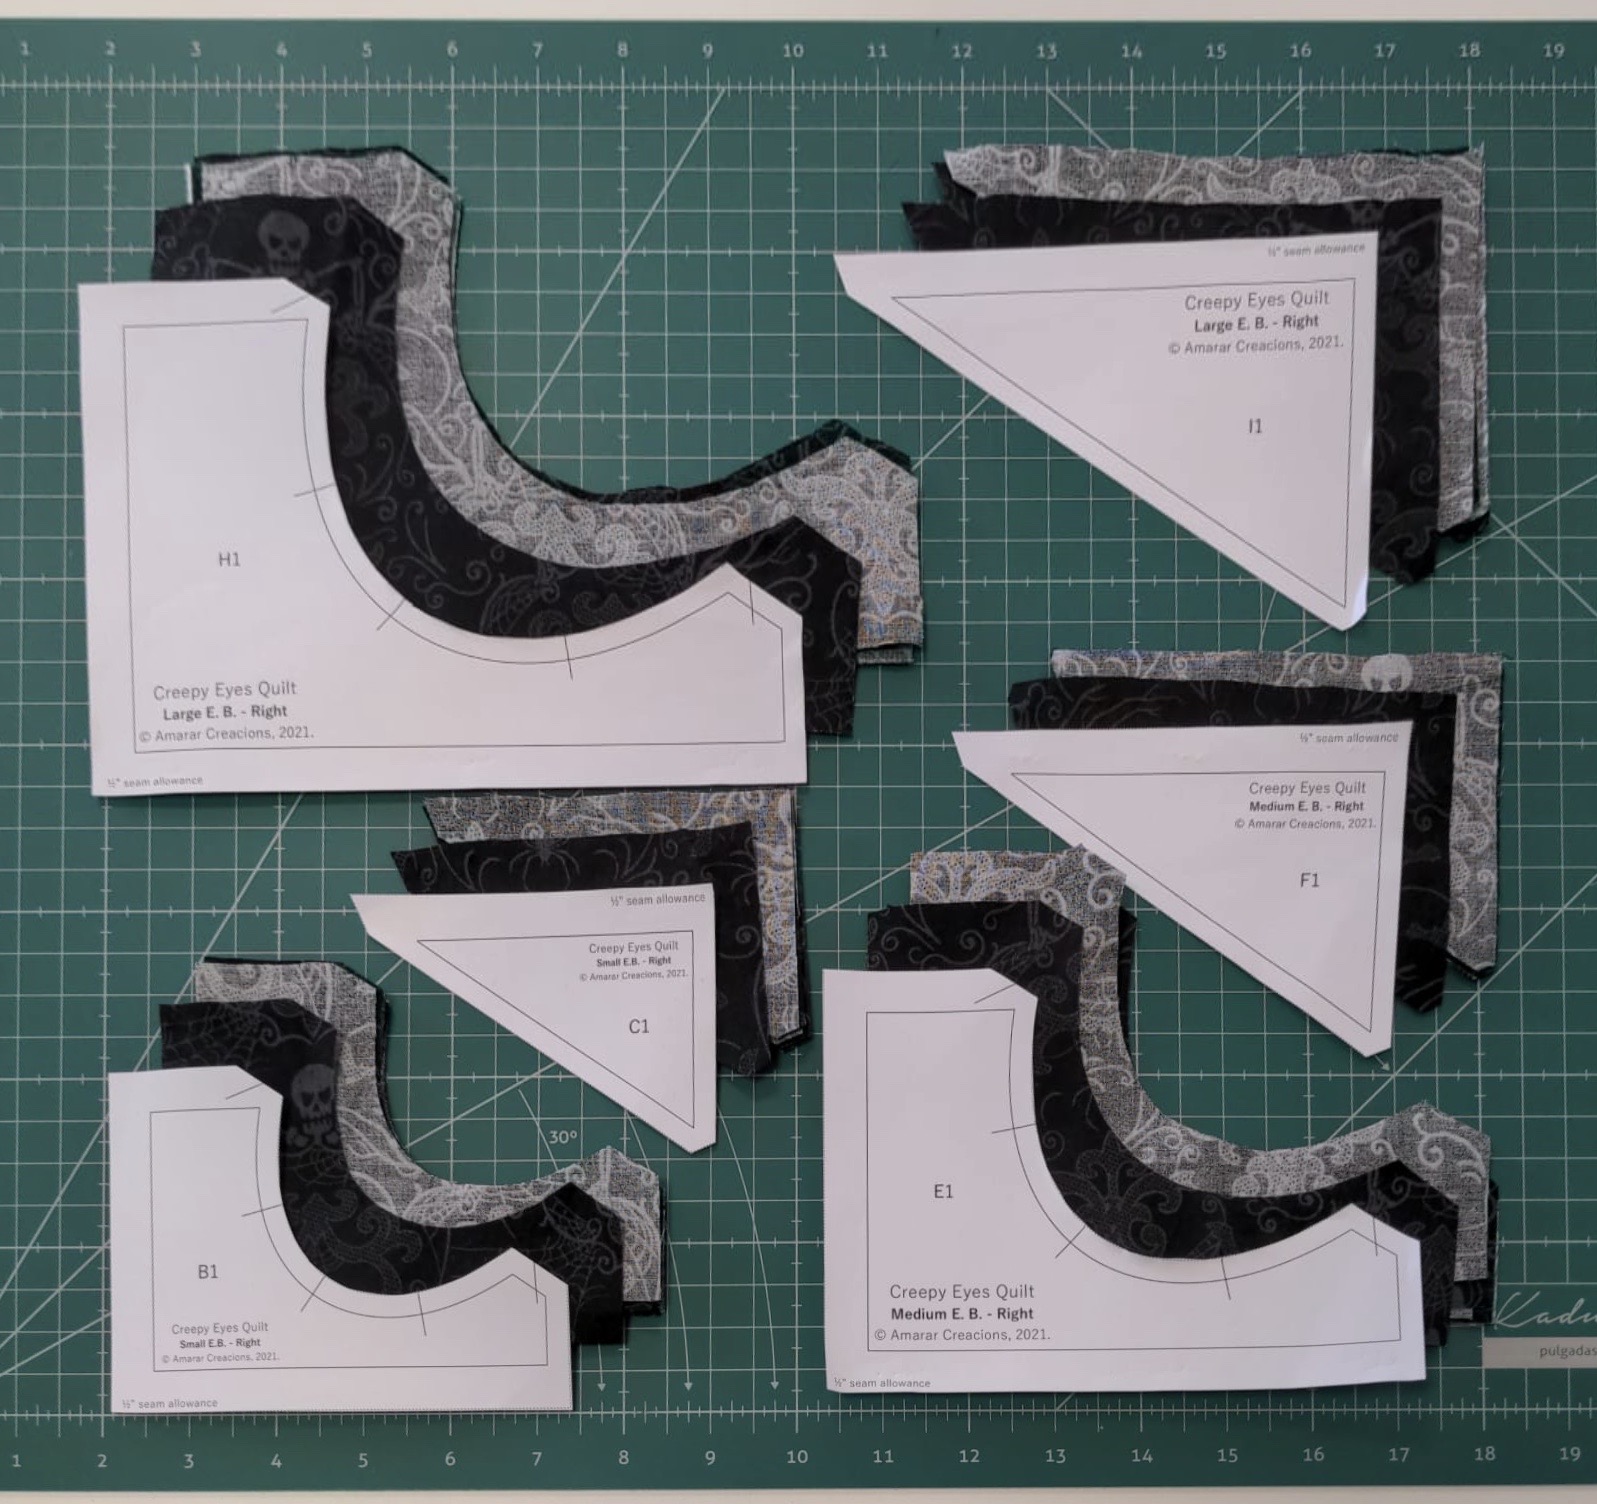
- 4 small eyes, so we need 8 FPP templates and 1 cutting template for the curved piece and 1 cutting template for the triangle. 10 templates in total.
- 3 medium eyes, so we need 6 FPP templates and 1 cutting template for the curved piece and 1 cutting template for the triangle. 8 templates in total.
- 3 large eyes, so we need 6 FPP templates and 1 cutting template for the curved piece and 1 cutting template for the triangle. 8 templates in total.
I have set up the pattern in the way you only have to print the pages indicated in page 16 for the pillow and baby sizes, so you don’t have to think of the templates you need. But you have to have it in mind in case you want to custom your project and sew a different number of eyes.
Here you have the templates I printed and cut for the baby size.

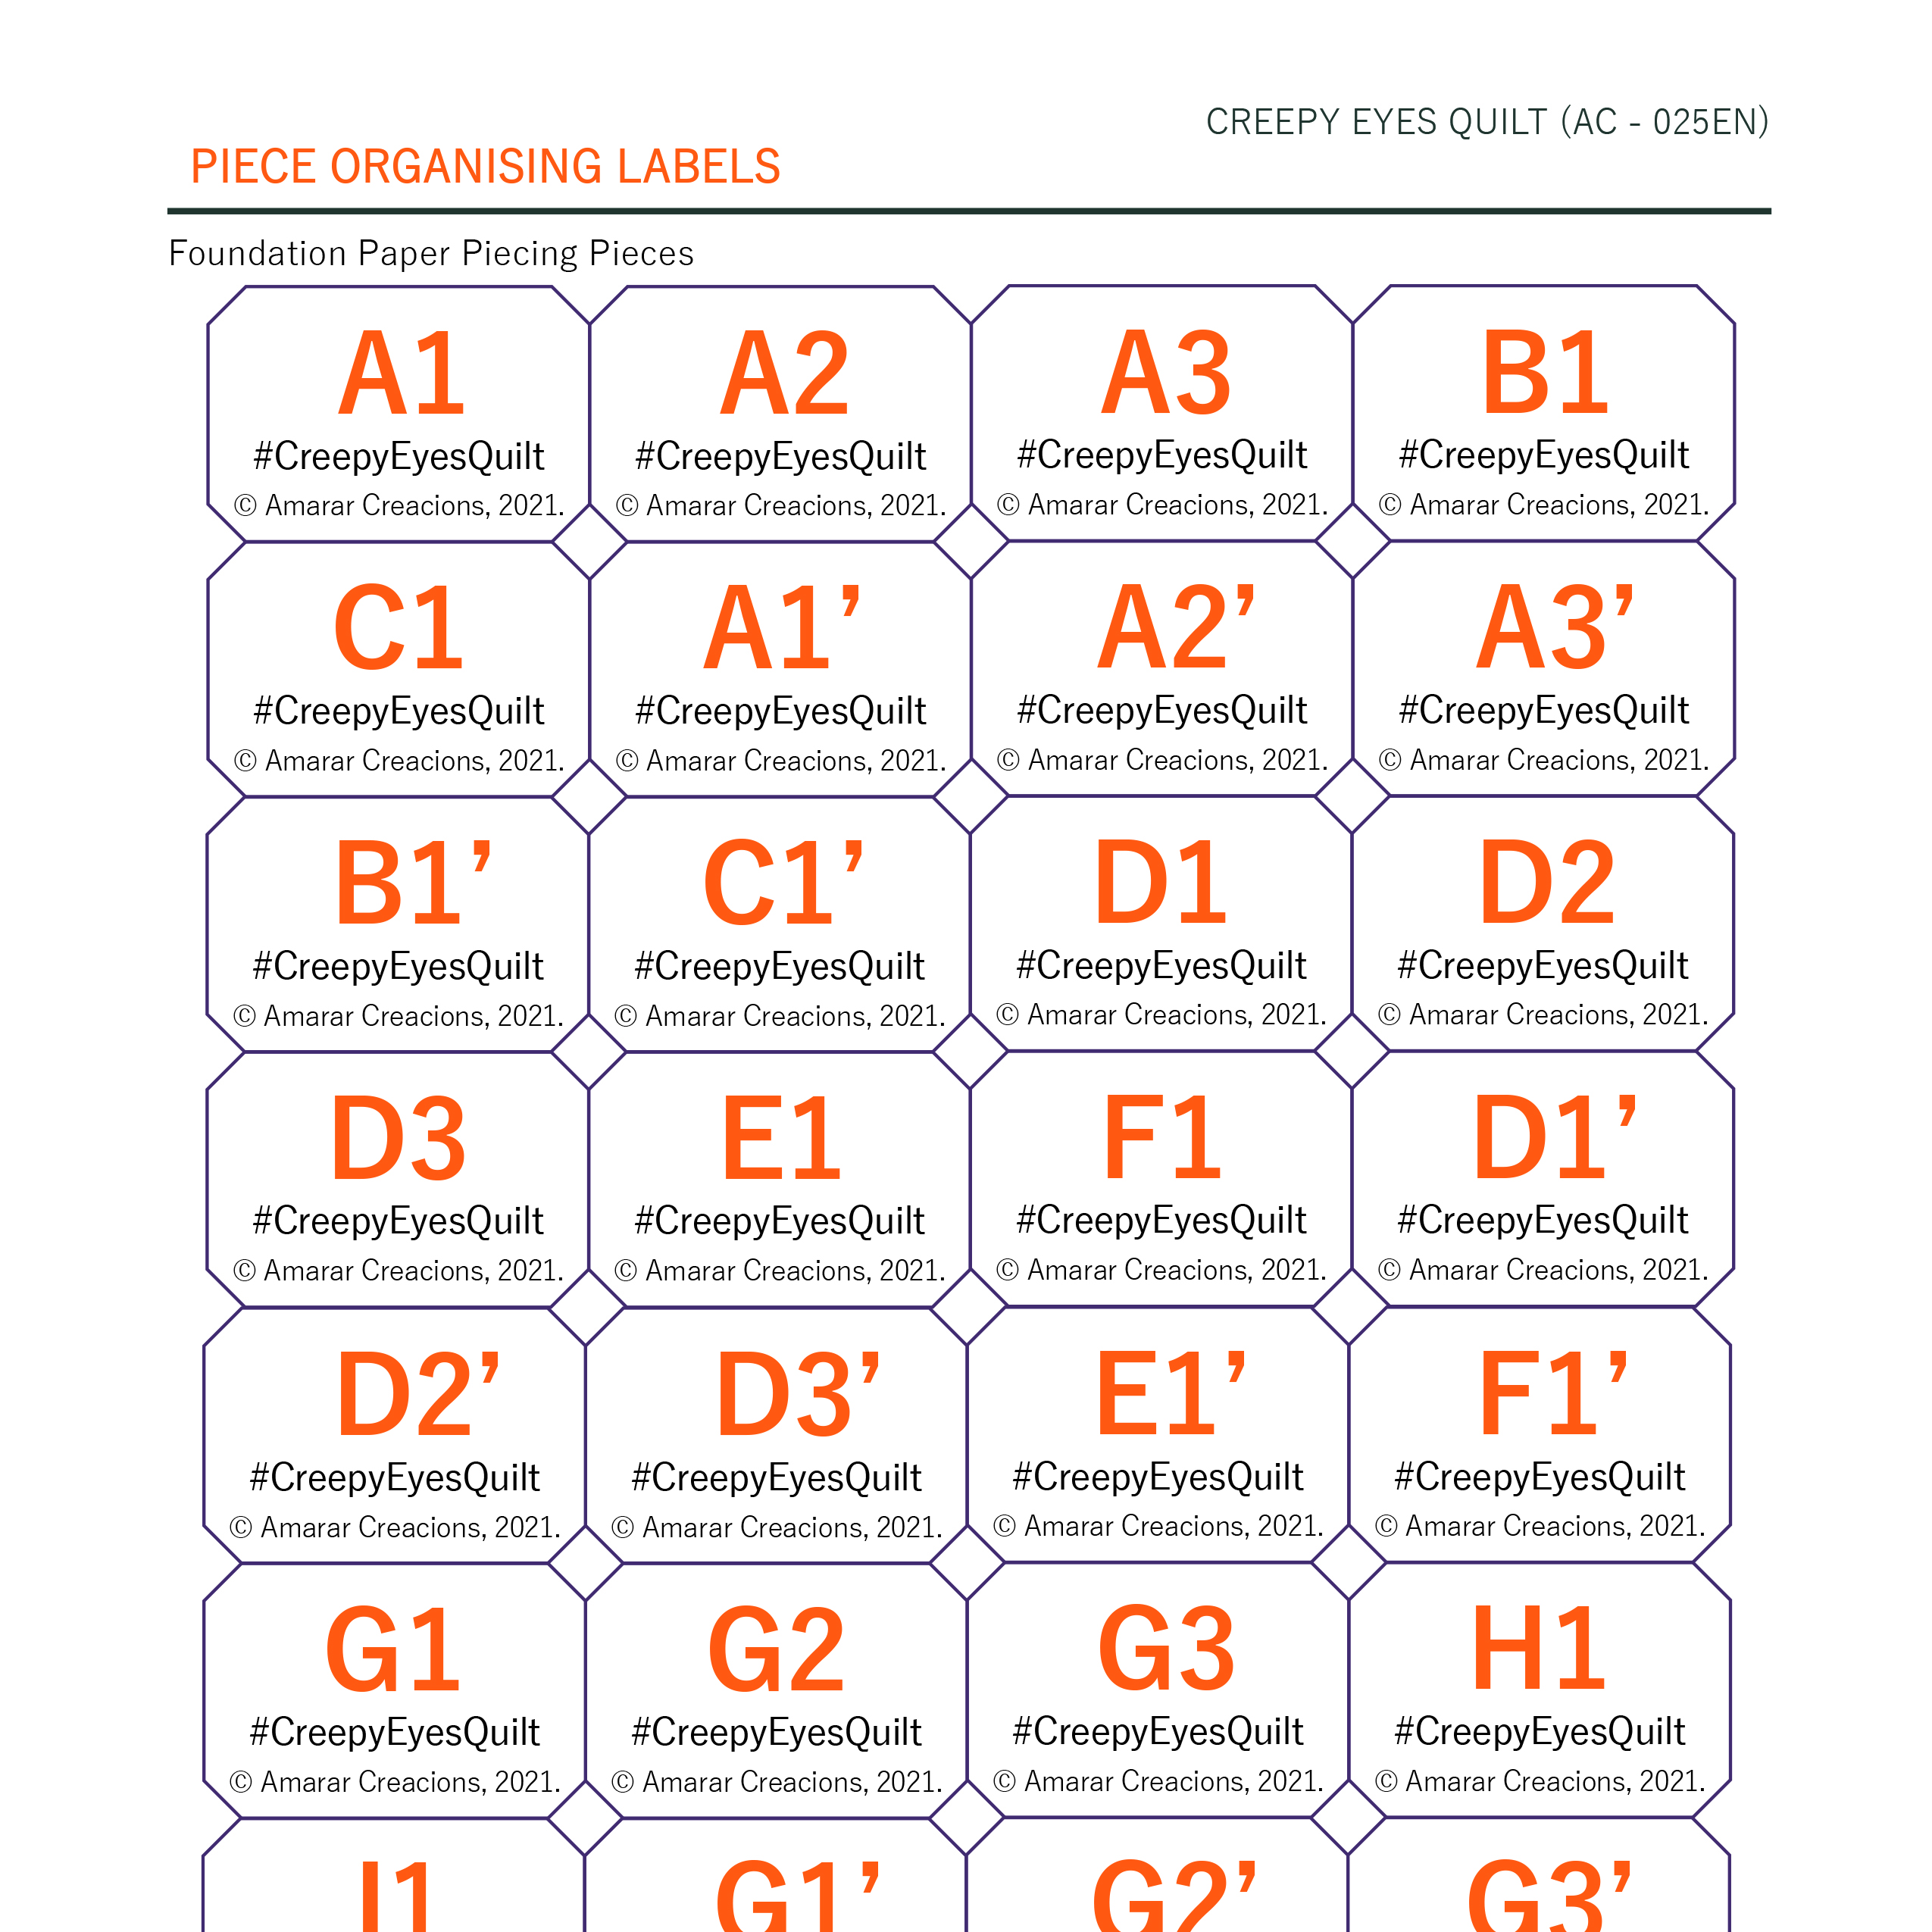
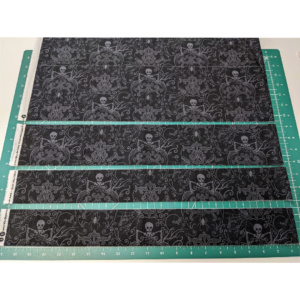
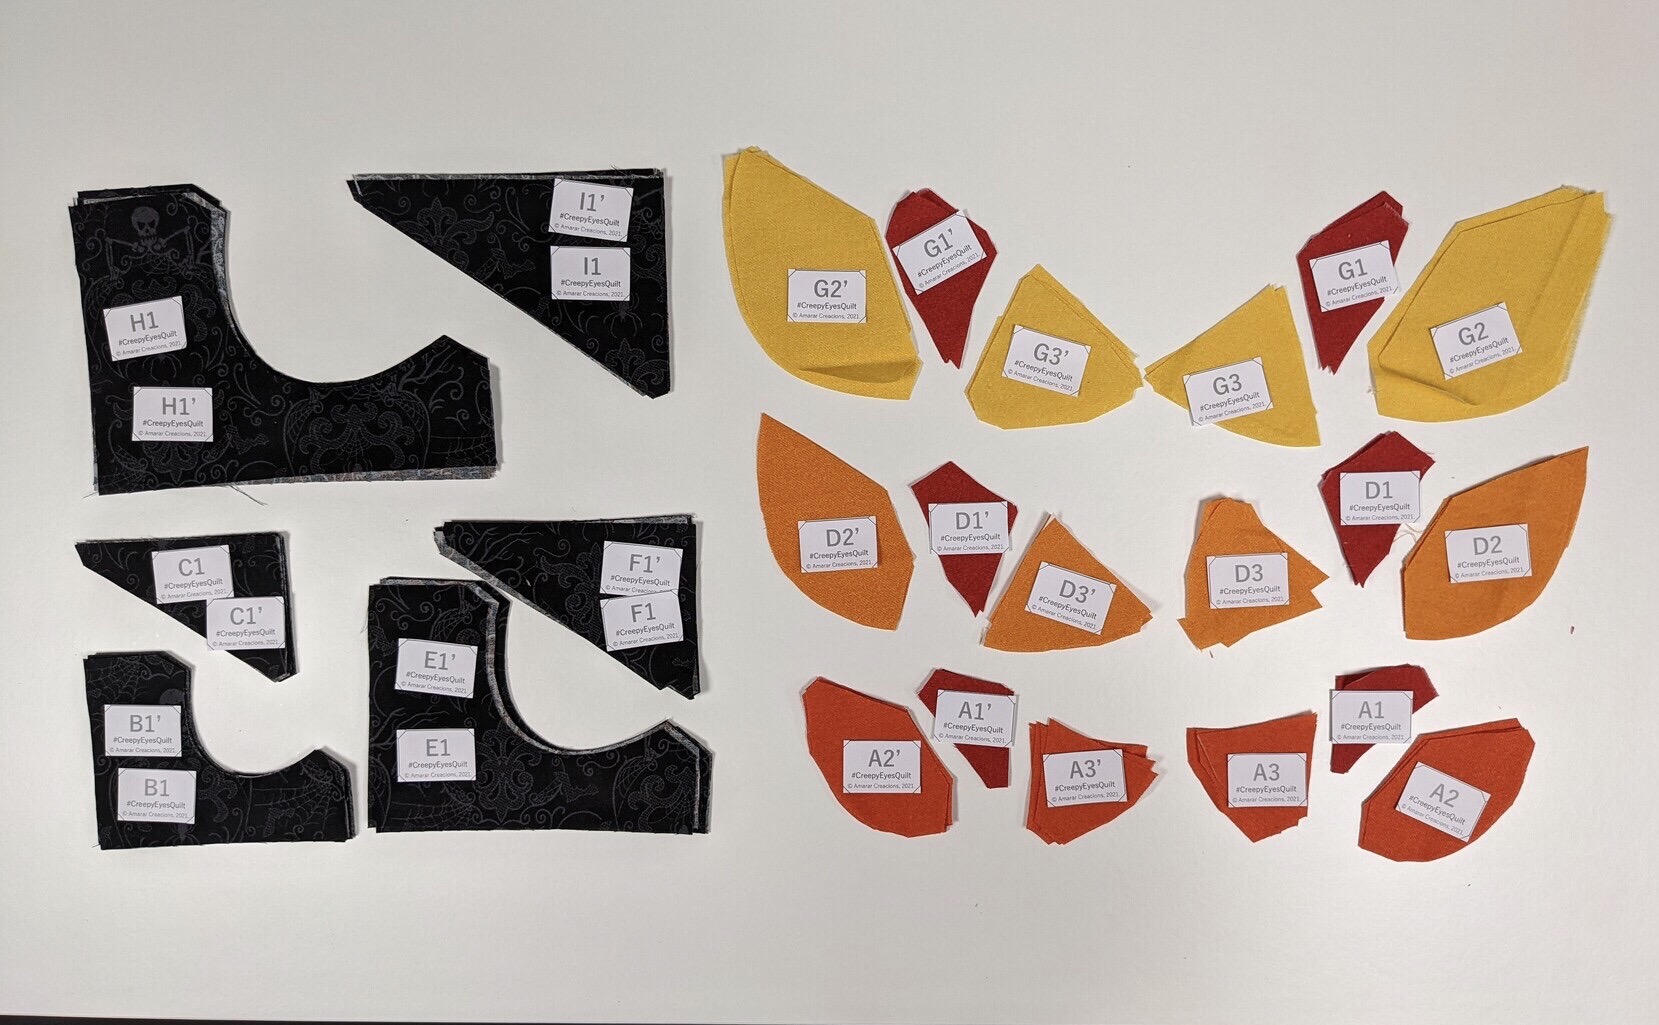
2. The organising labels
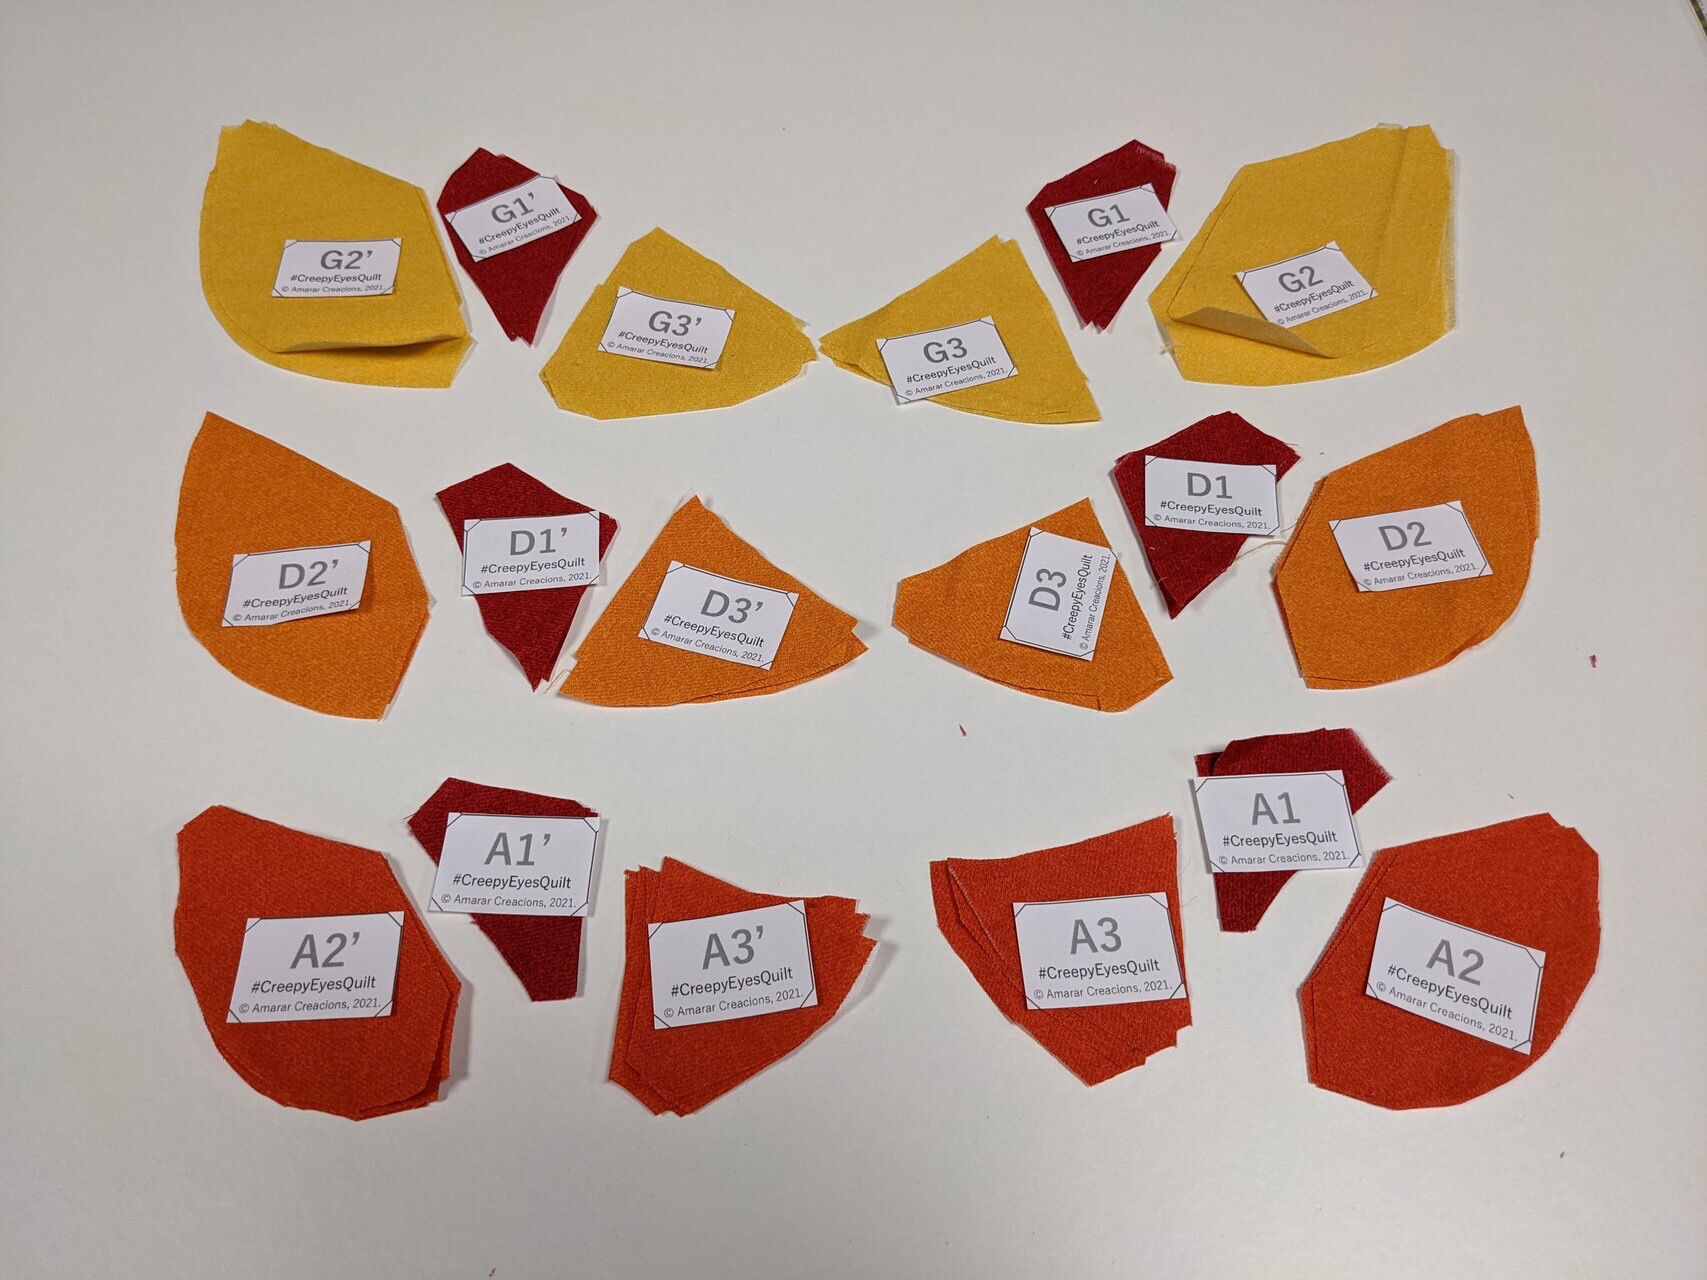
Before cutting the fabrics, we will cut the organising labels for the cut fabrics, which will help us to fully enjoy the sewing part. If we have the pieces organised we can go straight to catch the piece we need and we don’t have to think every time if we are choosing the right piece in every place.
Since in this design there are a lot of different size pieces, I have included in the pattern organising labels for all the pieces we will sew. You can use all of them, but I think the ones for the background pieces are really important, and the ones for the foundation paper piecing can be avoided, since in this part the pieces have a shape that can make them easily distinguishable.
Here is a sample of the organization tags included in the pattern.
3. The fabrics
Thos most important part of this Stage is cutting the fabrics. We will prepare all the fabrics of our project to have them ready to sew in the next Stage.
I will show you how to cut the fabrics for any Creepy Eyes project in an efficient and fast way.
Let’s start:
3.1. Background pieces
First step in the cutting the pieces is the cutting of the background pieces, the ones that are not part of the Eyes blocks. We start here because after that we will cut the Eyes blocks background pieces from the left fabrics on every strip.
Check the cutting table and cut the strips which are indicated for every size, and then subcut the strips in the pices needed indicated in the table.
Here there is an example for the smallest strips. For the Baby siZe we need to cut two 2 1/2″ strips x WOF and then subcut them into one 12 1/2″ x 2 1/2″ and three 15 1/2″ x 2 1/2″. And we reserve the left fabric to cut later the background for the eyes blocks.
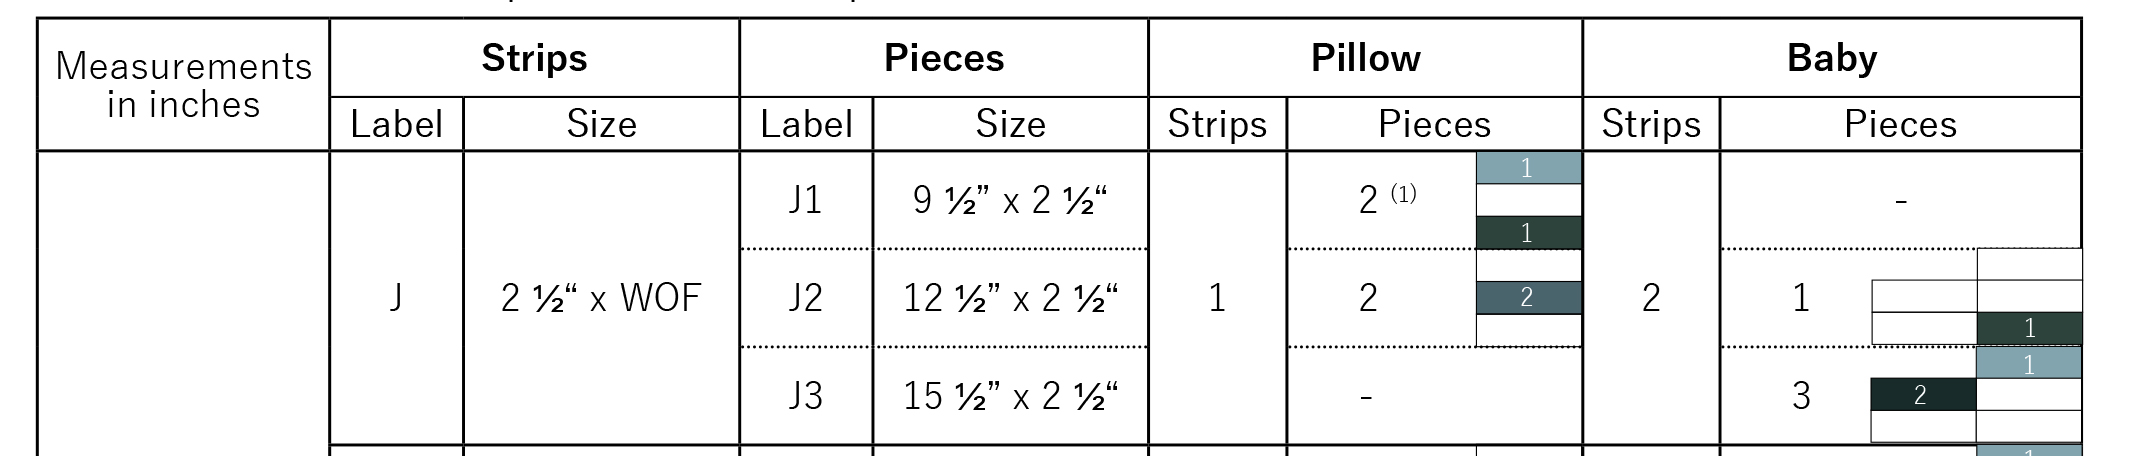
The pattern instructions for one background colour/fabric has the strips ordered from smaller to bigger heights, and you can cut them in the order you prefer, but there a suggestion from one of my testers which I think is a very good idea: We should cut the strips from bigger to smaller because if we make a mistake cutting one strip from big we can make small and from small we can’t make big! Brilliant. thank you so much Pati, @patiagnesd
If you are gonna make the striped background, check the number of colours you need for every fabric with the small boxes in the cutting table.
And if you want to make a completely custom background color you can write down the colours in the block layout diagrams on page 4, which indicates all the label pieces, and then go to check the measurements of the pieces you need in every color to the cutting table. Or use your QuiltInk digital mock-up or your colouring sheet combined with the diagram page 4 and cutting table to figure out the measurements you need of every piece.
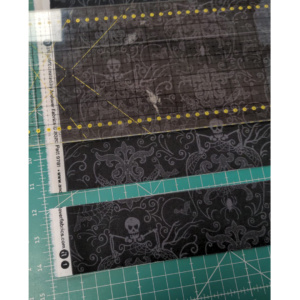
I make my Baby size quilt with a 1 background fabric with is printed and directional fabric.
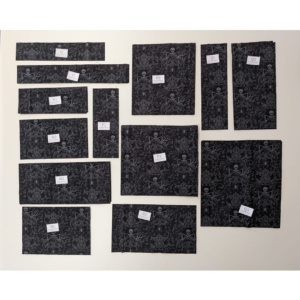
Look how we cut my strips, pieces and organised them. Yes we!! Since I am in a hurry preparign this flash QAL my lovely hisband has helped me cutting the fabrics!!
3.2. Background Eye Blocks pieces
Now, it’s the turn of the Background Eye blocks pieces. They are the pieces we will cut from background fabric/s and join to the Foundation Paper piecing pieces.
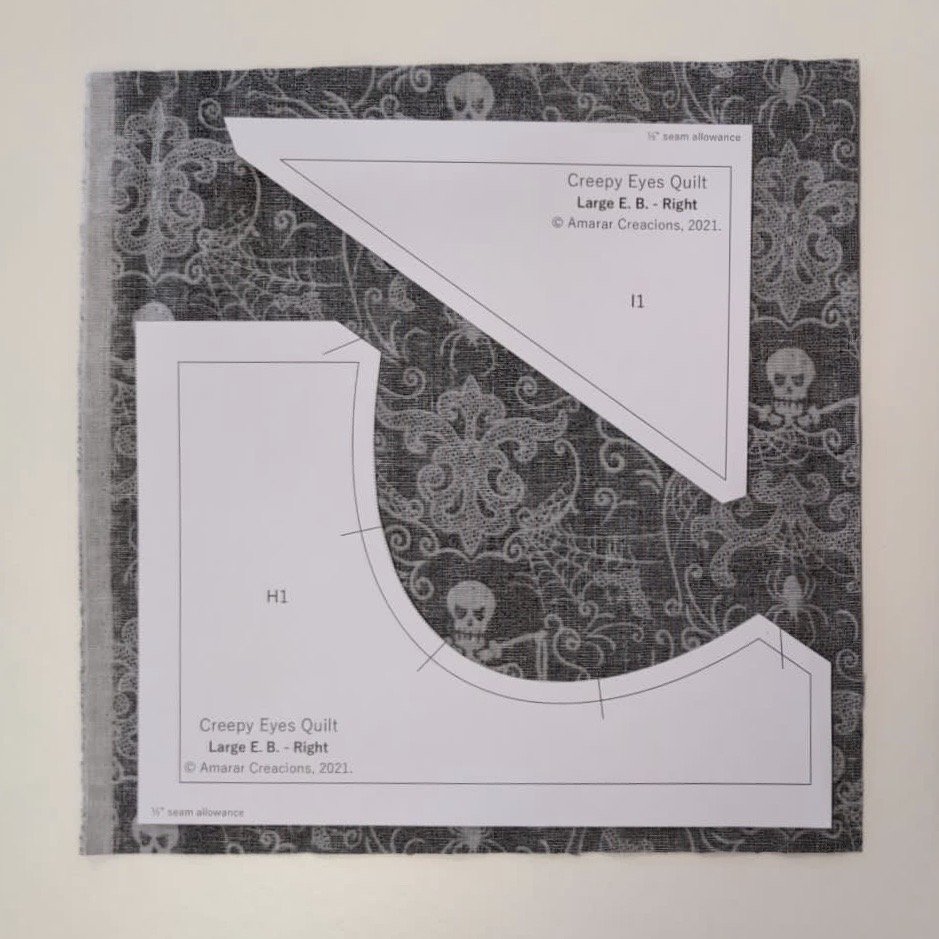
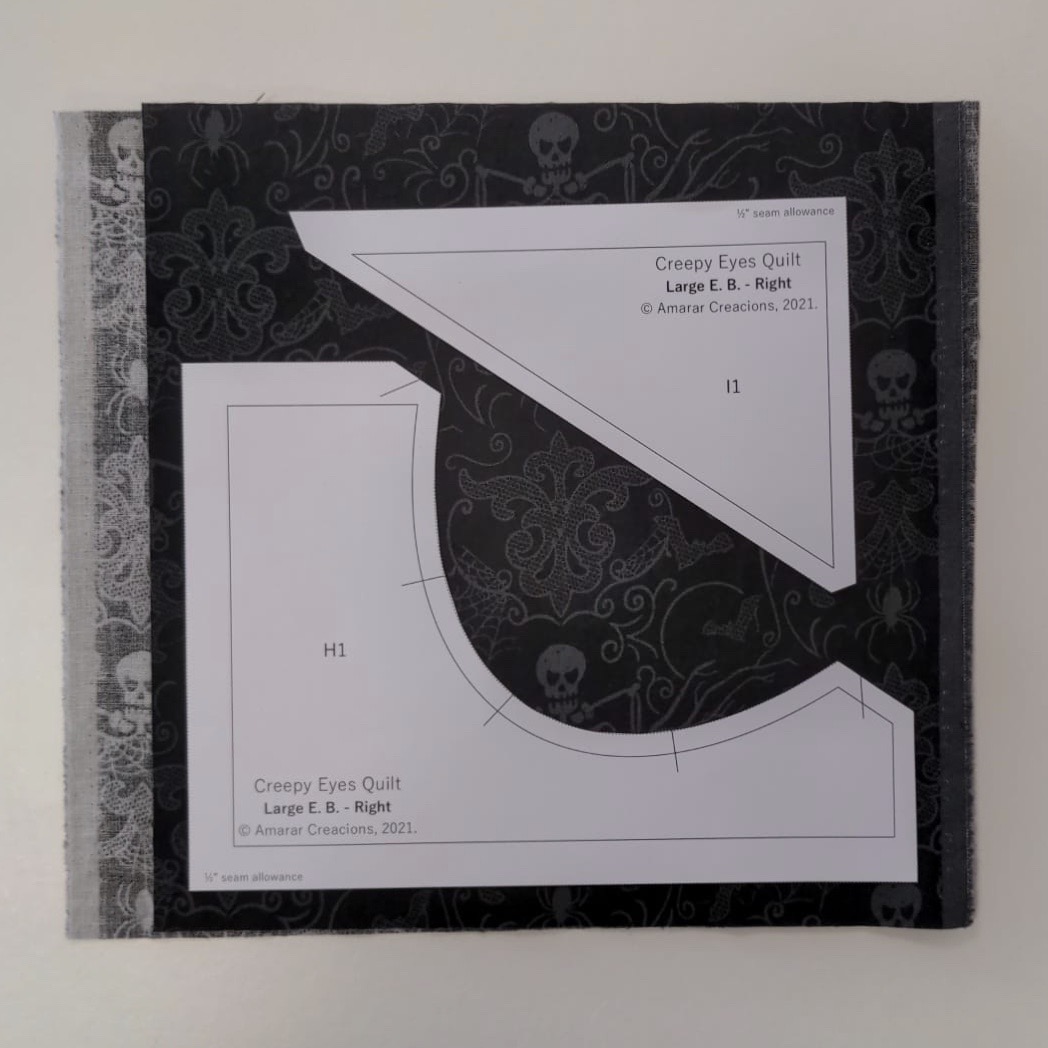
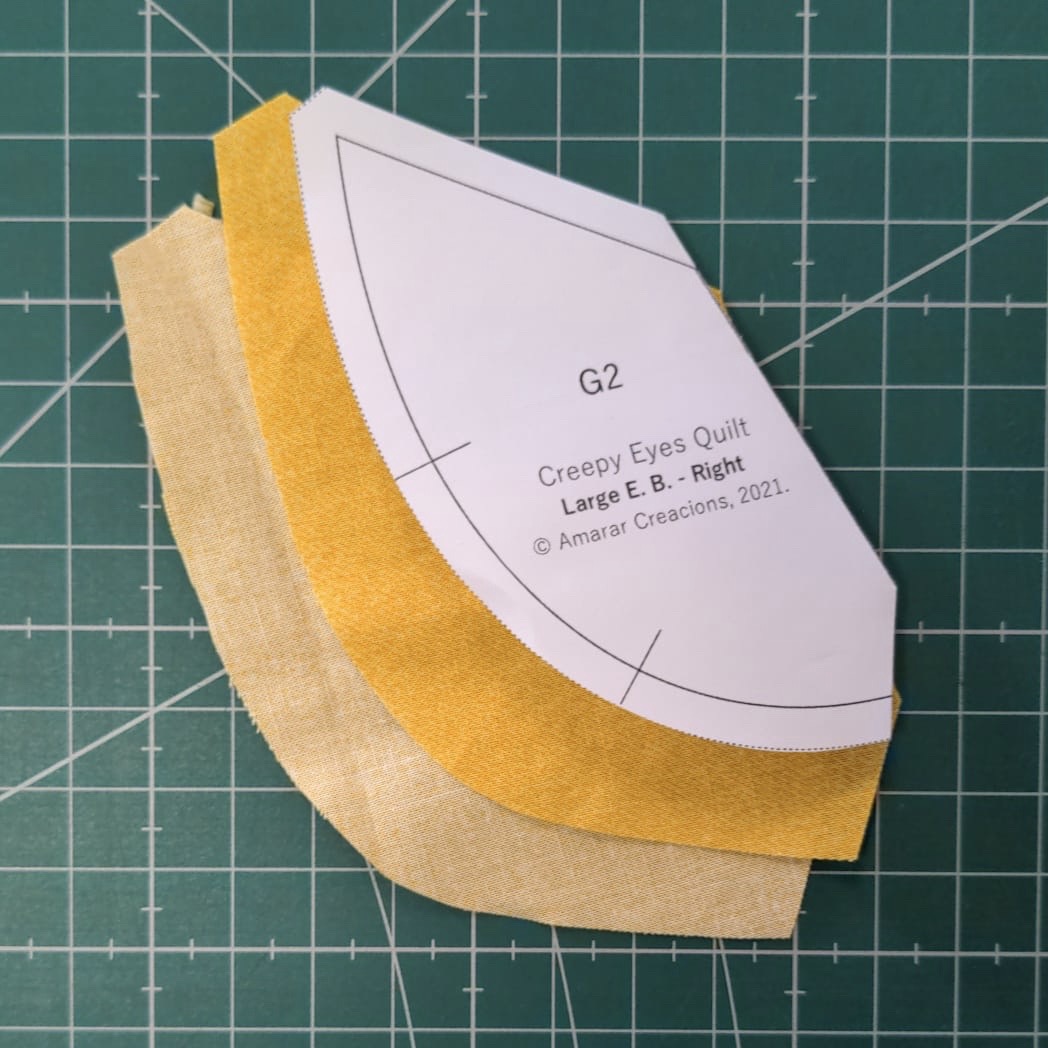
These pieces have to be cut with the cutting templates provided with the pattern. You will see these templates have 1/4″ seam allowance in the inner seams and 1/2″ seam allowance in the outer seams. It’s one of the best improvements from the Creepy Eyes block I released last year. Now, with the new templates, you will be able to sew the pieces together without worrying about the final size. When all the pieces are joined, we will trim them to the unfinished final size desired.
NOTICE: every Eyes block has 2 eyes, and they are mirrored. It means we can use the template for the right eye to cut the piece for right eye and left eye, just flipping the template. Another way to do it is placing two fabrics one over the other, one right side up and the other right side down and place the template over them.
Let’s see step by step how to cut these pieces in a printed drectional fabric.
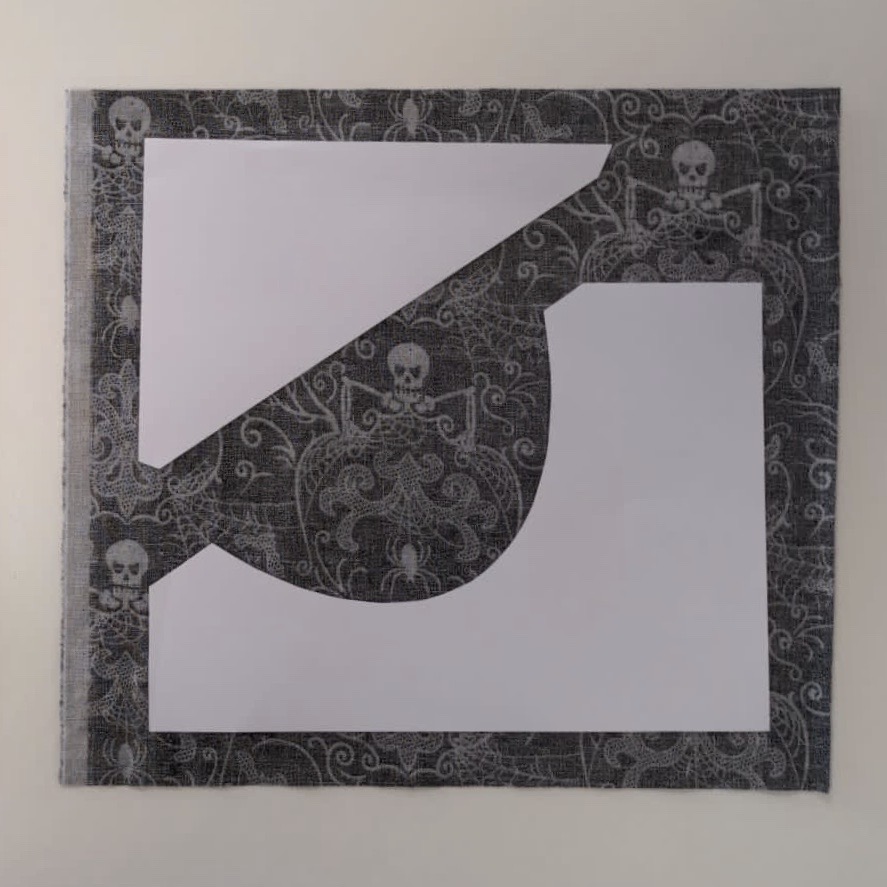
- Place one of the left fabrics from the strips right side up to check the prints and direction. Then, flip it back side up and place the template over it, with print up.

- Cut the fabric exactly at the same shape and size as the template. To know the exact shape you need to cut you can leave the template over the fabric and cut all around it or draw the template shape on the fabric. To cut the fabric, you can use a ruler and rotary cutter to cut the straight sides and with the cutter, going slowly, you can also cut the curve. And if you don’t like to cut curves with a rotary cutter you can cut them with scissors.
- We can cut 2 or more layers at the same time. For example, for the big eye size we need 3 left eyes and 3 right eyes, so we can place 3 layers and cut the 3 pieces at the same time.
- To cut the opposite eye, which is mirrored, place the fabric in the same way as before, right side down, and flip the template right side down. Or you can place the fabric right side up and the template with prints up.
- You can also cut the 2 mirrored eyes at the same time. Place two layers of fabric, one right side up and the other right side down and the template over them with prints up. And cut them.
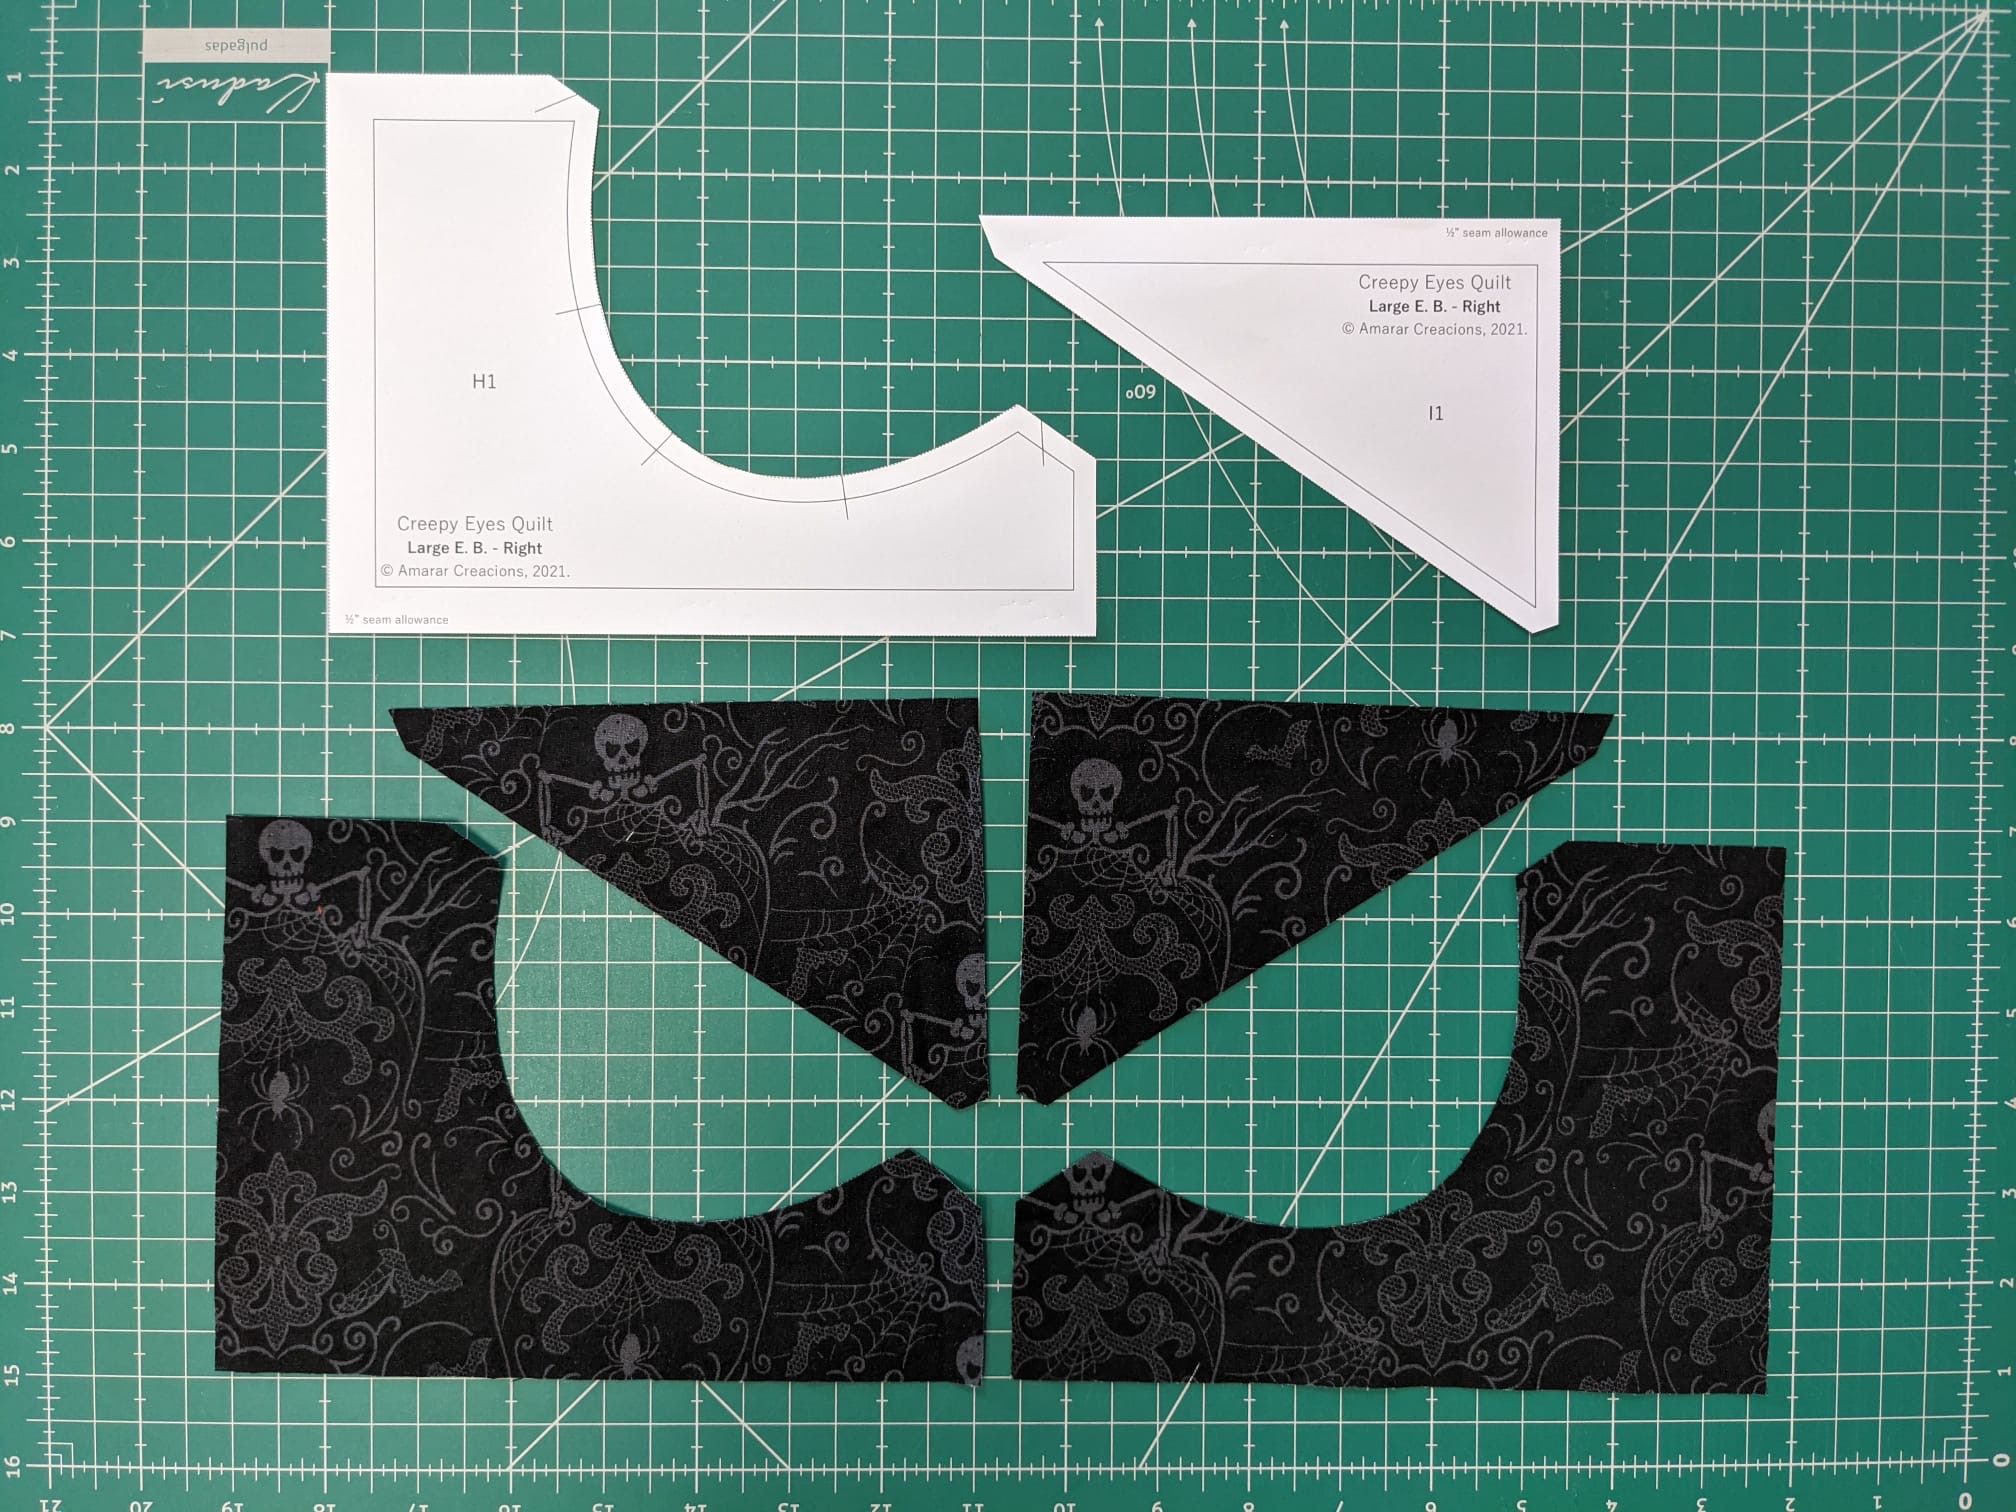
Calculate the number of bakground eyes pieces you need dependening on your project and the number of eyes you will make. Organise the pieces with the labels if you need it.
3.3. Foundation Paper Piecing pieces
We need 3 pieces of fabric for every eye, 2 in the same colour for the eye iris and another one for the eye pupil.
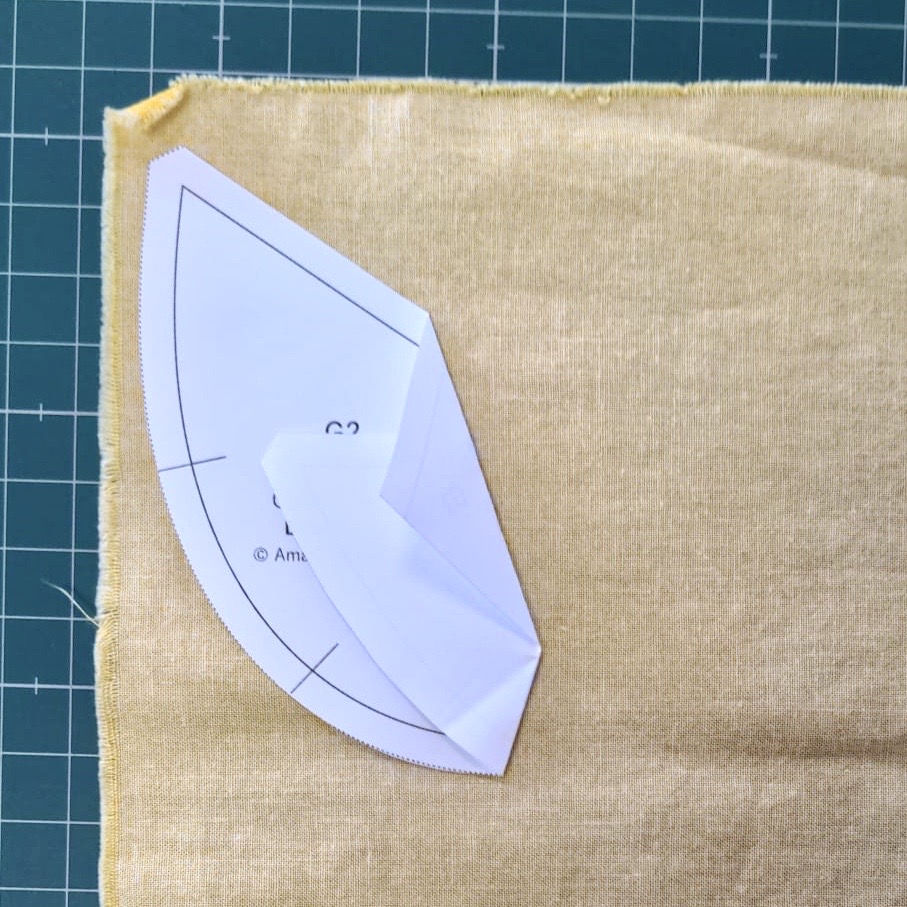
The pattern doesn’t provide cutting templates for these pieces, so we are gonna cut them using one of the Foundation paper piecing templates. So,
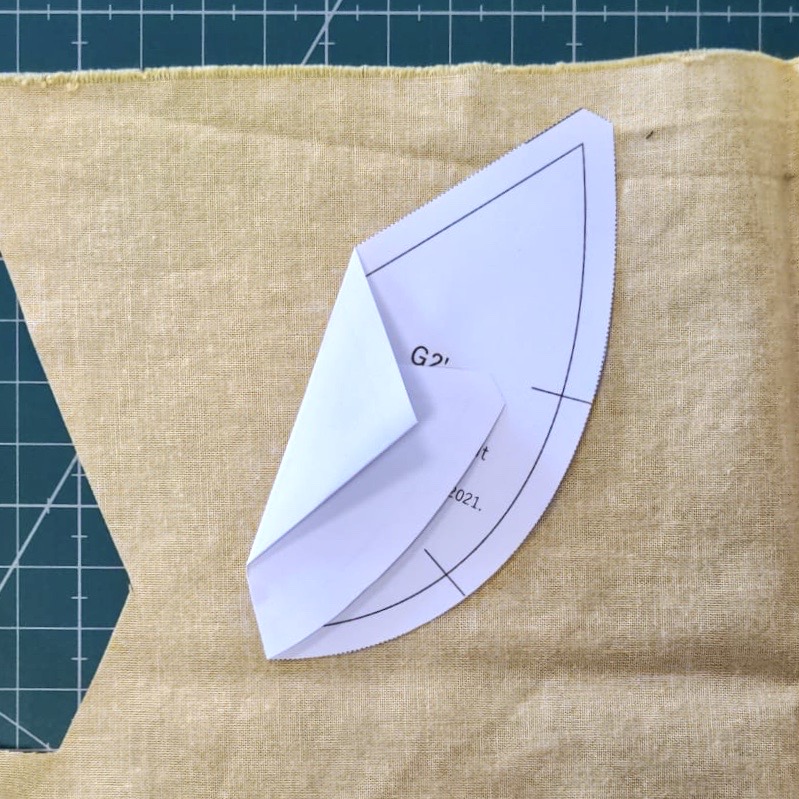
- Catch one of the eye foundation paper piecing templates and fold the paper by the sewing line in order to have the shape of one of the pieces.
- Place the template folded in the back of the fabric. That’s because the foundation paper pieces are mirrored and we will place the fabrics on the non printed side of the paper with the wrong side of the fabric in contact with the paper.
- Cut the mirrored piece (for the opposite eye) flipping the fabric (placing the template in the right side) or flipping the templates (placing the flippend templated in the wrong side of the fabric). You can also use the opposite template to cut the mirrored piece.
- You can cut both pieces of fabrics, left and right eyes, by placing two fabrics one over the other, one right side up and the other right side down, and the template over them.
We do the same the 3 eye pieces and the number of eyes you need to sew for your project.
And here all my fabrics ready to start sewing! It’s really exciting and I can’t wait to see yours!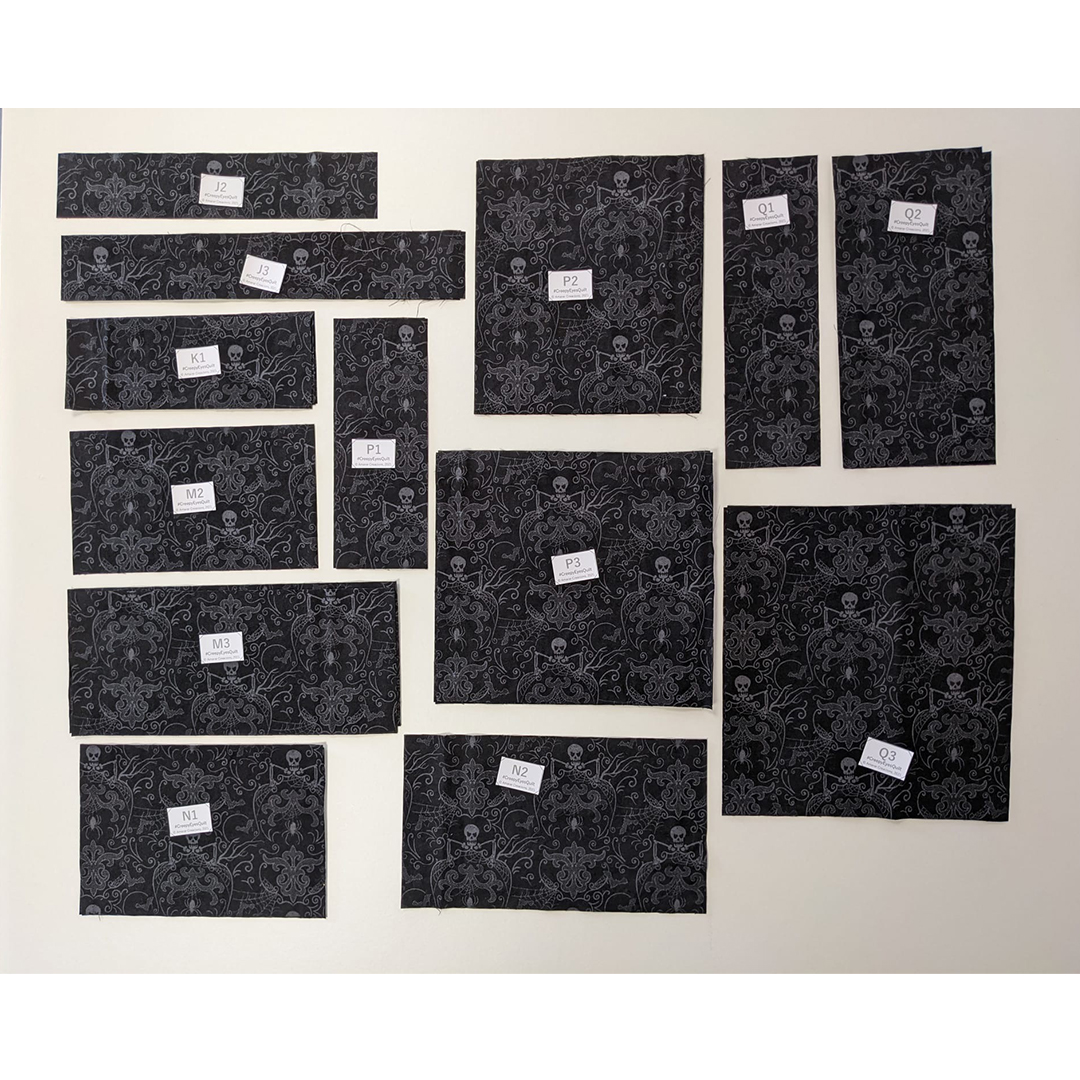
Remember to share your progress in the 2 first Stages, using the hashtag #CreepyeEyesQAL, and participate in the giveaway of a $25 gift card from Quilt Pattern Mart . As many shares you make, more entries for the giveaway and more possibilities to win!
When you have all your fabrics cut, visit the next Stage to see how to sew them all togheter.
You can still join the Creepy Eyes QAL! Hurry up!! Get he Pattern and Sign up to don’t miss any new about it!