


Day 4: Assembly of a Section.
Today we begin with the assembly of the Sections. The most entertaining part since you can see how the figure is growing us you are sewing.
This assembly consists in that we will join the fabrics with the base of the paper and according to the order established by the pattern.
1. Section A
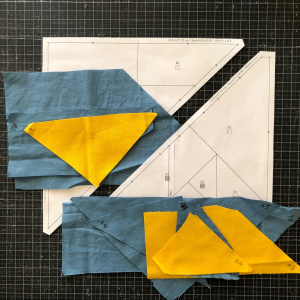
We take the paper of Section A (paper and fabrics in the right side) and all the fabrics we have prepared for this section. In addition we will need the sewing machine, the cutting mat, the rotary cutter and the ruler. Needles and pins could also help us.
1.1 Joining A1 i A2
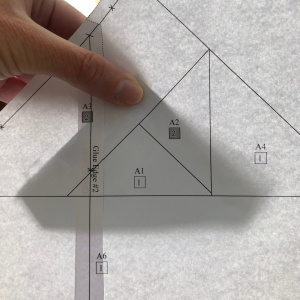
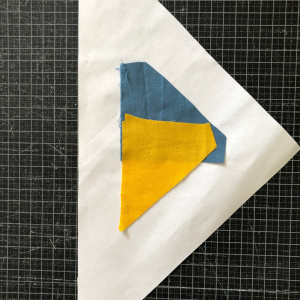
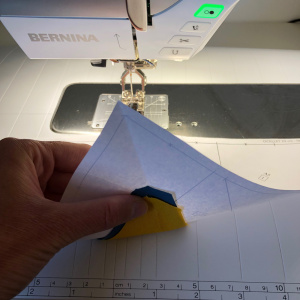
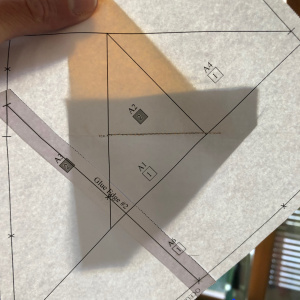
We take the paper and at backlit we put the fabric A1 behind it to see it with the figure A1 of the paper. In other words:
- We put the fabric A1 on the back of the paper, at the not printed side.
- The right face of the fabric must be the one that is NOT in contact with the paper, so, the back of the fabric in contact with the paper. If you remember, we wrote letter and number of each fabric in the wrong side, so this side has to be in contact with the paper.

- The cloth has to “cover” all the figure A1 of the paper and the remaining sidewalks must be well distributed all around. It should be left at least 1/4″ all around. (The templates are designed so that they are at least 1/2″).
- Some people put needles to fix the fabric to paper or use specialized bar glue, but I do it holding it with my hands, if the pieces are small, and if it’s necessary I put needles.
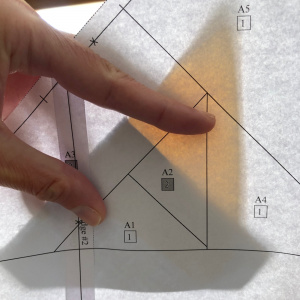
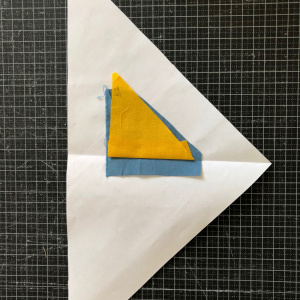
We have to combine two pieces of fabric, so we will now place the fabric A2 without moving the A1, which we have placed before. And just like before:
- We put fabric A2 on the back of the paper.
- The right face of the fabric must be the one that is NOT in contact with the paper, that is, the back of the fabric in contact with the paper.
- The cloth has to “cover” all the figure A2 of the paper and the remaining sidewalks must be well distributed around. It should be left at least 1/4″ all around.
- We can attach the fabric to the paper with a needle if it has to be easier.
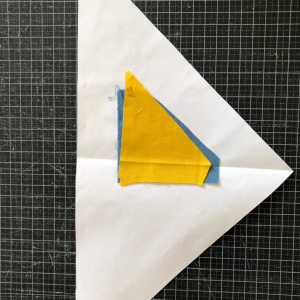
Here comes the most complicated part of the whole process: turn the A2 fabric on the A1 to join them with a stitching line. There are many ways to do it, here you have the two propositions that I have tried:
- Folding paper and fabrics (which one I prefer)
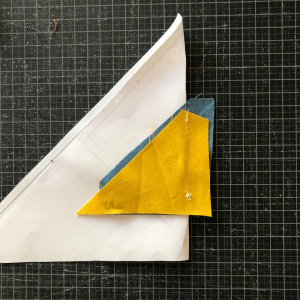
- With the fabrics placed, we fold paper and fabrics A1 and A2 for the line we will stitch them, the line that joins the figures A1 and A2, leaving the fabrics inside.
- Open the paper and let the fabrci A2 over the A1, so we will have the good face of A1 with the good face of A2. The fold of the cloth A2 must remain exactly in the same place but with the fabric turned over.
- Now, turn to the other side the small part of the A2 cloth (the yellow) that has remained under the large part. Without moving the large part of the place and letting the folds of the cloth A2 match the fold of the cloth A1 and the fold of the paper.
- We can fix the fabrics with a needle or put all them directly on the machine without the fabrics moving from their place.
- With the fabrics placed, we fold paper and fabrics A1 and A2 for the line we will stitch them, the line that joins the figures A1 and A2, leaving the fabrics inside.
- With needles.
- And we put needles at each end of the line between the figures A1 and A2.
- Because we have to join A1 and A2 we have to face them right side with right side, so we turn A2 on A1 matching the needle holes. You can do it, without removing the needles: remove the fabric A2, we turn it over, and then insert it into the needles through the holes made before but with the fabric turned. so we will have the good face of A1 with the good face of A2.
- We fix the two fabrics on the paper with needles, mentioning that the needle does not pass through the line joining A1 and A2.
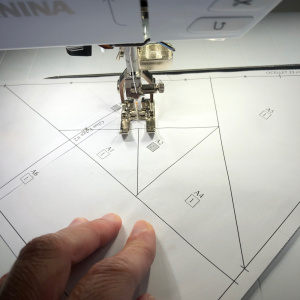
And now we can sew the two fabrics:
- We make a stiching line to the paper along the line that joins A1 and A2 with the fabrics in the lower part.
- We have to start a little bit before the start of the line and finish a little bit after the end of the line.
- If you make a short stitch, 2-2.5, it will be easier to take out the paper after finishing.
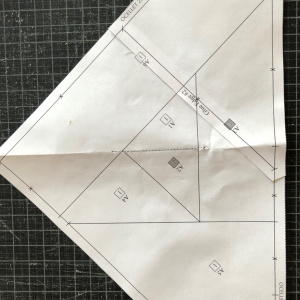
We turn the fabric A2 to its place, with the good face up and check against the light that the fabric has been stitched to the right place. If not you have to unsew and do it again.
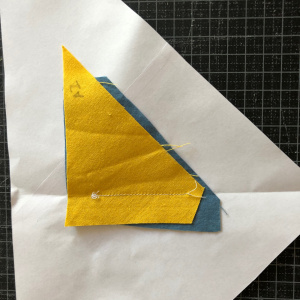
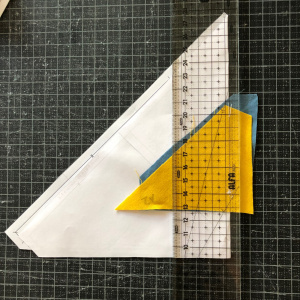
Now it’s time to take away the leftover fabric besides the stiching line that we just made:
- Fold the paper by de stitch line to the bottom, so that we only have the leftovers in one part. Warning with the good fabrics that have to stay in the other side.
- We put the ruler parallel to the seam that we’ve made and cut to 1/4″ of the seam. In that way we will have an edge of 1/4″..
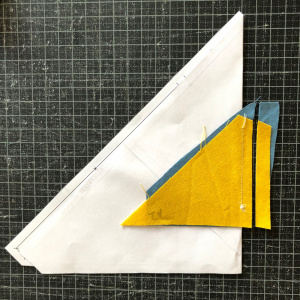
To finish with the two first fabrics, A1 i A2:
- We remove the fold of paper, opening it.
- We fold the fabric A2, by the stiching line, with the right face up,
- We fix the union of the two fabric in order to make it flat and stretched. We can do that with the iron, a roller or aour fingers.

Ans we already have fabrics A1 and A2 in place.
1.2 Unim A2 i A3
Day 3: Preparing papers and fabrics
Hello again!
I hope you have already cut papers and got the fabrics. Today we will do two things: join the papers and cut the fabrics.
1 – Joning the paper:
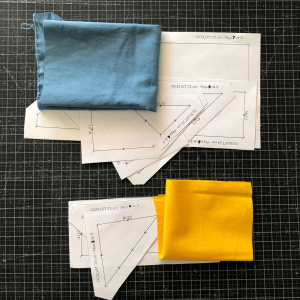
These are all the paper you should have obtained:
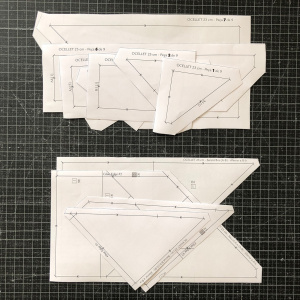
The papers of the sections:
And the papers of the templates for cutting the fabrics:
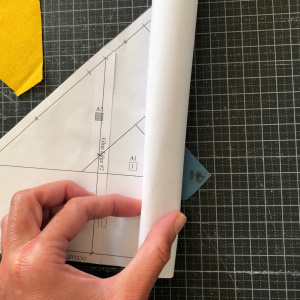
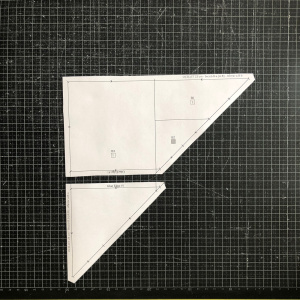
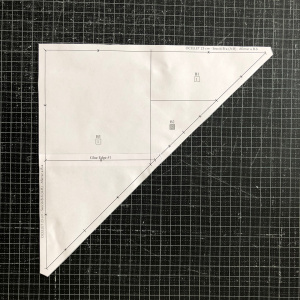
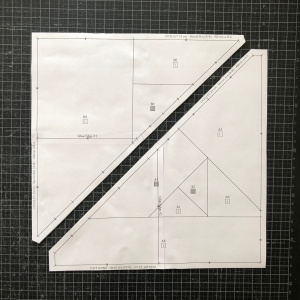
As we have already commented, and you will have seen when you have cut papers, sometimes it’s necessary to join two pieces of paper that are larger than one sheet. So we will glue together, the pieces of paper that indicate at the edge that they have more than one part (Ex: B-a and B-b), where it indicates Glue Edge #no. Glue the two pieces of paper that have the same number for the side where they have this note: Glue Edge # no.
Remember that we have to do this for the papers of the Sections and also for the papers of the templates to cut the fabrics.
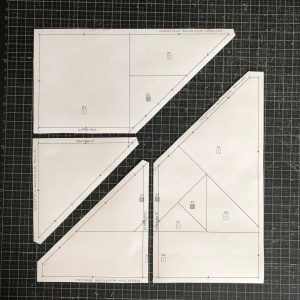
Here you can see how to join the papers:

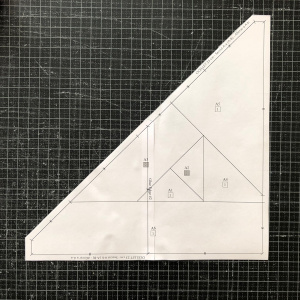
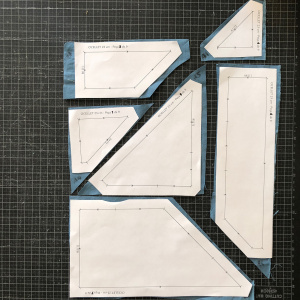
And we will have all the necessary paperwork to get the pattern. The sections, which you can see that we have two large pieces of paper (Section A and Section B) to which we first sew the fabrics and then we will connect them together.

And the templates, which are all the pieces of fabric we will need to complete the pattern.
2 – Cutting the fabrics.
The next step is to cut the fabrics. To cut the fabrics we will use the paper templates we have for this purpose. We could also cut the fabrics without the templates, taking the sizes of every piece inside a section and cut one by one.
To cut with the paper templates:
- Separate the paper shades according the fabric. Each piece of paper has indicated on the edge: Section (number) [number]. (Ex: A6 [1])
- Secció (núm): the number tells us which figure is in the section. From the example: It would be the piece 6 in Section A.
- [núm]: it indicates the fabric. In this pattern we have two fabrics: 1 and 2. The papers with the number [1] are for the background fabric and the papers with the number [2] are for the fabric of the figure. We have to make two groups of papers: those with number 1 and those with number 2.
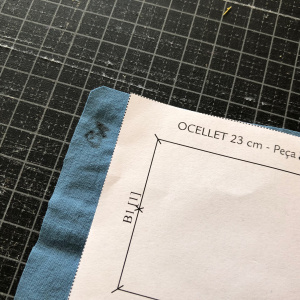
- IMPORTANT!!! These templates are inverted, such as parts of the sections, so we have to cut the fabrics for the wrong side, that is, by placing the paper on the reverse of the fabric.
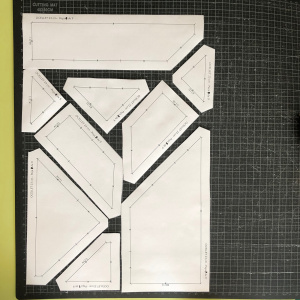
- Put the fabrics with the good face down and put on all the papers of the templates over the fabric. Put them side by side letting the less space between them.
- Cut with the rotary cutter in the middle of the papers and do not remove them!!
- Before separating each paper on the fabric we have to write the corresponding Section (number) (in the example it would be A6 ). It is advisable to write it on a corner, which will be discarded as the margin is a bit larger than we need.

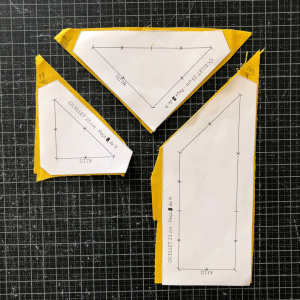
And we already have all the fabrics cut. Now we have to separate the Fabrics by Sections. We will do a pile with those in Section A and another with those in the Section B.
I usually order them by number so I have everything ready when I need to place them.
Day 2:
After the introduction of yesterday, today I want to introduce a little more in the technique so I have to do a little theory before putting on the sewing. Here are a whole series of things that you should keep in mind at all times when we are developing the pattern. Maybe at first glance you will not understand them but when we go, you will be more clear:
1- You will see that the drawing on paper is inverted, mirroed. This is because we sew the fabrics on the back of the paper and when we take out the paper we will have the drawing in the orientation we want. This always happens, all the FPP patterns have the drawing inverted.

2- With this technique we will be joining the fabrics with the base of a paper. With a simple pattern with a piece of paper it is enough but with a pattern like this we will need a few different pieces of paper that we will call SECTIONS. To teach you the technique I wanted to make a pattern with several sections so you will know how to do it when you find it in another pattern.
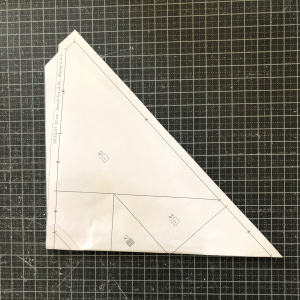
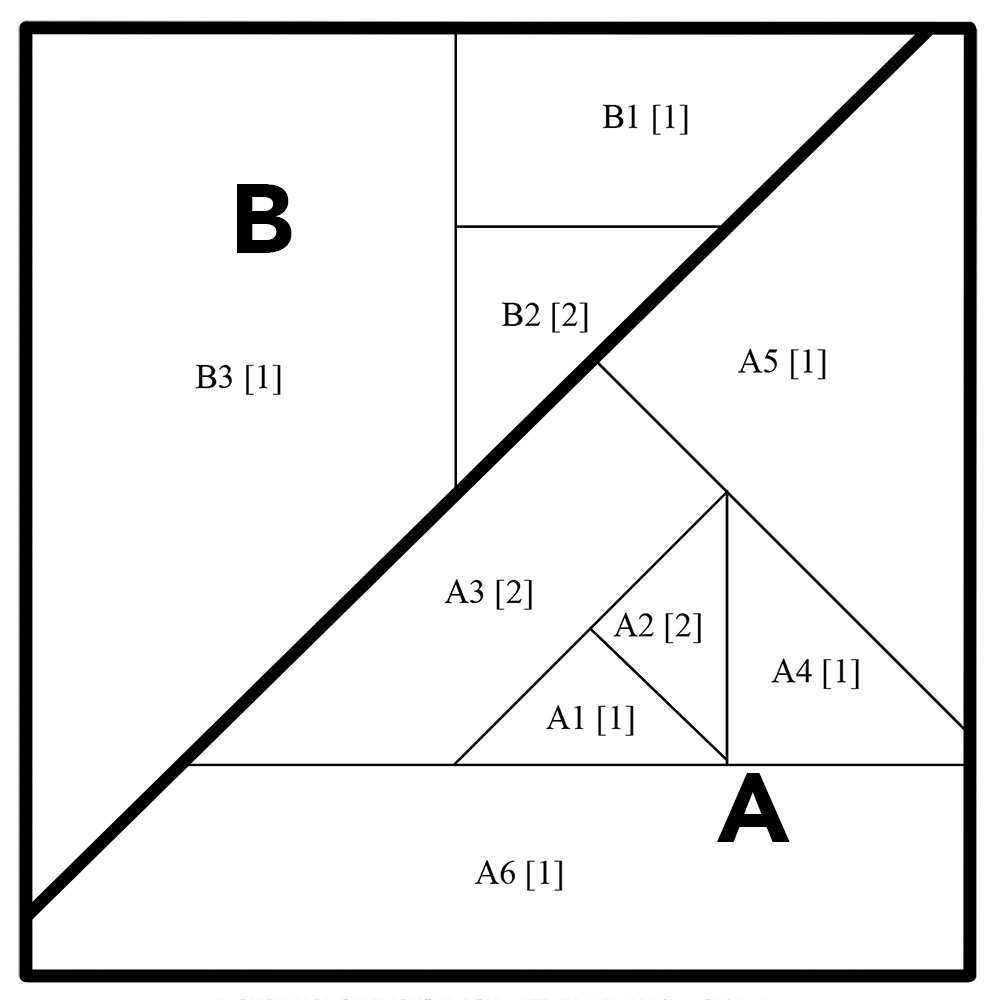
3- A section consists of the following legends (for example, see B-a section).
- On the margin: the pattern name (Bird 9″), the Section (Section B-a) and the number of sections in the pattern (A-B), two in this case. Also indicates Glue to B-b, that means that to get the entire section we will have to put together two pieces of paper by which it indicates Glue Edge #no. (Glue Edge #1).
- The code of each figure in the section (B1, B2 and B3): the letter indicates the section and each number a different fabric and the order in which they will be placed.
- Loose numbers (1 and 2): indicate if it is a fabric of the figure (2) or a background fabric (1).

4 – You will find two large groups of pieces of paper to cut in the pattern:
1 – The pieces of paper for the Sections, seen before.
2 – The templates for cutting the fabrics. You will not find these templates in all the patterns but I have wanted to include them here because you know about their existence and how they are used.
5- The fabrics are placed and sewn on the part of the paper where there is no drawing, at the reverse of the paper.
6- The fabrics go with the good side face, the reverse of the cloth will be in contact with the paper.
7- The stitches lines are made with the paper on the top and the fabrics below.
8- Start a couple of stitches before and finish a couple of stitches after the start and end of each joining line. And the length of the stitch is better if it is short (1.5-2) because it is easier to take the paper when finished.
What do you think? Much information for a single day? Do not worry that we will see it step by step, and at the end you will have already internalized all.
To lighten the head somewhat, we are going to put some manual homework for the next day
Cutting the papers
If you look at the pattern you will see that on the 2nd page you will find the instructions for assenbling this pattern. From the 6th page you can find the pieces of paper to prepare the sections of the drawing and from the 9th page the templates to cut each one of the fabrics that we will need.
The first thing to do is print page 6 and check that the 1″ measures exactly that, or the final drawing will not make the 9″. If the box does not make 1″ exactly check the preferences of your printer to print 100% without scales or margins.
Then, you have to print and trim the pieces of the pattern to mount the sections and the templates to cut the fabrics. To cut the paperwork goes very well with the rotary cutter and the ruler, it’s faster than scisors, although it is convenient to change the cutlery and have one to cut paper and an other to cut fabrics.
Go for it, I leave you couple of days so you have time to print and cut the papers. Next day we will join them and cut the fabrics.
Do you know that any question you have I am here to answere ot. So ask, ask that the more you ask now, the less doubts you will have when you have to do it alone.
See you soon!
Day 1:
What is the Foundation Paper Piencing?
The Foundation Paper Piecing (FPP) is a patchwork technique that involves joining pieces of fabric with a sheet of paper as a base, in which a drawing is printed that will serve as Guide to joining the fabrics. With this technique you can get very complicated figures in a relatively simple way.
It’s different from the “English Paper Piecing”, where the fabric pieces are first made with a paper pattern each individually and then joined by hand. These are different techniques and the way in which the figures are obtained is also different.
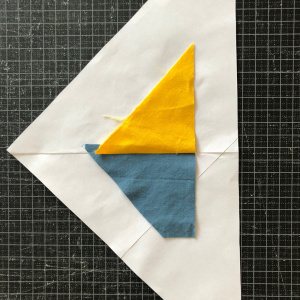
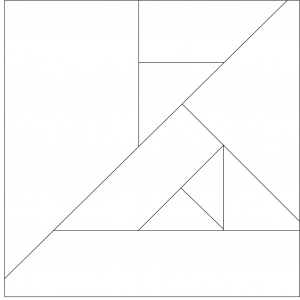
Following the FPP, here you can see the paper drawing we will use to create the Origami BIRD. You have it included in the pattern that you can download here, but without the letters and numbers. Here I want you to look at how the pattern itself will indicate the order of the fabrics. Also note that there are two major parts (A and B), these are the Sections: two large pieces of paper where we will first join the fabrics and then join them together. But all this will be seen very carefully later.
And to finish this little introduction, look at how wonderful we will do! A small bird that we can use to put on a bag, make a blanket of birds or what you imagin! I can’t wait to start!
FOTO OCELLET ACABAT
Materials
Since this introduction has not been very hard for you, here is a list of the materials that we will need to create this Origami BIRD with the FPP technique. So you can start preparing them:
- Fabrics (in the pattern you have a section where you can see the needs of fabric), for this bird specifically we need the following fabrics. Although we will see it in more detail in the next few days, you have an idea:
- Figure fabric: 8″ x 8″ / a layer cake square (10″ x 10″) / scraps.
- Background fabric: a fat eight (9″ x 21″ or 11″ x 18″).
- The pattern we want to make: that you can free download in the Facebook group and HERE.
- Paper (as thinner you can get): For this pattern you will need 7 sheets.
- Printer or some place where you can print it.
- Sewing Machine: INDISPENSABLE.
- Thread: INDISPENSABLE.
- Scissors: To cut threads and qhat we need.
- Cutting mat, ruler, and a rotary cutter: these tools are very very useful, although everything could be done without them. With some scissors it could be done but we would take it a lot longer and the cuts would not be so accurate. If you do not have these tools at any patchwork store or Amazon / ebay etc. you can find them.
- Needles: it is not essential but at any time they could to help us.
- Clips: it is not essential but at any time they could to help us.
- Soluble / removable fabric pen: it will be to mark in every fabric the Sections and order to sew. It will be necessary to name each fabric, although if you do not have a marker for cloth, you can do it with a pencil or thin wax in corner of the fabric, since later a piece of cloth will be discarded.
- iron: to fix the fabric joints (although it can be done with other tools) and to iron the final result.
You can go by preparing the tools that we will soon get to work!